Home >Web Front-end >JS Tutorial >Native Javascript plug-in development practice
Native Javascript plug-in development practice
- 高洛峰Original
- 2017-01-10 10:58:281316browse
Preface
The website designed by the company before was quite confusing and inconsistent in many places. One of them was the pop-up layer. The reason for this was because the company's UI changed several people, and each of them made it. Not all the same. Recently, the company has begun to rectify this problem. For such a unified thing, of course it should be made into a module or plug-in, and I plan to make it into a plug-in. The reason why I wrote this article is that after writing this plug-in, I found that there are many concepts in it, and I want to summarize these concepts, although this plug-in is not complicated.
How to structure it?
I have relatively little exposure to the concept of architecture. My understanding is that architecture is to solve what may happen in the future.
I have encapsulated some plug-ins before, but the backend thought that my encapsulation was too difficult to use, so I analyzed the reasons and found that the plug-ins I wrote before did not have the interfaces that should be exposed, and some parameters that did not need to be passed had to be passed instead. . There are no interfaces that should be exposed. This is because I did not write plug-ins according to future thinking, and plug-ins written in this way often become disposable items.
So during this period of time, before writing a plug-in, I will think clearly in advance what parameters the plug-in requires, which ones must be passed, which ones are optional, which functions may be used in the future, and which It can be changed, and these must be considered, otherwise the written plug-in will definitely have many problems.
Basic prototype
;(function(window,document){
 var MaskShare = function(){
 };
 MaskShare.prototype = {};
 window.MaskShare = MaskShare;
}(window,document));
Enclose the code to be written in a self-executing function to prevent variable conflicts, and then use this constructor Exposed to the window object, it is convenient for us to access this constructor externally.
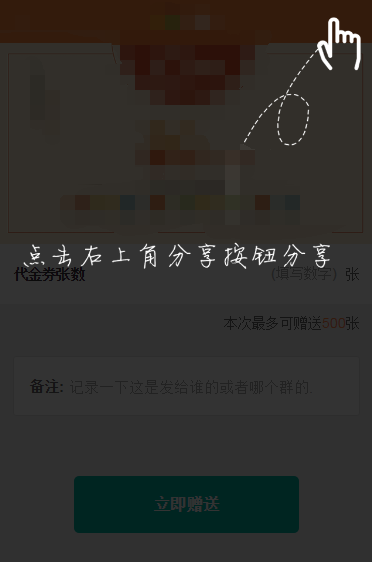
The effect needs to be made as follows:

#Think about what parameters are needed
This function is to click on an element to pop up a mask layer, click on the mask layer to remove the mask layer.
Therefore, it can be analyzed that at least one parameter is required, that is, we need to know who to click to pop up the pop-up layer, and we also need to configure some default parameters.
;(function(window,document){
 var MaskShare = function(targetDom,options){
  // 判断是用函数创建的还是用new创建的。这样我们就可以通过MaskShare("dom") 或 new MaskShare("dom")来使用这个插件了
  if(!(this instanceof MaskShare))return new MaskShare(targetDom,options);
  // 参数合并
  this.options = this.extend({
      // 这个参数以后可能会更改所以暴露出去
   imgSrc:"../static/img/coupon-mask_1.png"
  },options);
  // 判断传进来的是DOM还是字符串
  if((typeof targetDom)==="string"){
   this.targetDom = document.querySelector(targetDom);
  }else{
   this.targetDom = targetDom;
  }
  var boxDom = document.createElement("div");
  var imgDom = document.createElement("img");
  // 设置默认样式 注意将z-index值设置大一些,防止其他元素层级比遮罩层高
  boxDom.style.cssText = "display: none;position: absolute;left: 0;top: 0;width: 100%;height:100%;background-color: rgba(0,0,0,0.8);z-index:9999;";
  imgDom.style.cssText = "margin-top:20px;width: 100%;";
  // 追加或重设其样式
  if(this.options.boxDomStyle){
   this.setStyle(boxDom,this.options.boxDomStyle);
  }
  if(this.options.imgDomStyle){
   this.setStyle(imgDom,this.options.imgDomStyle);
  }
  imgDom.src = this.options.imgSrc;
  boxDom.appendChild(imgDom);
  this.boxDom = boxDom;
  // 初始化
  this.init();
 };
 MaskShare.prototype = {
  init:function(){
   this.event();
  },
  extend:function(obj,obj2){
   for(var k in obj2){
    obj[k] = obj2[k];
   }
   return obj;
  },
  setStyle:function(dom,objStyle){
   for(var k in objStyle){
    dom.style[k] = objStyle[k];
   }
  },
  event:function(){
   var _this = this;
   this.targetDom.addEventListener("click",function(){
    document.body.appendChild(_this.boxDom);
    _this.boxDom.style.display = "block";
        // 打开遮罩层的回调
    _this.options.open&&_this.options.open();
   },false);
   this.boxDom.addEventListener("click",function(){
    this.style.display = "none";
        // 关闭遮罩层的回调
    _this.options.close&&_this.options.close();
   },false);
  }
 };
 // 暴露方法
 window.MaskShare = MaskShare;
}(window,document));
Usage example:
MaskShare(".immediately",{
 imgSrc:"../static/img/loading_icon.gif",
 boxDomStyle:{
  opacity:".9"
 },
 imgDomStyle:{
  opacity:".8"
 },
 open:function(){
  console.log("show");
 },
 close:function(){
  console.log("close");
 }
});
This summary
Analyze it again at this time, I found that it still has many limitations. For example, what if you don’t use a picture but use a paragraph of text? These are all big questions. To write a practical plug-in, not only the technology needs to be passed, but also the thinking must be comprehensive. So this article is just the beginning, and there is still a long way to go.
The above is the entire content of this article. I hope that the content of this article can bring some help to everyone's study or work. I also hope to support the PHP Chinese website!
For more articles related to native Javascript plug-in development practices, please pay attention to the PHP Chinese website!
Related articles
See more- An in-depth analysis of the Bootstrap list group component
- Detailed explanation of JavaScript function currying
- Complete example of JS password generation and strength detection (with demo source code download)
- Angularjs integrates WeChat UI (weui)
- How to quickly switch between Traditional Chinese and Simplified Chinese with JavaScript and the trick for websites to support switching between Simplified and Traditional Chinese_javascript skills

