Home >Web Front-end >CSS Tutorial >The road to advanced CSS front-end: First experience with Less
The road to advanced CSS front-end: First experience with Less
- 高洛峰Original
- 2016-11-14 14:21:421421browse
1. Official introduction
Less is a CSS preprocessing language. It expands the CSS language and adds functions such as variables, mixins, and functions, making CSS easier to maintain, theme creation, and expansion. Less can run on Node or the browser.
Back to top
2. Understand for yourself
Less is a dynamic CSS language that makes CSS styles more flexible in Html tags. Just imagine if there is no Less, we can only rely on JS to do some logical calculations on styles. With Less, we can easily and dynamically set styles for Html tags. For example, one of the most common needs is to set a style for a certain div when the current browser width is less than 500px. Using less+css3 can easily solve the problem. Of course, this is just one of the scenarios. Some common conditions and logical judgments can also be performed in less. In general, Less gives CSS the ability to perform logical operations.
In addition, dynamic CSS syntax also plays an important role in improving the maintainability of style code. For example, the simplest one is that we can define a global color variable @aaa:#222. All default colors in the system are written with @aaa. If we need to modify the global color at this time, we only need to change @aaa The value of the variable is just fine, and there is no need to make any modifications elsewhere. This should be easy for programmers to understand.
Practice is the key, let’s take a look at some of the most basic uses of Less with the blogger.
Back to the top
3, Less, Sass, Stylus
Speaking of Less, some people may be dissatisfied, some may say: Less is outdated, Sass is the trend, you see bootstrap3 uses less, why bootstrap4 Switched to sass and so on. The blogger thinks that all three of them must have their own advantages as CSS preprocessing technologies. I don’t want to discuss the advantages and disadvantages of the three here today. Let’s learn Less first. Why think so much!
Back to the top
2. Getting started with Less
There are a lot of introductory tutorials on Less that can be found online, and they are basically the same as those on the Less Chinese website. Less can run on both the Node server and the browser client. The blogger is not familiar with Node, so this article will look at its use on the browser side. In fact, it doesn't matter. No matter where it is used, its basic usage is the same.
Generally speaking, there are two situations when the client runs Less:
The first way is to directly reference the .less file on the html page, and then use less.js to compile the less file to dynamically generate css styles that exist on the current page , this method is suitable for development mode.
The second method is that we first write the syntax of the .less file, and then use tools to generate the corresponding .css file, and then the client directly references the .css file. For example, our commonly used bootstrap.css is compiled through tools, which is more suitable for the running environment.
Back to top
1. Use Less in development mode
(1) First, we create a new less file under the project, named less.less, and write the simplest syntax in it

@base: #f938ab;

div{
    background-color:@base;
    padding:50px;
}
(2 ) Then reference the less file in the head of the html page
(3) Go to the less open source address to download the less.js file, and then import the file.
Or if you don’t want to download the less.js file, you can also directly use CDN to reference less. js, this is what bloggers do.
It should be noted that less The function of .js is to compile the less.less file and make it into a CSS style that the browser can understand.
(4) Before referencing less.js, you need a less variable to declare the environment parameters for compiling less, so in the end all referenced files are as follows:
<link rel="stylesheet/less" type="text/css" href="~/Content/less.less" />
    <script type="text/javascript">
    less = {
        env: "development",
        async: false,
        fileAsync: false,
        poll: 1000,
        functions: {},
        dumpLineNumbers: "comments",
        relativeUrls: false,
        rootpath: ":/a.com/"
    };
    </script>
    <script src="//cdnjs.cloudflare.com/ajax/libs/less.js/2.5.3/less.min.js"></script>
It should be emphasized here that the declaration of less variables must be in less.js before the reference.
(5) Debug and run
We run the project directly and get the following results

如果你的调试环境不是Visual Studio,就不会有这个问题!对于上述问题,需要在web.config里面配置如下节点
<system.webServer>
  <staticContent>
    <mimeMap fileExtension=".less" mimeType="text/css" />
  </staticContent ></system.webServer>
然后再次运行,可以看到编译生成的css如下
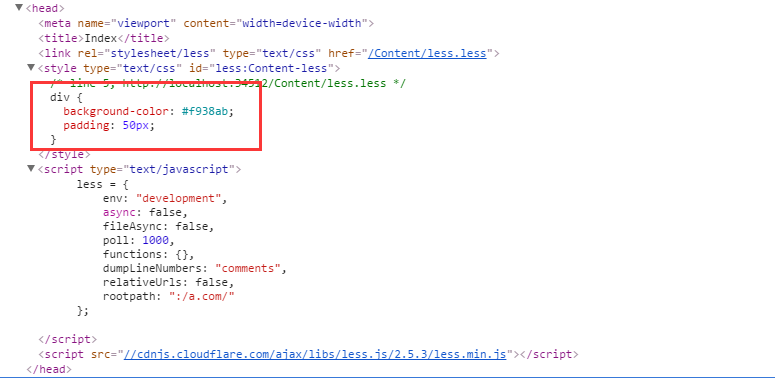
2、运行模式下使用Less
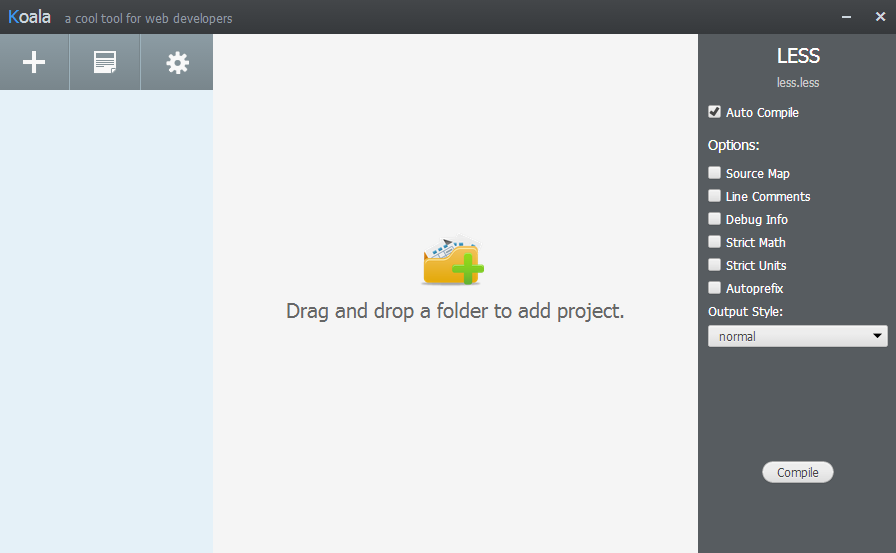
如果是运行环境,最好是将less.less编译成.css文件,然后直接引用生成的.css文件即可,博主不熟悉Node的环境,这里,博主介绍一款less生成css的工具:Koala。首先去官网下载安装文件,安装运行之后得到如下界面:
然后将less所在的目录拖到界面中间
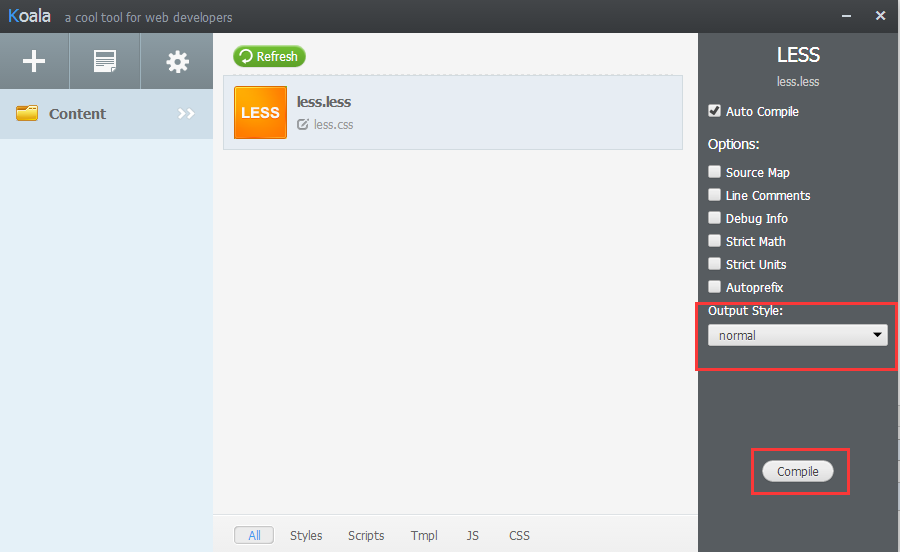
点击Compile按钮。将会在less.less的同级目录下生成一个less.css文件

然后直接引用这个css文件即可。有了工具是不是很easy~~
回到顶部
三、常见用法示例
初初入门,我们还是从最基础的开始吧!
回到顶部
1、从第一个Less变量开始
@base: #f938ab;

div{
    background-color:@base;
    padding:50px;
}
页面html代码:
<body>
    <div>
        第一个Less样式    </div></body>
编译之后的Css样式如下:

效果预览:

以上是一个最基础的Less变量,在.less文件里面定义一个全局的@base变量,那么在该文件里面所有地方均可调用。
需要说明的是(1)Less里面的变量都是以@作为变量的起始标识,变量名由字母、数字、_和-组成;(2)在一个文件里面定义的同名变量存在全局变量和局部变量的区别(后面介绍);
回到顶部
2、变量计算
@nice-blue: #f938ab;
@light-blue: @nice-blue + #333;

div {
  background-color: @light-blue;
}
编译得到结果:
div {
  background-color: #ff6bde;
}
这说明,在Less里面,变量可以动态计算。
3、变量混合
混合可以将一个定义好的class A轻松的引入到另一个class B中,从而简单实现class B继承class A中的所有属性。我们还可以带参数地调用,就像使用函数一样。我们来看下面的例子:
.rounded-corners (@radius: 15px) {
  border-radius: @radius;
  -webkit-border-radius: @radius;
  -moz-border-radius: @radius;
}

#div1 {
    padding:20px;
    width:200px;
    height:100px;
    border:2px solid red;
  .rounded-corners;
}
#div2 {
    padding:20px;
    width:200px;
    height:100px;
    border:2px solid green;
  .rounded-corners(30px);
}
编译后的结果你是否猜到了呢:
#div1 {
  padding: 20px;
  width: 200px;
  height: 100px;
  border: 2px solid red;
  border-radius: 15px;
  -webkit-border-radius: 15px;
  -moz-border-radius: 15px;
}
#div2 {
  padding: 20px;
  width: 200px;
  height: 100px;
  border: 2px solid green;
  border-radius: 30px;
  -webkit-border-radius: 30px;
  -moz-border-radius: 30px;
}
原理解析:最上面的 @radius 变量可以理解为一个方法的参数,然后“15px”可以理解为参数的默认值。首先我们定义一个动态样式 .rounded-corners ,这个样式有一个动态的参数 @radius ,这个参数的默认值是“15px”。我们调用的时候如果不传参数,那么 @radius 就等于15px,如果我们传了30px,那么@radius就是我们传的参数值。如果这样理解是否会好一点呢,是不是有点类似我们编程里面的“方法”的概念。如果按照面向对象的原理也很好理解,#div1和#div2继承.rounded-corners这个样式,所以可以直接使用,然后如果“子类”(#div2)有不同于“父类”的属性,可以“重写”,是不是一样一样的。
既然做了测试,我们还是来看看测试结果:
  <div id="div1">div1</div>
    <div id="div2">div2</div>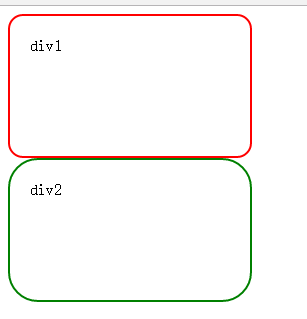
4、嵌套规则
在CSS里面,我们也经常可以见到标签样式嵌套的写法,那么在Less里面它是怎么实现的呢?我们来下下面的Less代码
#div1 {
    h1 {
        font-size: 26px;
        font-weight: bold;
    }
    span {
        font-size: 12px;
        a {
            text-decoration: none;
            &:hover {
                border-width: 1px;
            }
        }
    }
}
编译后的CSS:
#div1 h1 {
  font-size: 26px;
  font-weight: bold;
}
#div1 span {
  font-size: 12px;
}
#div1 span a {
  text-decoration: none;
}
#div1 span a:hover {
  border-width: 1px;
}
Less的这种写法好处是显而易见,标签层级结构清晰可见,并且能减少css代码量。但博主猜想肯定有人会不习惯这种写法,就是因为这种结构层级深,所以在阅读上面还是会有人不习惯,不管怎么样,且用且珍惜吧。
5、函数的使用
在Less里面函数的概念还是比较容易理解的。比如我们有这么一段定义:
.mixin (dark, @color) {
  color: darken(@color, 10%);
}
.mixin (light, @color) {
  color: lighten(@color, 10%);
}
.mixin (@_, @color) {
  display: block;
}
然后有这么一句调用
@switch: light;

.class {
  .mixin(@switch, #888);
  }
编译得到
.class {
  color: #a2a2a2;
  display: block;
}
以上不难理解,就是一个简单的逻辑判断。
回到顶部
6、条件判断
在上述“函数的使用”里面,我们看到Less支持“等于”的匹配方式,除此之外,Less里面还支持大于、小于等条件判断的语法,此之所谓“导引混合”。先来看看它的语法:
首先定义几个条件判断的“方法”
.mixin (@a) when (lightness(@a) >= 50%) {
  background-color: black;
}
.mixin (@a) when (lightness(@a) < 50%) {
  background-color: white;
}
.mixin (@a) {
  color: @a;
}
然后调用该“方法”
.class1 { .mixin(#ddd) }
.class2 { .mixin(#555) }
你猜结果是什么?编译结果如下:
.class1 {
  background-color: black;
  color: #ddd;
}
.class2 {
  background-color: white;
  color: #555;
}
原理解析:不知道你有没有猜对结果,反正最开始博主是猜错了的。when的语法不难理解,就是一个条件判断,关键是下面的color从哪里来的。原来在Less里面是一种混合调用的方式,也就是说,如果定义了三个函数mixin,分别对应有三个不同的条件,那么我们调用mixin函数的时候如果三个的条件都满足,那么它三个的结果都会得到。这就是为什么我们class1和class2得到如上结果。在Less里面所有的运算符有: >、 >=、 =、 =
.mixin (@a, @b: 0) when (isnumber(@b)) { ... }
.mixin (@a, @b: black) when (iscolor(@b)) { ... }
除了上述条件表达式以外,Less还提供了and、not等逻辑表达式。基础用法如:
.mixin (@b) when not (@b > 0) {
       background-color:blue;
 }
7、变量作用域
Less的作用域很好理解,就是我们常说的全局变量和局部变量的区别,记住Less里面变量名可以重复。
@aaa: red;

#div1 {
  @aaa: green;
  #header {
    color: @aaa;
  }
}

#div2 {
  color: @aaa;
}
相信你已经猜到结果了吧。编译之后
#div1 #header {
  color: green;
}#div2 {
  color: red;
}
8、不得不说的import指令
less里面使用import将外部的less引入到本地less文件里面来。比如A.less里面定义了一个变量@aaa:red,而B.less文件里面也需要使用@aaa这个变量,这个时候怎么办呢?import派上用场了。
A.less内容如下:
@aaa:red;
B.less内容如下:
@import 'A.less';

div{
    color:@aaa;
}
然后再html页面引入B.less文件,编译最终可以得到如下结果
div{
    color:@aaa;
}
有人可能要说,不就是引用其他less文件里面的变量吗,没啥用。可是你想过没有,由于项目里面模块很多,每个模块都有自己的less文件,如果没有import,怎么去统一调度呢。这点从bootstrap就可以看出来,当我们下载bootstrap3的源码,你会发现有很多的less文件,放在less文件夹里面,这些less文件分别对应着各个模块的样式。形如
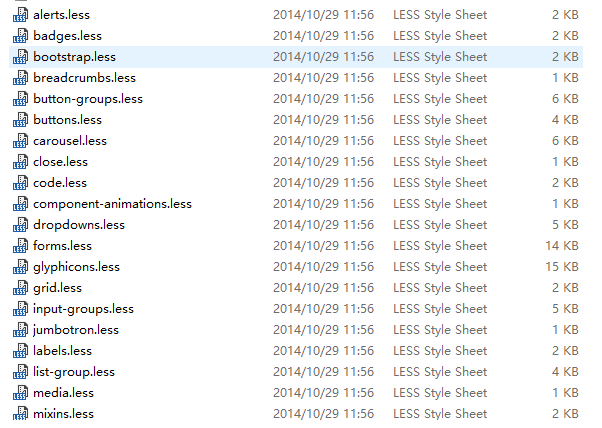
各个模块的样式写完后,会有一个bootstrap.less文件,将其他所有的less文件都import进来,其内容如下:
// Core variables and mixins
@import "variables.less";
@import "mixins.less";

// Reset and dependencies
@import "normalize.less";
@import "print.less";
@import "glyphicons.less";

// Core CSS
@import "scaffolding.less";
@import "type.less";
@import "code.less";
@import "grid.less";
@import "tables.less";
@import "forms.less";
@import "buttons.less";

// Components
@import "component-animations.less";
@import "dropdowns.less";
@import "button-groups.less";
@import "input-groups.less";
@import "navs.less";
@import "navbar.less";
@import "breadcrumbs.less";
@import "pagination.less";
@import "pager.less";
@import "labels.less";
@import "badges.less";
@import "jumbotron.less";
@import "thumbnails.less";
@import "alerts.less";
@import "progress-bars.less";
@import "media.less";
@import "list-group.less";
@import "panels.less";
@import "responsive-embed.less";
@import "wells.less";
@import "close.less";

// Components w/ JavaScript
@import "modals.less";
@import "tooltip.less";
@import "popovers.less";
@import "carousel.less";

// Utility classes
@import "utilities.less";
@import "responsive-utilities.less";
然后我们编译bootstrap.less,就能将所有模块的less文件引入进来。
为了证明这点,我们来测试一把,在A.less里面加入如下内容:
@aaa:red;
@widthtest:200px;

.class2{
    background-color:green;
    border:5px solid red;
}
B.less内容如下:
@import 'A.less';

div{
    color:@aaa;
    width:@widthtest;
    height:50px;
}
然后编译B.less得到的B.css文件内容如下:
.class2 {
  background-color: green;
  border: 5px solid red;
}
div {
  color: #ff0000;
  width: 200px;
  height: 50px;
}
另外,import指令还包含了多种参数类型:
1. @import (reference) "文件路径"; 将引入的文件作为样式库使用,因此文件中样式不会被直接编译为css样式规则。当前样式文件通过extend和mixins的方式引用样式库的内容。
2. @import (inline) "文件路径"; 用于引入与less不兼容的css文件,通过inline配置告知编译器不对引入的文件进行编译处理,直接输出到最终输出。
3. @import (less) "文件路径"; 默认使用该配置项,表示引入的文件为less文件。
4. @import (css) "文件路径"; 表示当前操作为CSS中的@import操作。当前文件会输出一个样式文件,而被引入的文件自身为一个独立的样式文件
5. @import (once) "文件路径"; 默认使用该配置项,表示对同一个资源仅引入一次。
6. @import (multiple) "文件路径"; 表示对同一资源可引入多次。
回到顶部
9、综合实例
对于上文提到的屏幕变化的时候动态去设置样式的问题,使用less结合css3的@media就能轻松处理,比如有下面一段less代码:
@base: #f938ab;

div{
    background-color:@base;
    padding:50px;
}

.divcolor {
  @media (max-width: 400px) {
    background-color: green;
  }
  @media (min-width: 400px) and (max-width: 800px) {
    background-color: red;
  }
  @media (min-width: 800px) {
    background-color: #f938ab;
  }
}
界面html如下:
<body>
    <div id="div1" class="divcolor">div1</div>
    <div id="div2">div2</div></body>
使用这种嵌套的写法就能实现多个条件的预设样式,所以最终编译得到的css如下:
/* line 4, http://localhost:34512/Content/less.less */
div {
  background-color: #f938ab;
  padding: 50px;
}
@media (max-width: 400px) {
  .divcolor {
    background-color: green;
  }
}
@media (min-width: 400px) and (max-width: 800px) {
  .divcolor {
    background-color: red;
  }
}
@media (min-width: 800px) {
  .divcolor {
    background-color: #f938ab;
  }
}
表示当前文档的宽度小于400的时候,背景色为green;大于400小于800时背景色为red;大约800时背景色为#f938ab。来看看是不是这样:

这里只是一个简单的测试,实际应用中肯定不可能只是设置一个简单的背景色。对于响应式布局的情况,这种写法非常多。
对于条件判断,less支持嵌套的写法,比如:
@base: #f938ab;

div{
    background-color:@base;
    padding:50px;
}

.class1{
    width:550px;
    margin:10px;
}

.class2{
    width:150px;
    margin:auto;
    display:block;
}

.divcolor {
  @media (max-width: 800px) {
     background-color: green;
     .class1;
     @media (min-width: 400px){
        background-color: red;
        .class2
     }
  }
}
编译得到的css如下:
div {
  background-color: #f938ab;
  padding: 50px;
}

.class1 {
  width: 550px;
  margin: 10px;
}
.class2 {
  width: 150px;
  margin: auto;
  display: block;
}
@media (max-width: 800px) {
  .divcolor {
    background-color: green;
    width: 550px;
    margin: 10px;
  }
}
@media (max-width: 800px) and (min-width: 400px) {
  .divcolor {
    background-color: red;
    width: 150px;
    margin: auto;
    display: block;
  }
}Related articles
See more- How Can I Restrict CSS3 `nth-of-type` Selectors to Specific Classes?
- Game AI: The Bots Strike Back!
- CSS Art Meets Space: A Space-Themed Art Project
- ## Why Does a Flex Item with `flex: 1` Exceed Its Parent Height in Firefox, But Not Chrome?
- How do I Align Content Correctly in a Flexbox When It Exceeds the Container Width?

