Home >Web Front-end >JS Tutorial >jQuery animation effect realizes seamless continuous scrolling of pictures_jquery
jQuery animation effect realizes seamless continuous scrolling of pictures_jquery
- WBOYWBOYWBOYWBOYWBOYWBOYWBOYWBOYWBOYWBOYWBOYWBOYWBOriginal
- 2016-05-16 15:20:161447browse
The example in this article introduces the detailed code of jQuery animation effect to achieve seamless continuous scrolling of images. It is shared with everyone for your reference. The specific content is as follows
The rendering is as follows:

1. HTML code
<body>
  <div id="container">
    <ul id="content">
      <li><a href="#"><img src="images/0.png"/></a></li>
      <li><a href="#"><img src="images/1.png"/></a></li>
      <li><a href="#"><img src="images/tewu.png"/></a></li>
      <li><a href="#"><img src="images/2.png"/></a></li>
      <li><a href="#"><img src="images/tewu.png"/></a></li>
      <li><a href="#"><img src="images/3.png"/></a></li>
      <li><a href="#"><img src="images/4.png"/></a></li>
    </ul>
  </div>
</body>
1. The div with the id of container is the outermost packaging and is used to control the specific position of the scroll area.
2. The ul with the id of content is used to wrap pictures that need to be scrolled.
3. The li element is used to package specific pictures.
2. CSS code
*{margin: 0; padding: 0;}

img{
  border:0;
}

#container{
  width:800px;
  height: 130px;
<span style="white-space:pre">  </span>margin:100px auto;
  border:3px solid blue;
  overflow: hidden;
  position: relative;
}

#container ul{
  list-style: none;
  width:10000px;
  position: absolute;
}

#container ul li{
  float:left;
  margin-right: 20px;
}
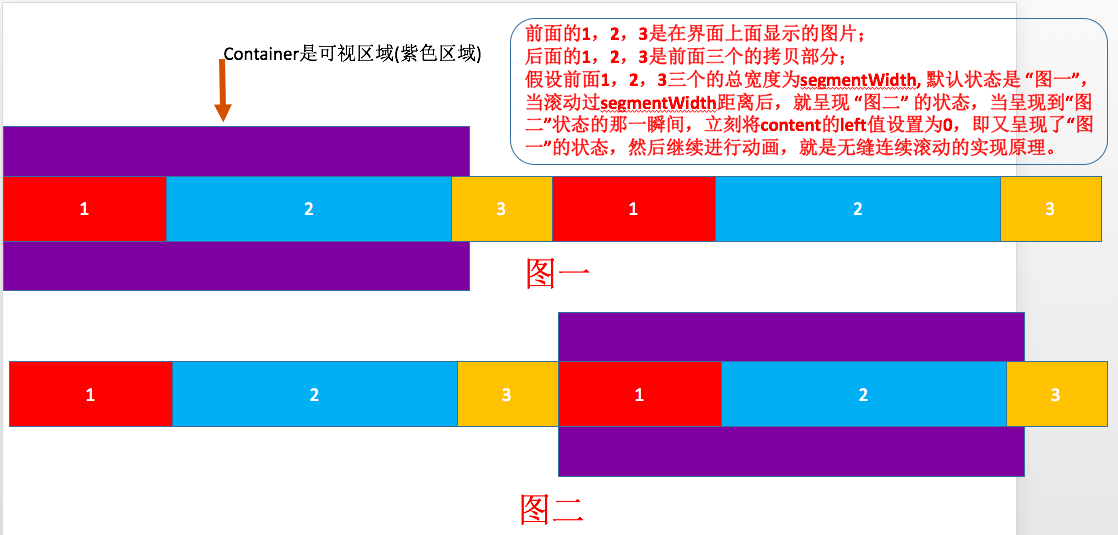
Here is a explanation of why the width of ul is set to 10000px. Because the implementation principle of seamless continuous scrolling is to clone a copy of the existing display image and splice it behind the display image. However, since the total width of the display image is unknown, for the sake of safety, it is best to put the ul The width setting is larger.
3. Analysis of the principle of seamless continuous scrolling

4. JQuery implementation code
<script type="text/javascript">
/* window.onload比 $(function(){}) 加载的更晚一些,这样那些宽度的计算在Chrome中就可以准确计算了*/
  window.onload = function(){

    /*计算一个segment的宽度*/

    var segmentWidth = 0;
    $("#container #content li").each(function(){
      segmentWidth+= $(this).outerWidth(true);
    });

    $("#container #content li").clone().appendTo($("#container #content"));

    run(6000);

    function run(interval){
      $("#container #content").animate({"left":-segmentWidth}, interval,"linear",function(){
        $("#container #content").css("left",0);
        run(6000);
      });
    }

    $("#container").mouseenter(function(){
      $("#container #content").stop();
    }).mouseleave(function(){
      var passedCourse = -parseInt($("#container #content").css("left"));
      var time = 6000 * (1 - passedCourse/segmentWidth);
      run(time);
    });
  };

</script>
1. First traverse all li elements through each and calculate the sum of their widths.
2. Copy a picture to the back of the existing picture, as shown in "Figure 1" of the principle analysis diagram.
3. Set 6 seconds to scroll through the existing pictures on the interface. After the scrolling is completed, set the left value of the content to bring it back to the initial state, as shown in "Figure 2" of the principle analysis diagram. Then call the run method recursively to complete infinite scrolling.
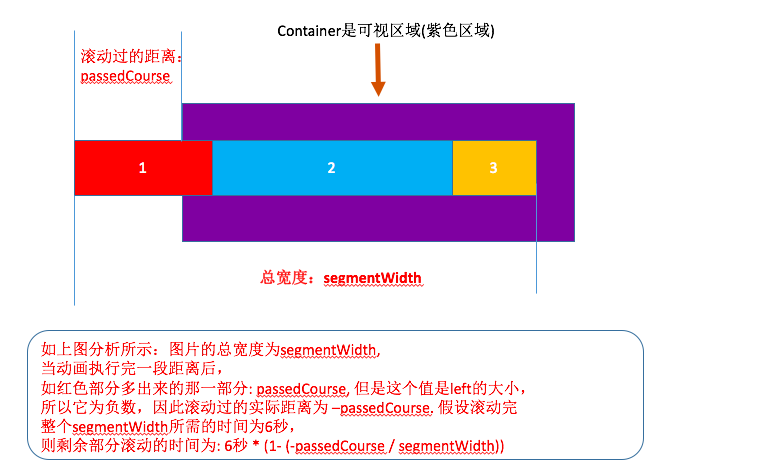
4. When the mouse passes through the scroll area, the animation stops immediately; when the mouse leaves, the animation continues.
About the code for animation continuation execution, as shown below:

The above is the jQuery code to achieve seamless and continuous scrolling of images. I hope it will be helpful to everyone's learning.
Related articles
See more- An in-depth analysis of the Bootstrap list group component
- Detailed explanation of JavaScript function currying
- Complete example of JS password generation and strength detection (with demo source code download)
- Angularjs integrates WeChat UI (weui)
- How to quickly switch between Traditional Chinese and Simplified Chinese with JavaScript and the trick for websites to support switching between Simplified and Traditional Chinese_javascript skills

