
 Backend DevelopmentPython TutorialDetailed explanation of how to use the forms form class in Python's Django framework
Detailed explanation of how to use the forms form class in Python's Django framework

Form form functions
- Automatically generate HTML form elements
- Check the legality of form data
- If validation error occurs, redisplay the form (data will not be reset)
- Data type conversion (character type data is converted into the corresponding Python type)
Form related objects include
- Widget: A tool used to render HTML elements, such as: forms.Textarea corresponds to the
- Field: A field in the Form object, such as: EmailField represents the email field. If this field is not a valid email format, an error will occur.
- Form: a collection of Field objects, responsible for validating and displaying HTML elements
- Form Media: CSS and JavaScript resources used to render forms.
Form Objects
The Form object encapsulates a series of Field and validation rules. The Form class must directly or indirectly inherit from django.forms.Form. There are two ways to define a Form:
Method 1: Directly inherit Form
from django import forms
class ContactForm(forms.Form):
 subject = forms.CharField(max_length=100,label='主题')
 message = form.CharField(widget=forms.TextArea)
 sender = form.EmailField()
 cc_myself = forms.BooleanField(required=False)
Method 2: Combine Model and inherit django.forms.ModelForm
#models.py
class Contact(models.Model):
 title = models.CharField(max_length=30)
 content = models.CharField(max_length=20)

#form.py
class ConotactForm(ModelForm):
 class Meta:
 model = Contact
 field = ('title','content') #只显示model中指定的字段
Use form in view
The general scenario of using form in the view function is:
view.py:
form django.shortcuts import render
form django.http import HttpResponseRedirect

def contact(request):
 if request.method=="POST":
  form = ContactForm(request.POST)
  if form.is_valid(): #所有验证都通过
   #do something处理业务
   return HttpResponseRedirect('/')
 else:
  form = ContactForm()
 return render(request,'contact.html',{'form':form})
contact.html:
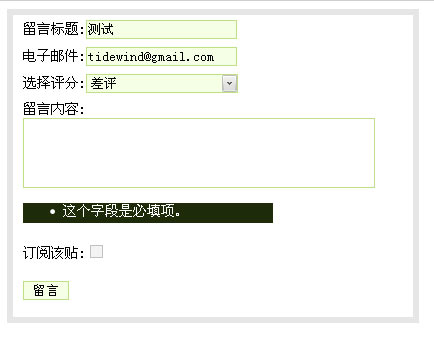
<form action='/contact/' method='POST'>
 {% for field in form %}
  <div class = 'fieldWrapper'>
   {{field.label_tag}}:{{field}}
   {{field.errors}}
  </div>
 {% endfor %}
 <div class='fieldWrapper'> <p><input type='submit' value='留言'></p></div>
</form>
Process form data
After form.is_valid() returns true, the form data is stored in the form.cleaned_data object (dictionary type, meaning cleaned data), and the data will be automatically converted into a Python object, such as: in form If DateTimeField is defined, then the field will be converted to datetime type, as well as: IntegerField, FloatField
if form.is_valid():
 subject = form.cleaned_data['subject']
 message = form.cleaned_data['message']
 sender = form.cleaned_data['sender']
 cc_myself = form.cleaned_data['cc_myself']

 recipients = ['info@example.com']
 if cc_myself:
  recipients.append(sender)

 from django.core.mail import send_mail
 send_mail(subject, message, sender, recipients)
 return HttpResponseRedirect('/thanks/') # Redirect after POST
These are the simple ways to use Form. Also:
Several ways to display forms in templates:
There are many ways to display form and template, and they can also be customized:
<form action="/contact/" method="post">{% csrf_token %}
{{ form.as_p }}
<input type="submit" value="Submit" />
</form>
You can also use form.as_table and form.as_ul, which respectively indicate using the
tag,


 Python: Automation, Scripting, and Task ManagementApr 16, 2025 am 12:14 AM
Python excels in automation, scripting, and task management. 1) Automation: File backup is realized through standard libraries such as os and shutil. 2) Script writing: Use the psutil library to monitor system resources. 3) Task management: Use the schedule library to schedule tasks. Python's ease of use and rich library support makes it the preferred tool in these areas.
 Python and Time: Making the Most of Your Study TimeApr 14, 2025 am 12:02 AM
To maximize the efficiency of learning Python in a limited time, you can use Python's datetime, time, and schedule modules. 1. The datetime module is used to record and plan learning time. 2. The time module helps to set study and rest time. 3. The schedule module automatically arranges weekly learning tasks.
 Python: Games, GUIs, and MoreApr 13, 2025 am 12:14 AM
Python excels in gaming and GUI development. 1) Game development uses Pygame, providing drawing, audio and other functions, which are suitable for creating 2D games. 2) GUI development can choose Tkinter or PyQt. Tkinter is simple and easy to use, PyQt has rich functions and is suitable for professional development.
 Python vs. C : Applications and Use Cases ComparedApr 12, 2025 am 12:01 AM
Python is suitable for data science, web development and automation tasks, while C is suitable for system programming, game development and embedded systems. Python is known for its simplicity and powerful ecosystem, while C is known for its high performance and underlying control capabilities.
 The 2-Hour Python Plan: A Realistic ApproachApr 11, 2025 am 12:04 AM
You can learn basic programming concepts and skills of Python within 2 hours. 1. Learn variables and data types, 2. Master control flow (conditional statements and loops), 3. Understand the definition and use of functions, 4. Quickly get started with Python programming through simple examples and code snippets.
 Python: Exploring Its Primary ApplicationsApr 10, 2025 am 09:41 AM
Python is widely used in the fields of web development, data science, machine learning, automation and scripting. 1) In web development, Django and Flask frameworks simplify the development process. 2) In the fields of data science and machine learning, NumPy, Pandas, Scikit-learn and TensorFlow libraries provide strong support. 3) In terms of automation and scripting, Python is suitable for tasks such as automated testing and system management.
 How Much Python Can You Learn in 2 Hours?Apr 09, 2025 pm 04:33 PM
You can learn the basics of Python within two hours. 1. Learn variables and data types, 2. Master control structures such as if statements and loops, 3. Understand the definition and use of functions. These will help you start writing simple Python programs.
 How to teach computer novice programming basics in project and problem-driven methods within 10 hours?Apr 02, 2025 am 07:18 AM
How to teach computer novice programming basics within 10 hours? If you only have 10 hours to teach computer novice some programming knowledge, what would you choose to teach...


Hot AI Tools

Undresser.AI Undress
AI-powered app for creating realistic nude photos

AI Clothes Remover
Online AI tool for removing clothes from photos.

Undress AI Tool
Undress images for free

Clothoff.io
AI clothes remover

AI Hentai Generator
Generate AI Hentai for free.

Hot Article
Hot Tools

mPDF
mPDF is a PHP library that can generate PDF files from UTF-8 encoded HTML. The original author, Ian Back, wrote mPDF to output PDF files "on the fly" from his website and handle different languages. It is slower than original scripts like HTML2FPDF and produces larger files when using Unicode fonts, but supports CSS styles etc. and has a lot of enhancements. Supports almost all languages, including RTL (Arabic and Hebrew) and CJK (Chinese, Japanese and Korean). Supports nested block-level elements (such as P, DIV),

Dreamweaver Mac version
Visual web development tools

Safe Exam Browser
Safe Exam Browser is a secure browser environment for taking online exams securely. This software turns any computer into a secure workstation. It controls access to any utility and prevents students from using unauthorized resources.

SublimeText3 Chinese version
Chinese version, very easy to use

PhpStorm Mac version
The latest (2018.2.1) professional PHP integrated development tool

