


JS code needs to be written often, otherwise it will be easy to get rusty. Recently, although I have been looking at JS prototypes, behavioral delegation and other knowledge points, the amount of hands-on code writing has been slightly reduced. This article shares a drag and drop component with you for your reference. The specific content is as follows
First, let’s take a look at the principle of dragging.
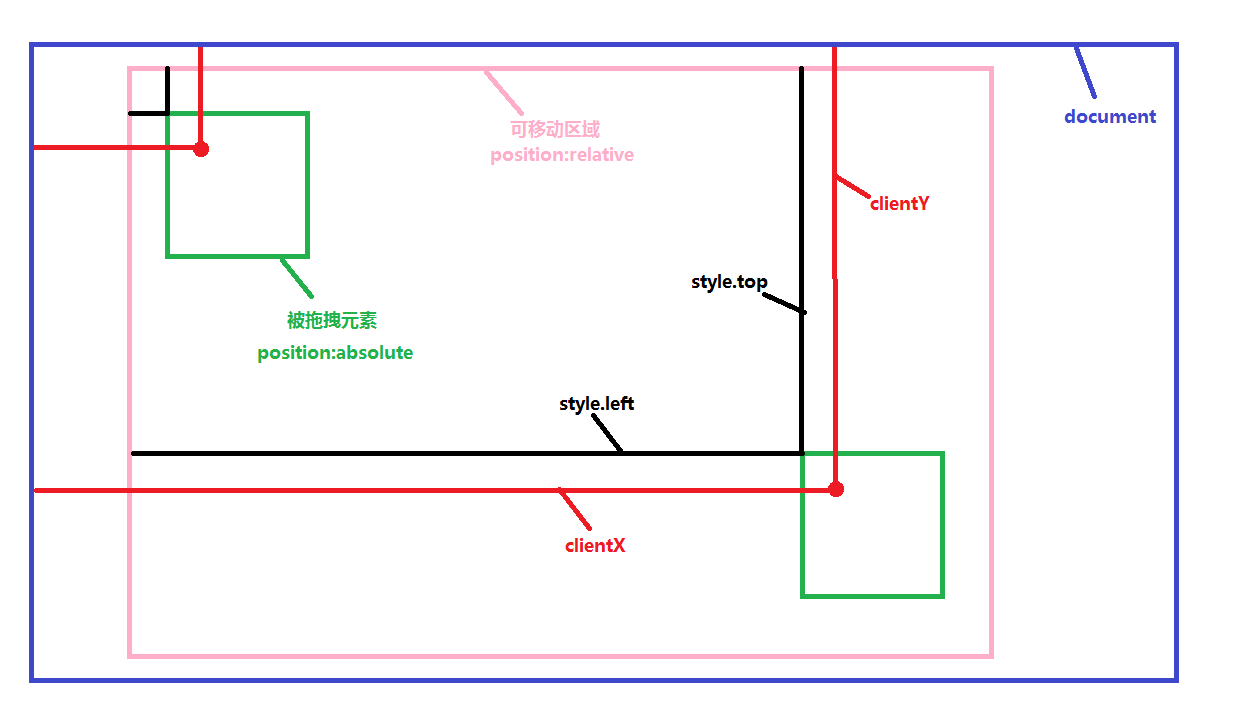
The change in the position of the dragged element and the left value are actually the change in the horizontal direction of the mouse position, e.clientX - e.clientX when the left mouse button is pressed.
The change in the top value is actually the change in the vertical direction of the mouse position, e.clientY - e.clientY when the left mouse button is pressed.
The other is to set the dragging range . The top, bottom, left and right should not exceed the area where the parent element is located.
  function Drag (config){
      this.moveTarget = document.getElementById(config.id);
      if(config.parentId){
        this.targetParent = document.getElementById(config.parentId);
        this.max_left = this.targetParent.clientWidth - this.moveTarget.offsetWidth;
        this.max_top = this.targetParent.clientHeight - this.moveTarget.offsetHeight;
      }else{
        console.log(document.documentElement.clientHeight + "||" + this.moveTarget.offsetHeight)
        this.max_left = document.documentElement.clientWidth - this.moveTarget.offsetWidth -
          parseInt(this.getStyle(document.body, "border-width"));
        this.max_top = document.documentElement.clientHeight - this.moveTarget.offsetHeight-
          parseInt(this.getStyle(document.body, "border-width"));
      }
      this.lock = true;
    }
    Drag.prototype.getStyle = function(element, attr){
      if(element.currentStyle){
        return element.currentStyle[attr];
      }else{
        return window.getComputedStyle(element,null).getPropertyValue(attr)
      }
    }
    Drag.prototype.moDown = function(e){
      e = e || window.event;
      this.clientX = e.clientX;
      this.clientY = e.clientY;
      //鼠标按下时,drag的left值,top值(写在style中或者是css中)
      this.startLeft = parseInt(this.moveTarget.style.left || this.getStyle(this.moveTarget, "left"));
      this.startTop = parseInt(this.moveTarget.style.top || this.getStyle(this.moveTarget, "top"));
      //鼠标按下时,鼠标的clientX值,clientY值
      this.startClientX = e.clientX;
      this.startClientY = e.clientY;
      this.lock = false;
    };
    Drag.prototype.moMove = function(e){
      e = e || window.event;
      if(e.which != 1){
        this.lock = true;
      }
      if(!this.lock){
        var realLeft = this.startLeft + e.clientX - this.startClientX;//实际的移动范围
        var realTop = this.startTop + e.clientY - this.startClientY;
          //rightLeft , rightTop; //left, top 取值(在可移动范围内)
        var rightLeft = realLeft > this.max_left ? this.max_left : ( realLeft > 0 ? realLeft : 0 );
        var rightTop = realTop > this.max_top ? this.max_top : ( realTop > 0 ? realTop : 0 );
        this.moveTarget.style.left = rightLeft + "px";
        this.moveTarget.style.top = rightTop + "px";
      }
    };
    Drag.prototype.moUp = function(e){
      e = e || window.event;
      this.lock = true;
    };
    Drag.prototype.startDrag = function(){
      console.log(this)
      this.moveTarget.onmousedown = function(e){this.moDown(e)}.bind(this);
      this.moveTarget.onmousemove = function(e){this.moMove(e)}.bind(this);
      this.moveTarget.onmouseup = function(e){this.moUp(e)}.bind(this);
    }
Description: moDown responds to the left mouse button press operation, moMove responds to the mouse move operation, and MoUp responds to the mouse lift operation.
Added e.which judgment in moMove, e.which ==1 means the left mouse button is pressed. This is to solve the problem that when the mouse is moved outside the draggable range, there is no need to press the left button when moving back. , there is a bug that the dragged element will move accordingly.
Instructions for use:
When used, the id of the dragged element is a required parameter, and the id of the parent element (that is, the range that can be dragged and moved) is an optional parameter. If the id of the parent element is not passed, documentElement is used by default to be draggable. The range of pulling.
If you pass a parent element, don’t forget to set the positioning of the parent element to position:relative or position:absolute.
When using it, first introduce the js file of the drag and drop plug-in.
<!doctype html>
<html lang="en">
<head>
<meta charset="UTF-8">
<meta name="Generator" content="EditPlus®">
<meta name="Author" content="刘艳">
<meta name="Keywords" content="关键字">
<meta name="Description" content="描述">
<title>Document</title>
<style>
*{
margin:0px;
padding:0px;
}
#content{
width:600px;
height:500px;
position:relative;
border:5px solid green;
}
#drag{
position:absolute;
height:100px;
width:100px;
top:50px;left:0px;
background:pink;
cursor:pointer;
}
</style>
</head>
<body>
<div id = "content">
<div id = "drag" >
</div>
</div>
</body>
</html>
<script src = "url/drag.js"></script>
<script>
window.onload = function(){
var drag = new Drag({id: "drag", parentId: "content"});
drag.startDrag();
}
</script>
If you want to drag across the entire window, please do not set the positioning of the parent element of the dragged element, that is, position it relative to the body.
If you need to position the body, but also need to set the position of its parent element to non-static, then you can extend this plug-in.
I hope this article will be helpful to everyone in learning javascript programming.

 Javascript Data Types : Is there any difference between Browser and NodeJs?May 14, 2025 am 12:15 AM
JavaScript core data types are consistent in browsers and Node.js, but are handled differently from the extra types. 1) The global object is window in the browser and global in Node.js. 2) Node.js' unique Buffer object, used to process binary data. 3) There are also differences in performance and time processing, and the code needs to be adjusted according to the environment.
 JavaScript Comments: A Guide to Using // and /* */May 13, 2025 pm 03:49 PM
JavaScriptusestwotypesofcomments:single-line(//)andmulti-line(//).1)Use//forquicknotesorsingle-lineexplanations.2)Use//forlongerexplanationsorcommentingoutblocksofcode.Commentsshouldexplainthe'why',notthe'what',andbeplacedabovetherelevantcodeforclari
 Python vs. JavaScript: A Comparative Analysis for DevelopersMay 09, 2025 am 12:22 AM
The main difference between Python and JavaScript is the type system and application scenarios. 1. Python uses dynamic types, suitable for scientific computing and data analysis. 2. JavaScript adopts weak types and is widely used in front-end and full-stack development. The two have their own advantages in asynchronous programming and performance optimization, and should be decided according to project requirements when choosing.
 Python vs. JavaScript: Choosing the Right Tool for the JobMay 08, 2025 am 12:10 AM
Whether to choose Python or JavaScript depends on the project type: 1) Choose Python for data science and automation tasks; 2) Choose JavaScript for front-end and full-stack development. Python is favored for its powerful library in data processing and automation, while JavaScript is indispensable for its advantages in web interaction and full-stack development.
 Python and JavaScript: Understanding the Strengths of EachMay 06, 2025 am 12:15 AM
Python and JavaScript each have their own advantages, and the choice depends on project needs and personal preferences. 1. Python is easy to learn, with concise syntax, suitable for data science and back-end development, but has a slow execution speed. 2. JavaScript is everywhere in front-end development and has strong asynchronous programming capabilities. Node.js makes it suitable for full-stack development, but the syntax may be complex and error-prone.
 JavaScript's Core: Is It Built on C or C ?May 05, 2025 am 12:07 AM
JavaScriptisnotbuiltonCorC ;it'saninterpretedlanguagethatrunsonenginesoftenwritteninC .1)JavaScriptwasdesignedasalightweight,interpretedlanguageforwebbrowsers.2)EnginesevolvedfromsimpleinterpreterstoJITcompilers,typicallyinC ,improvingperformance.
 JavaScript Applications: From Front-End to Back-EndMay 04, 2025 am 12:12 AM
JavaScript can be used for front-end and back-end development. The front-end enhances the user experience through DOM operations, and the back-end handles server tasks through Node.js. 1. Front-end example: Change the content of the web page text. 2. Backend example: Create a Node.js server.
 Python vs. JavaScript: Which Language Should You Learn?May 03, 2025 am 12:10 AM
Choosing Python or JavaScript should be based on career development, learning curve and ecosystem: 1) Career development: Python is suitable for data science and back-end development, while JavaScript is suitable for front-end and full-stack development. 2) Learning curve: Python syntax is concise and suitable for beginners; JavaScript syntax is flexible. 3) Ecosystem: Python has rich scientific computing libraries, and JavaScript has a powerful front-end framework.


Hot AI Tools

Undresser.AI Undress
AI-powered app for creating realistic nude photos

AI Clothes Remover
Online AI tool for removing clothes from photos.

Undress AI Tool
Undress images for free

Clothoff.io
AI clothes remover

Video Face Swap
Swap faces in any video effortlessly with our completely free AI face swap tool!

Hot Article
Hot Tools

Dreamweaver Mac version
Visual web development tools

SublimeText3 Mac version
God-level code editing software (SublimeText3)

WebStorm Mac version
Useful JavaScript development tools

Atom editor mac version download
The most popular open source editor

DVWA
Damn Vulnerable Web App (DVWA) is a PHP/MySQL web application that is very vulnerable. Its main goals are to be an aid for security professionals to test their skills and tools in a legal environment, to help web developers better understand the process of securing web applications, and to help teachers/students teach/learn in a classroom environment Web application security. The goal of DVWA is to practice some of the most common web vulnerabilities through a simple and straightforward interface, with varying degrees of difficulty. Please note that this software

