


1. Extend existing components
1. Demand background
Many times, we use jquery.ajax to send requests to the background, such as
$.ajax({
        type: "post",
        url: "/User/Edit",
        data: { data: JSON.stringify(postdata) },
        success: function (data, status) {
          if (status == "success") {
            toastr.success('提交数据成功');
            $("#tb_aaa").bootstrapTable('refresh');
          }
        },
        error: function (e) {
        },
        complete: function () {
        }

      });
This kind of code is too common. At this time, we have a need: when we call the ajax request ourselves, we don’t want to write code like error:function(e){} every time, but we also want it to Each time, the ajax error message is output to the browser so that the user can see it. What to do?
2. Implementation principle
It is not difficult to achieve the above effect. We can encapsulate $.ajax({}) and define the event corresponding to error in the encapsulated public method. Indeed, this can meet our requirements, but it is not perfect. The reason is very simple: 1) Encapsulating a layer on top of jquery is not efficient enough; 2) The caller's habits need to be changed, and every time ajax is called, We don’t want to see it written according to the rules of the method we defined, instead of directly using the native $.ajax({}) method.
In this case, how can we achieve the above requirements without encapsulating controls? The answer is to extend the native jquery.ajax through our $.extend.
In fact, it is not difficult to implement. Our requirements can be achieved through the following piece of code.
(function ($) {
  //1.得到$.ajax的对象
  var _ajax = $.ajax;
  $.ajax = function (options) {
    //2.每次调用发送ajax请求的时候定义默认的error处理方法
    var fn = {
      error: function (XMLHttpRequest, textStatus, errorThrown) {
        toastr.error(XMLHttpRequest.responseText, '错误消息', { closeButton: true, timeOut: 0, positionClass: 'toast-top-full-width' });
      },
      success: function (data, textStatus) { },
      beforeSend: function (XHR) { },
      complete: function (XHR, TS) { }
    }
    //3.如果在调用的时候写了error的处理方法,就不用默认的
    if (options.error) {
      fn.error = options.error;
    }
    if (options.success) {
      fn.success = options.success;
    }
    if (options.beforeSend) {
      fn.beforeSend = options.beforeSend;
    }
    if (options.complete) {
      fn.complete = options.complete;
    }
    //4.扩展原生的$.ajax方法,返回最新的参数
    var _options = $.extend(options, {
      error: function (XMLHttpRequest, textStatus, errorThrown) {
        fn.error(XMLHttpRequest, textStatus, errorThrown);
      },
      success: function (data, textStatus) {
        fn.success(data, textStatus);
      },
      beforeSend: function (XHR) {
        fn.beforeSend(XHR);
      },
      complete: function (XHR, TS) {
        fn.complete(XHR, TS);
      }
    });
    //5.将最新的参数传回ajax对象
    _ajax(_options);
  };
})(jQuery);
If you have not been exposed to the $.extend method in jquery, you may not understand what the above means. Okay, let's first take a look at how the jquery API explains the $.extend() method.
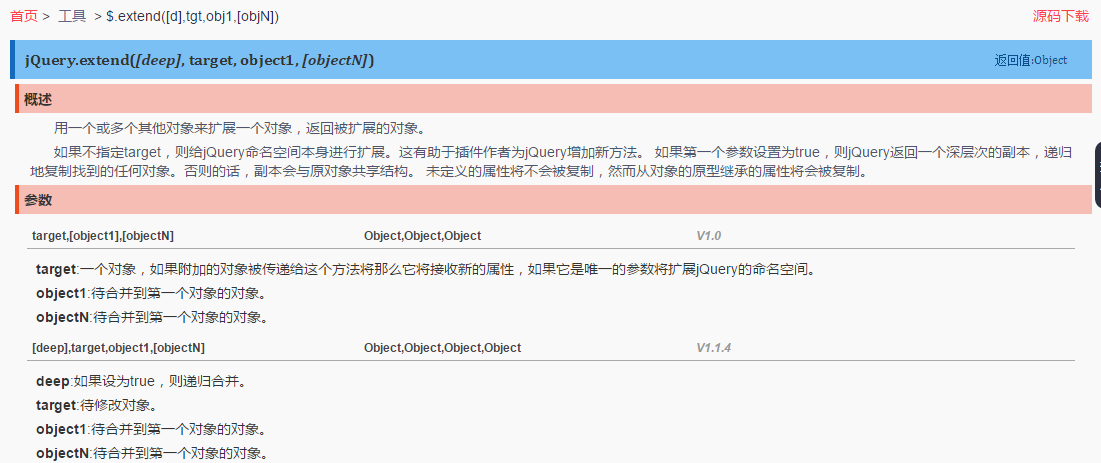
What does it mean? Let’s look at the two official examples to find out
Chestnut 1:
var settings = { validate: false, limit: 5, name: "foo" };
var options = { validate: true, name: "bar" };
$.extend(settings, options);
Result:
settings == { validate: true, limit: 5, name: "bar" }
Chestnut 2:
var empty = {};
var defaults = { validate: false, limit: 5, name: "foo" };
var options = { validate: true, name: "bar" };
var settings = $.extend(empty, defaults, options);
Result:
settings == { validate: true, limit: 5, name: "bar" }
empty == { validate: true, limit: 5, name: "bar" }
The above two simple examples illustrate that the function of the extend() method is to merge another object. If there are the same objects, they will be overwritten. If there are no identical objects, they will be added. It's that simple.
Understanding the role of $.extend(), we can roughly understand the implementation of the above extension jquery.ajax. The main steps are divided into:
1) Define the default error handling method.
var fn = {
      error: function (XMLHttpRequest, textStatus, errorThrown) {
        toastr.error(XMLHttpRequest.responseText, '错误消息', { closeButton: true, timeOut: 0, positionClass: 'toast-top-full-width' });
      },
      success: function (data, textStatus) { },
      beforeSend: function (XHR) { },
      complete: function (XHR, TS) { }
    }
2) Determine whether the user has customized error:function(){} when calling $.ajax({}). If it has been defined, the user-defined one will be used. Otherwise, the default error handling method will be used.
3) Use $.extend() to pass the default error handling method into the parameter of $.ajax(). When we look at the options parameter, it includes all the parameters in the $.ajax() method, and then use the default fn to expand it.
Through the above three steps, you can implement the default error handling method in the $.ajax() method. With this expansion, our users will not feel the change at all. We can still send ajax requests like $.ajax({});. If there are no special circumstances, there is no need to write an error handling method.
3. The meaning of component extension
Using component extensions can help us add some processing requirements related to our system business to the original components. When using them, we can still call them just like using native components, eliminating the need to encapsulate them again. A layer of bloat.
2. Expand your own components
The error event handling method of $.ajax() is extended above through the $.extend() method. Let's try encapsulating a component of our own. The function is very simple, but relatively illustrative. Let's take the select component as an example. In many cases, the options in our select need to fetch data from the database, so the general approach is to send an ajax request and then spell html in the success method. Now we will encapsulate a method to select remote data retrieval.
1. Code implementation and usage examples
Let’s start with the practical stuff and write it out:
(function ($) {
   //1.定义jquery的扩展方法combobox
  $.fn.combobox = function (options, param) {
    if (typeof options == 'string') {
      return $.fn.combobox.methods[options](this, param);
    }
    //2.将调用时候传过来的参数和default参数合并
    options = $.extend({}, $.fn.combobox.defaults, options || {});
    //3.添加默认值
    var target = $(this);
    target.attr('valuefield', options.valueField);
    target.attr('textfield', options.textField);
    target.empty();
    var option = $('<option></option>');
    option.attr('value', '');
    option.text(options.placeholder);
    target.append(option);
    //4.判断用户传过来的参数列表里面是否包含数据data数据集,如果包含,不用发ajax从后台取,否则否送ajax从后台取数据
    if (options.data) {
      init(target, options.data);
    }
    else {
      //var param = {};
      options.onBeforeLoad.call(target, options.param);
      if (!options.url) return;
      $.getJSON(options.url, options.param, function (data) {
        init(target, data);
      });
    }
    function init(target, data) {
      $.each(data, function (i, item) {
        var option = $('<option></option>');
        option.attr('value', item[options.valueField]);
        option.text(item[options.textField]);
        target.append(option);
      });
      options.onLoadSuccess.call(target);
    }
    target.unbind("change");
    target.on("change", function (e) {
      if (options.onChange)
        return options.onChange(target.val());
    });
  }

  //5.如果传过来的是字符串,代表调用方法。
  $.fn.combobox.methods = {
    getValue: function (jq) {
      return jq.val();
    },
    setValue: function (jq, param) {
      jq.val(param);
    },
    load: function (jq, url) {
      $.getJSON(url, function (data) {
        jq.empty();
        var option = $('<option></option>');
        option.attr('value', '');
        option.text('请选择');
        jq.append(option);
        $.each(data, function (i, item) {
          var option = $('<option></option>');
          option.attr('value', item[jq.attr('valuefield')]);
          option.text(item[jq.attr('textfield')]);
          jq.append(option);
        });
      });
    }
  };

  //6.默认参数列表
  $.fn.combobox.defaults = {
    url: null,
    param: null,
    data: null,
    valueField: 'value',
    textField: 'text',
    placeholder: '请选择',
    onBeforeLoad: function (param) { },
    onLoadSuccess: function () { },
    onChange: function (value) { }
  };
})(jQuery);
Let’s first take a look at how to use our custom components:
Usage 1: Remotely retrieve data through URL and initialize
First define an empty select
<select id="sel_search_plant" class="form-control"></select>
Then initialize it
$(function(){
   $('#sel_search_plant').combobox({
      url: '/apiaction/Plant/Find',
      valueField: 'TM_PLANT_ID',
      textField: 'NAME_C'
   });
})
The parameters are very simple, so I won’t introduce them one by one. It’s very simple, is there any~~
Usage 2: Value and setting
var strSelectedValue = $('#sel_search_plant').combobox("getValue");
$('#sel_search_plant').combobox("setValue", "aaa");
其实对于简单的select标签,博主觉得这里的getValu和SetValue意义不大,因为直接通过$('#sel_search_plant').val()就能解决的事,何必要再封一层。这里仅仅是做演示,试想,如果是封装成类似select2或者multiselect这种组件,getValue和setValue的意义就有了,你觉得呢?
2、代码详细讲解
上面的实现代码,如果您一眼就能看懂,证明您是经常封组件的大虾了,下面的就不用看了。如果看不懂,也没关系,我们将代码拆开详细看看里面是什么鬼。
(1)首先看看我们最常看到的如下写法:
(function ($) {
   //....封装组件逻辑
})(jQuery);
初初看到这种用法,博主也是狂抓,这是什么鬼嘛,四不像啊。使用多了之后才知道原来这就是一个匿名函数的形式。将它拆开来看如下:
var fn = function($){
    //.....组件封装逻辑
};
fn(jQuery);
也就是说这种写法就表示先定义一个方法,然后立即调用这个方法,jQuery相当于实参。打开jquery.js的原文件可以看到,jQuery是这个文件里面的一个全局变量。
(2)定义自己的组件的代码:
$.fn.combobox = function (options, param) {

};
习惯这种写法的应该知道,这个就表示向jquery对象添加自定义方法,比如你想使用文章开始的 $("#id").MyJsControl({}) 这种用法,你就可以这样定义 $.fn.MyJsControl=function(options){} 。
(3) options = $.extend({}, $.fn.combobox.defaults, options || {}); 这一句,看过上文的朋友应该还记得extend这么一个方法吧,怎么样,又来了你。这句话其实就没什么好说的了,合并默认参数和用户传进来的参数。
(4)默认参数列表
 $.fn.combobox.defaults = {
    url: null,
    param: null,
    data: null,
    valueField: 'value',
    textField: 'text',
    placeholder: '请选择',
    onBeforeLoad: function (param) { },
    onLoadSuccess: function () { },
    onChange: function (value) { }
  };
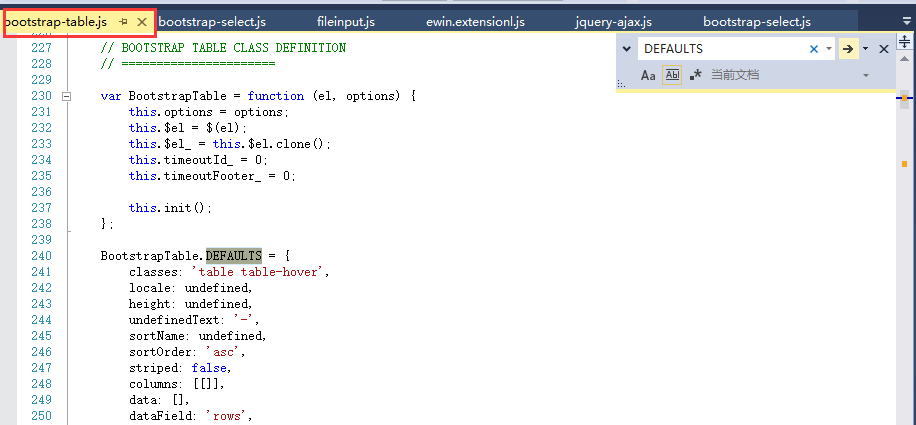
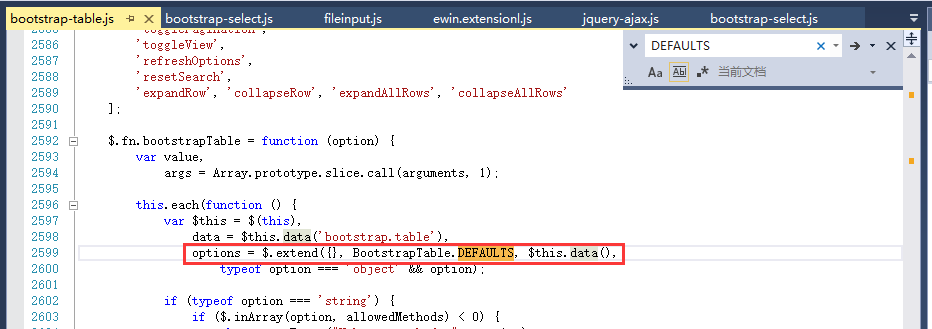
如果用户没有传参,就用默认的参数列表。如果你够细心,你会发现博主之前分享的其他bootstrap组件的js文件里面都有这么一个default参数列表。我们随便找两个:
bootstrap上传组件

bootstrap table组件
基本都是这么些用法。这样来看,是否也可以自己封一个js组件~~
以上就是对js组件扩展以及封装用法的认识和总结,希望大家喜欢。

 集邦咨询:英伟达 Blackwell 平台产品带动台积电今年 CoWoS 产能提高 150%Apr 17, 2024 pm 08:00 PM
本站4月17日消息,集邦咨询(TrendForce)近日发布报告,认为英伟达Blackwell新平台产品需求看涨,预估带动台积电2024年CoWoS封装总产能提升逾150%。英伟达Blackwell新平台产品包括B系列的GPU,以及整合英伟达自家GraceArmCPU的GB200加速卡等。集邦咨询确认为供应链当前非常看好GB200,预估2025年出货量有望超过百万片,在英伟达高端GPU中的占比达到40-50%。在英伟达计划下半年交付GB200以及B100等产品,但上游晶圆封装方面须进一步采用更复
 AMD “Strix Halo” FP11 封装尺寸曝光:和英特尔 LGA1700 相当,比 Phoenix 大 60%Jul 18, 2024 am 02:04 AM
本站7月9日消息,AMDZen5架构“Strix”系列处理器会有两种封装方案,其中较小的StrixPoint将采用FP8封装,而StrixHalo将会采用FP11封装。图源:videocardz消息源@Olrak29_最新曝料称StrixHalo的FP11封装尺寸为37.5mm*45mm(1687平方毫米),和英特尔AlderLake、RaptorLakeCPU的LGA-1700封装尺寸相同。AMD最新的PhoenixAPU采用FP8封装方案,尺寸为25*40mm,这意味着StrixHalo的F
 C++ 函数如何通过封装代码来提高 GUI 开发的效率?Apr 25, 2024 pm 12:27 PM
通过封装代码,C++函数可以提高GUI开发效率:代码封装:函数将代码分组到独立单元,使代码易于理解和维护。可重用性:函数可创建通用功能供应用程序中重复使用,减少重复编写和错误。简洁代码:封装代码使主逻辑简洁,便于阅读和调试。
 PHP中的封装技术及应用Oct 12, 2023 pm 01:43 PM
PHP中的封装技术及应用封装是面向对象编程中的一个重要概念,它指的是将数据和对数据的操作封装在一起,以便提供对外部程序的统一访问接口。在PHP中,封装可以通过访问控制修饰符和类的定义来实现。本文将介绍PHP中的封装技术及其应用场景,并提供一些具体的代码示例。一、封装的访问控制修饰符在PHP中,封装主要通过访问控制修饰符来实现。PHP提供了三个访问控制修饰符,
 Vue中Axios封装及其常用方法介绍Jun 09, 2023 pm 04:13 PM
Vue中Axios封装及其常用方法介绍Axios是一款基于Promise实现的HTTP库,它的优点在于具有良好的可读性、易用性以及可扩展性。Vue作为一款流行的前端框架,也对Axios提供了全面支持。本文将介绍如何在Vue中进行Axios封装,并且介绍Axios常用的一些方法。一、Axios封装在开发过程中,我们常常需要对Axios进行一些自定义的封装,例如
 如何在Go语言中实现封装和继承Jul 23, 2023 pm 08:17 PM
如何在Go语言中实现封装和继承封装和继承是面向对象编程中的两个重要概念,它们可以使代码更加模块化和可维护,同时也为代码的复用提供了便利。本文将介绍在Go语言中如何实现封装和继承,并提供相应的代码示例。封装封装是将数据和功能进行封装,隐藏实现的细节,只暴露必要的接口给外部使用。在Go语言中,封装是通过导出和非导出标识符来实现的。首字母大写的标识符可以被其他包访
 如何解决Python的代码的可扩展性差错误?Jun 25, 2023 am 09:51 AM
Python作为一门高级编程语言,被广泛应用于数据分析、机器学习、Web开发等领域。然而,随着代码规模不断扩大,Python程序的可扩展性问题也逐渐显现出来。可扩展性差错误是指Python程序在某些情况下不能很好地适应需求变化,无法对大规模数据进行处理,导致程序运行效果不佳。太多的依赖、糟糕的代码结构、缺乏文档等都是Python程序可扩展性差错误的罪魁祸首。
 富士康打造 AI 一条龙服务,投资的夏普进军半导体先进封装:2026 投产、设计月产 2 万片晶圆Jul 18, 2024 pm 02:17 PM
本站7月11日消息,经济日报今天(7月11日)报道,富士康集团已进军先进封装领域,重点布局时下主流的面板级扇出封装(FOPLP)半导体方案。1.继旗下群创光电(Innolux)之后,富士康集团投资的夏普(Sharp)也宣布进军日本面板级扇出式封装领域,预计将于2026年投产。富士康集团在AI领域本身就有足够的影响力,而补上先进封装短板之后让其可以提供“一条龙”服务,便于后续接受更多的AI产品订单。本站查询公开资料,富士康集团目前持有夏普10.5%的股权,该集团表示现阶段不会增持,也不会减持,将维


Hot AI Tools

Undresser.AI Undress
AI-powered app for creating realistic nude photos

AI Clothes Remover
Online AI tool for removing clothes from photos.

Undress AI Tool
Undress images for free

Clothoff.io
AI clothes remover

AI Hentai Generator
Generate AI Hentai for free.

Hot Article
Hot Tools

Dreamweaver Mac version
Visual web development tools

MantisBT
Mantis is an easy-to-deploy web-based defect tracking tool designed to aid in product defect tracking. It requires PHP, MySQL and a web server. Check out our demo and hosting services.

PhpStorm Mac version
The latest (2018.2.1) professional PHP integrated development tool

SublimeText3 Chinese version
Chinese version, very easy to use

mPDF
mPDF is a PHP library that can generate PDF files from UTF-8 encoded HTML. The original author, Ian Back, wrote mPDF to output PDF files "on the fly" from his website and handle different languages. It is slower than original scripts like HTML2FPDF and produces larger files when using Unicode fonts, but supports CSS styles etc. and has a lot of enhancements. Supports almost all languages, including RTL (Arabic and Hebrew) and CJK (Chinese, Japanese and Korean). Supports nested block-level elements (such as P, DIV),

