Swift开发iOS应用(1)列表的实现
软硬件环境
- OS X EI Capitan
- Xcode 7.0.1
简介
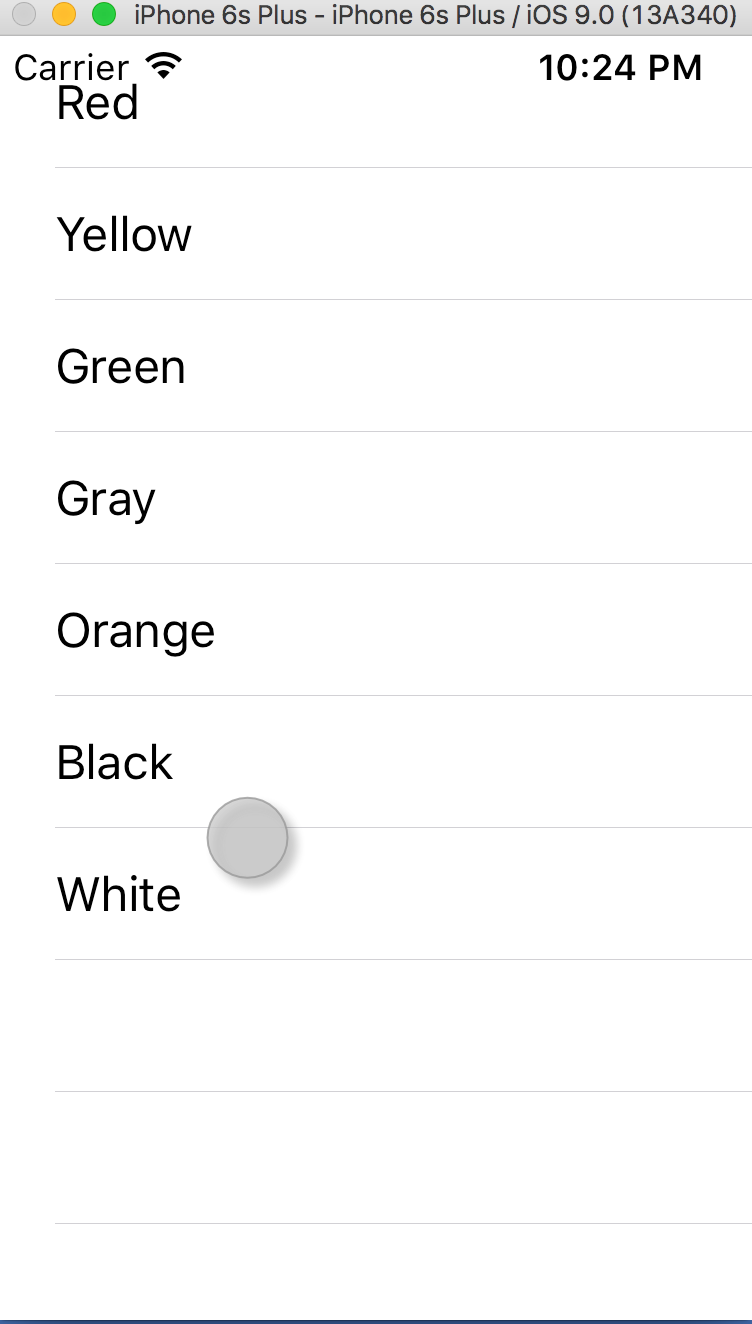
列表,可以说是控件中最重要的一个,在iOS中是UITableView,本节就来学习一下如何来实现一个列表,如下所示效果图
 效果图
效果图实现步骤
UI部分
新建一个工程,工程名为UITableViewDemo,模板选择Single View

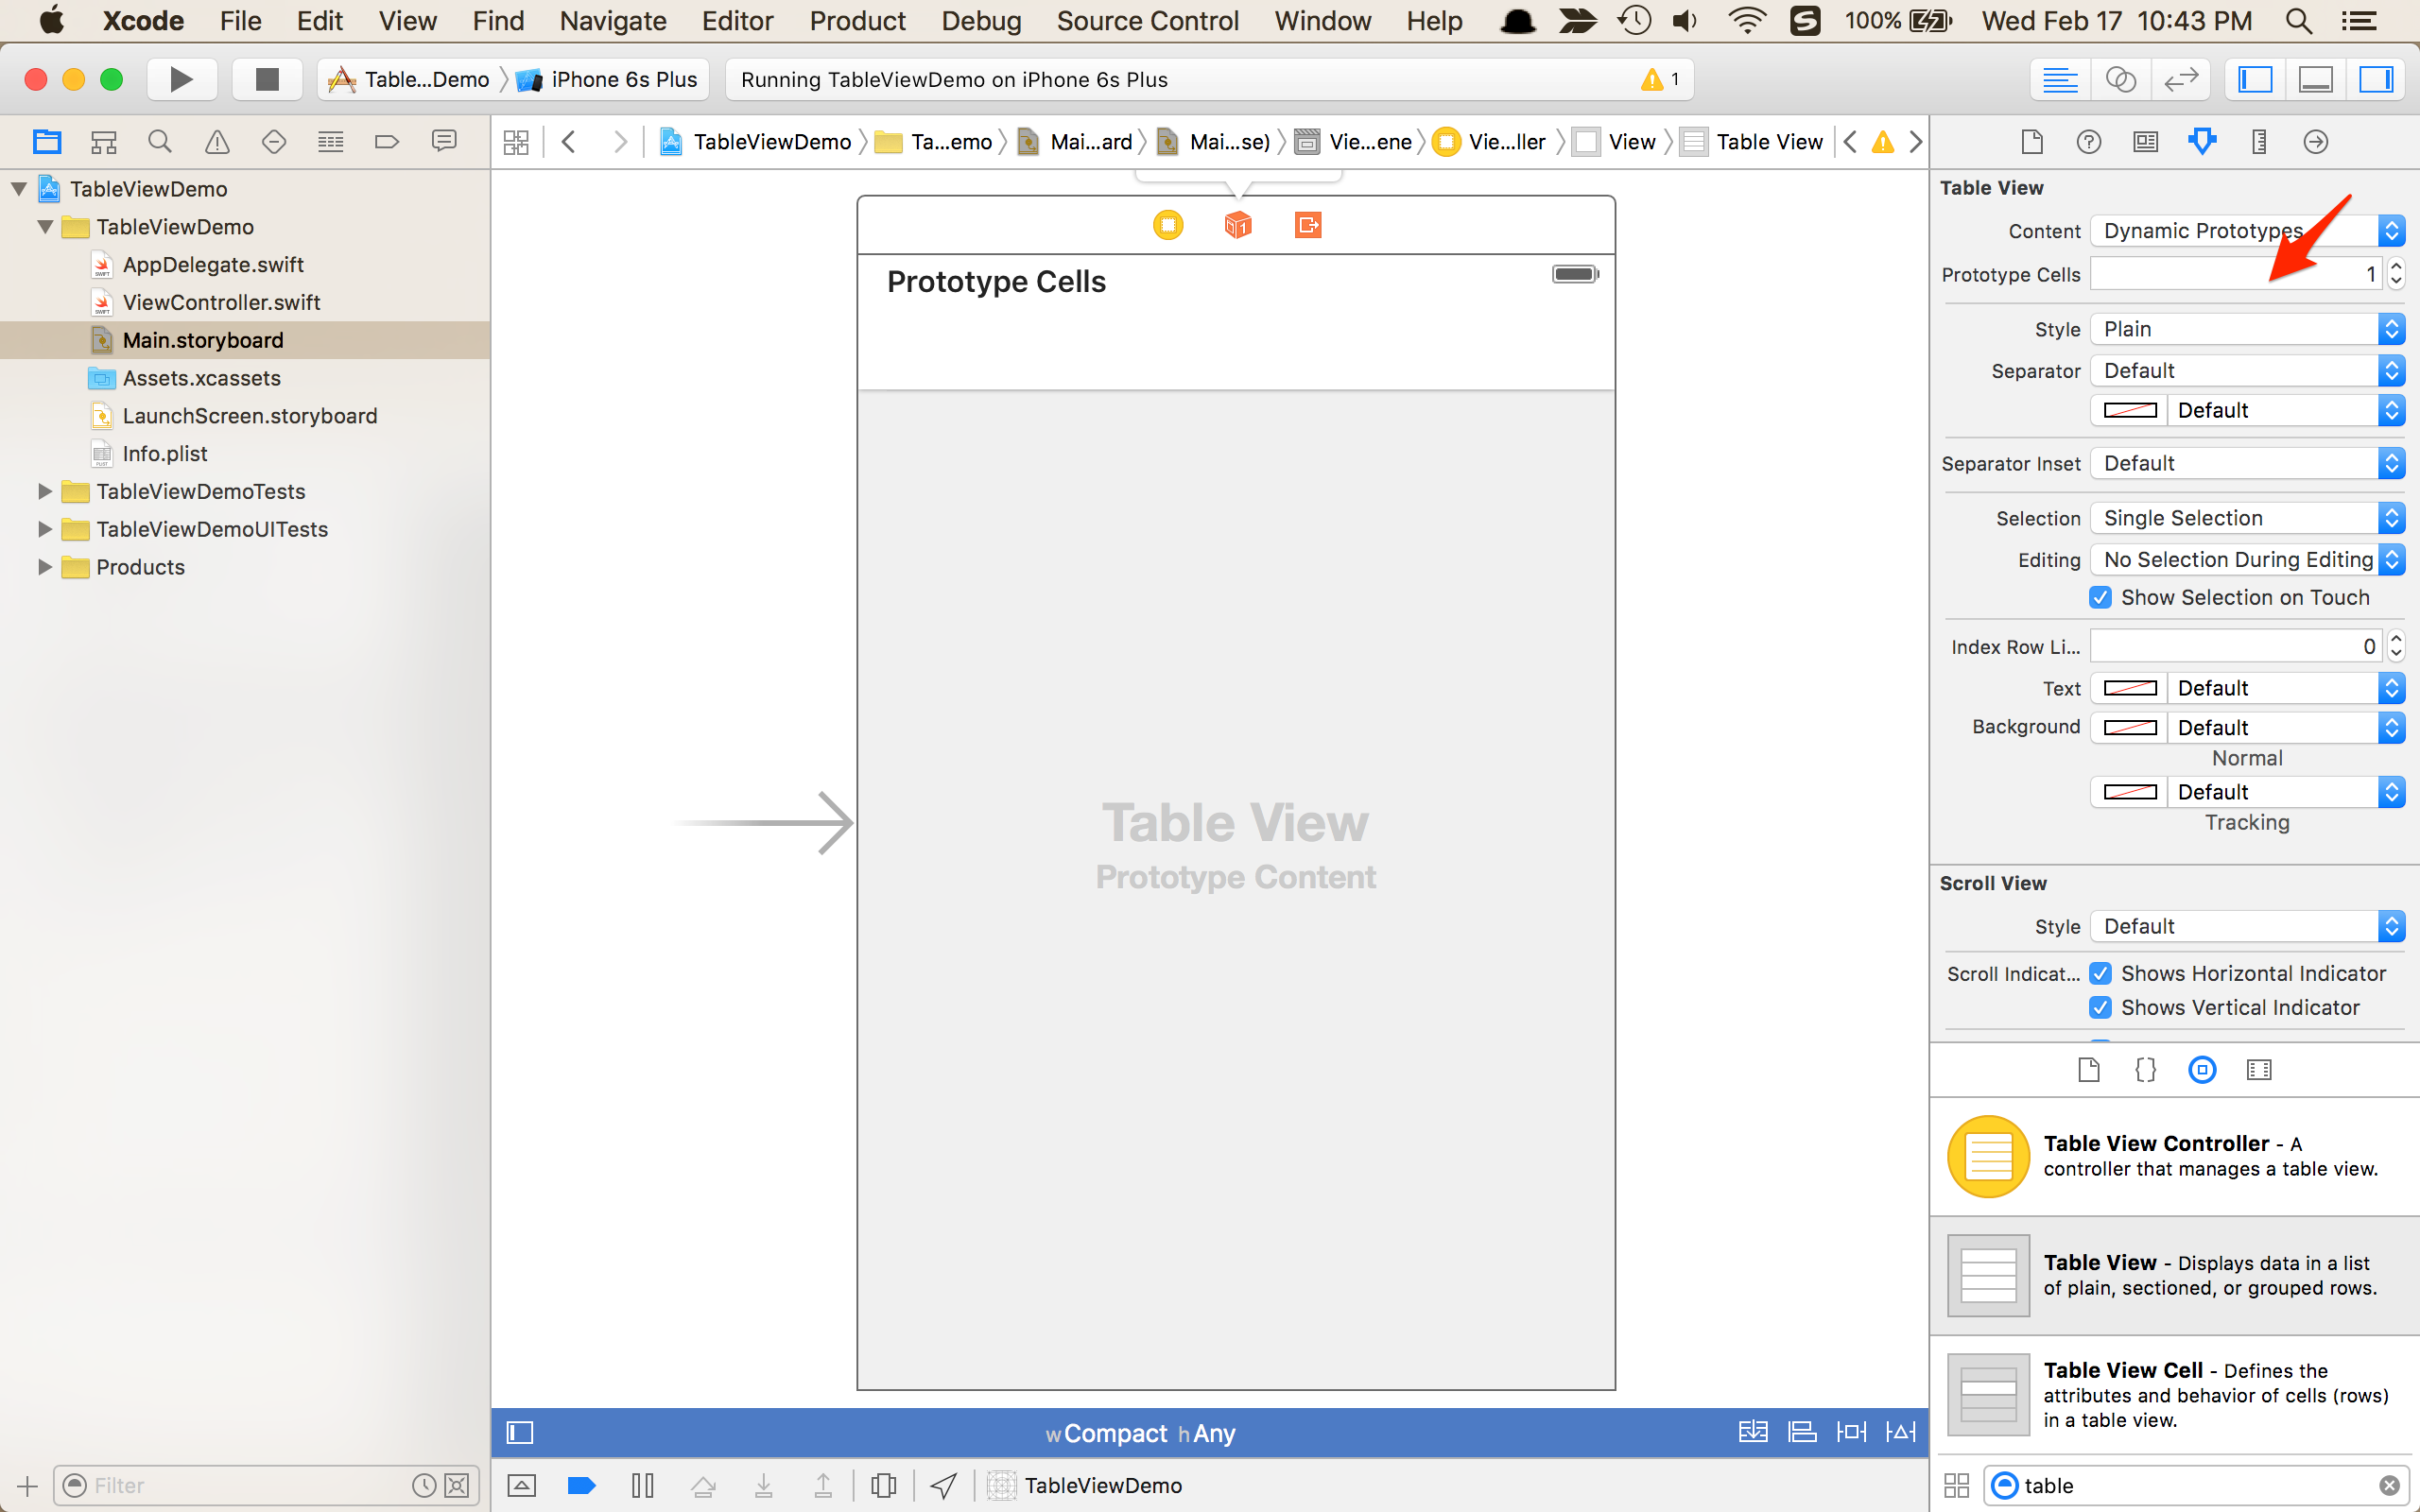
在Xcode的右下角控件库里选择Table View,按住拖拽到storyboard里,并将其拖大至全屏

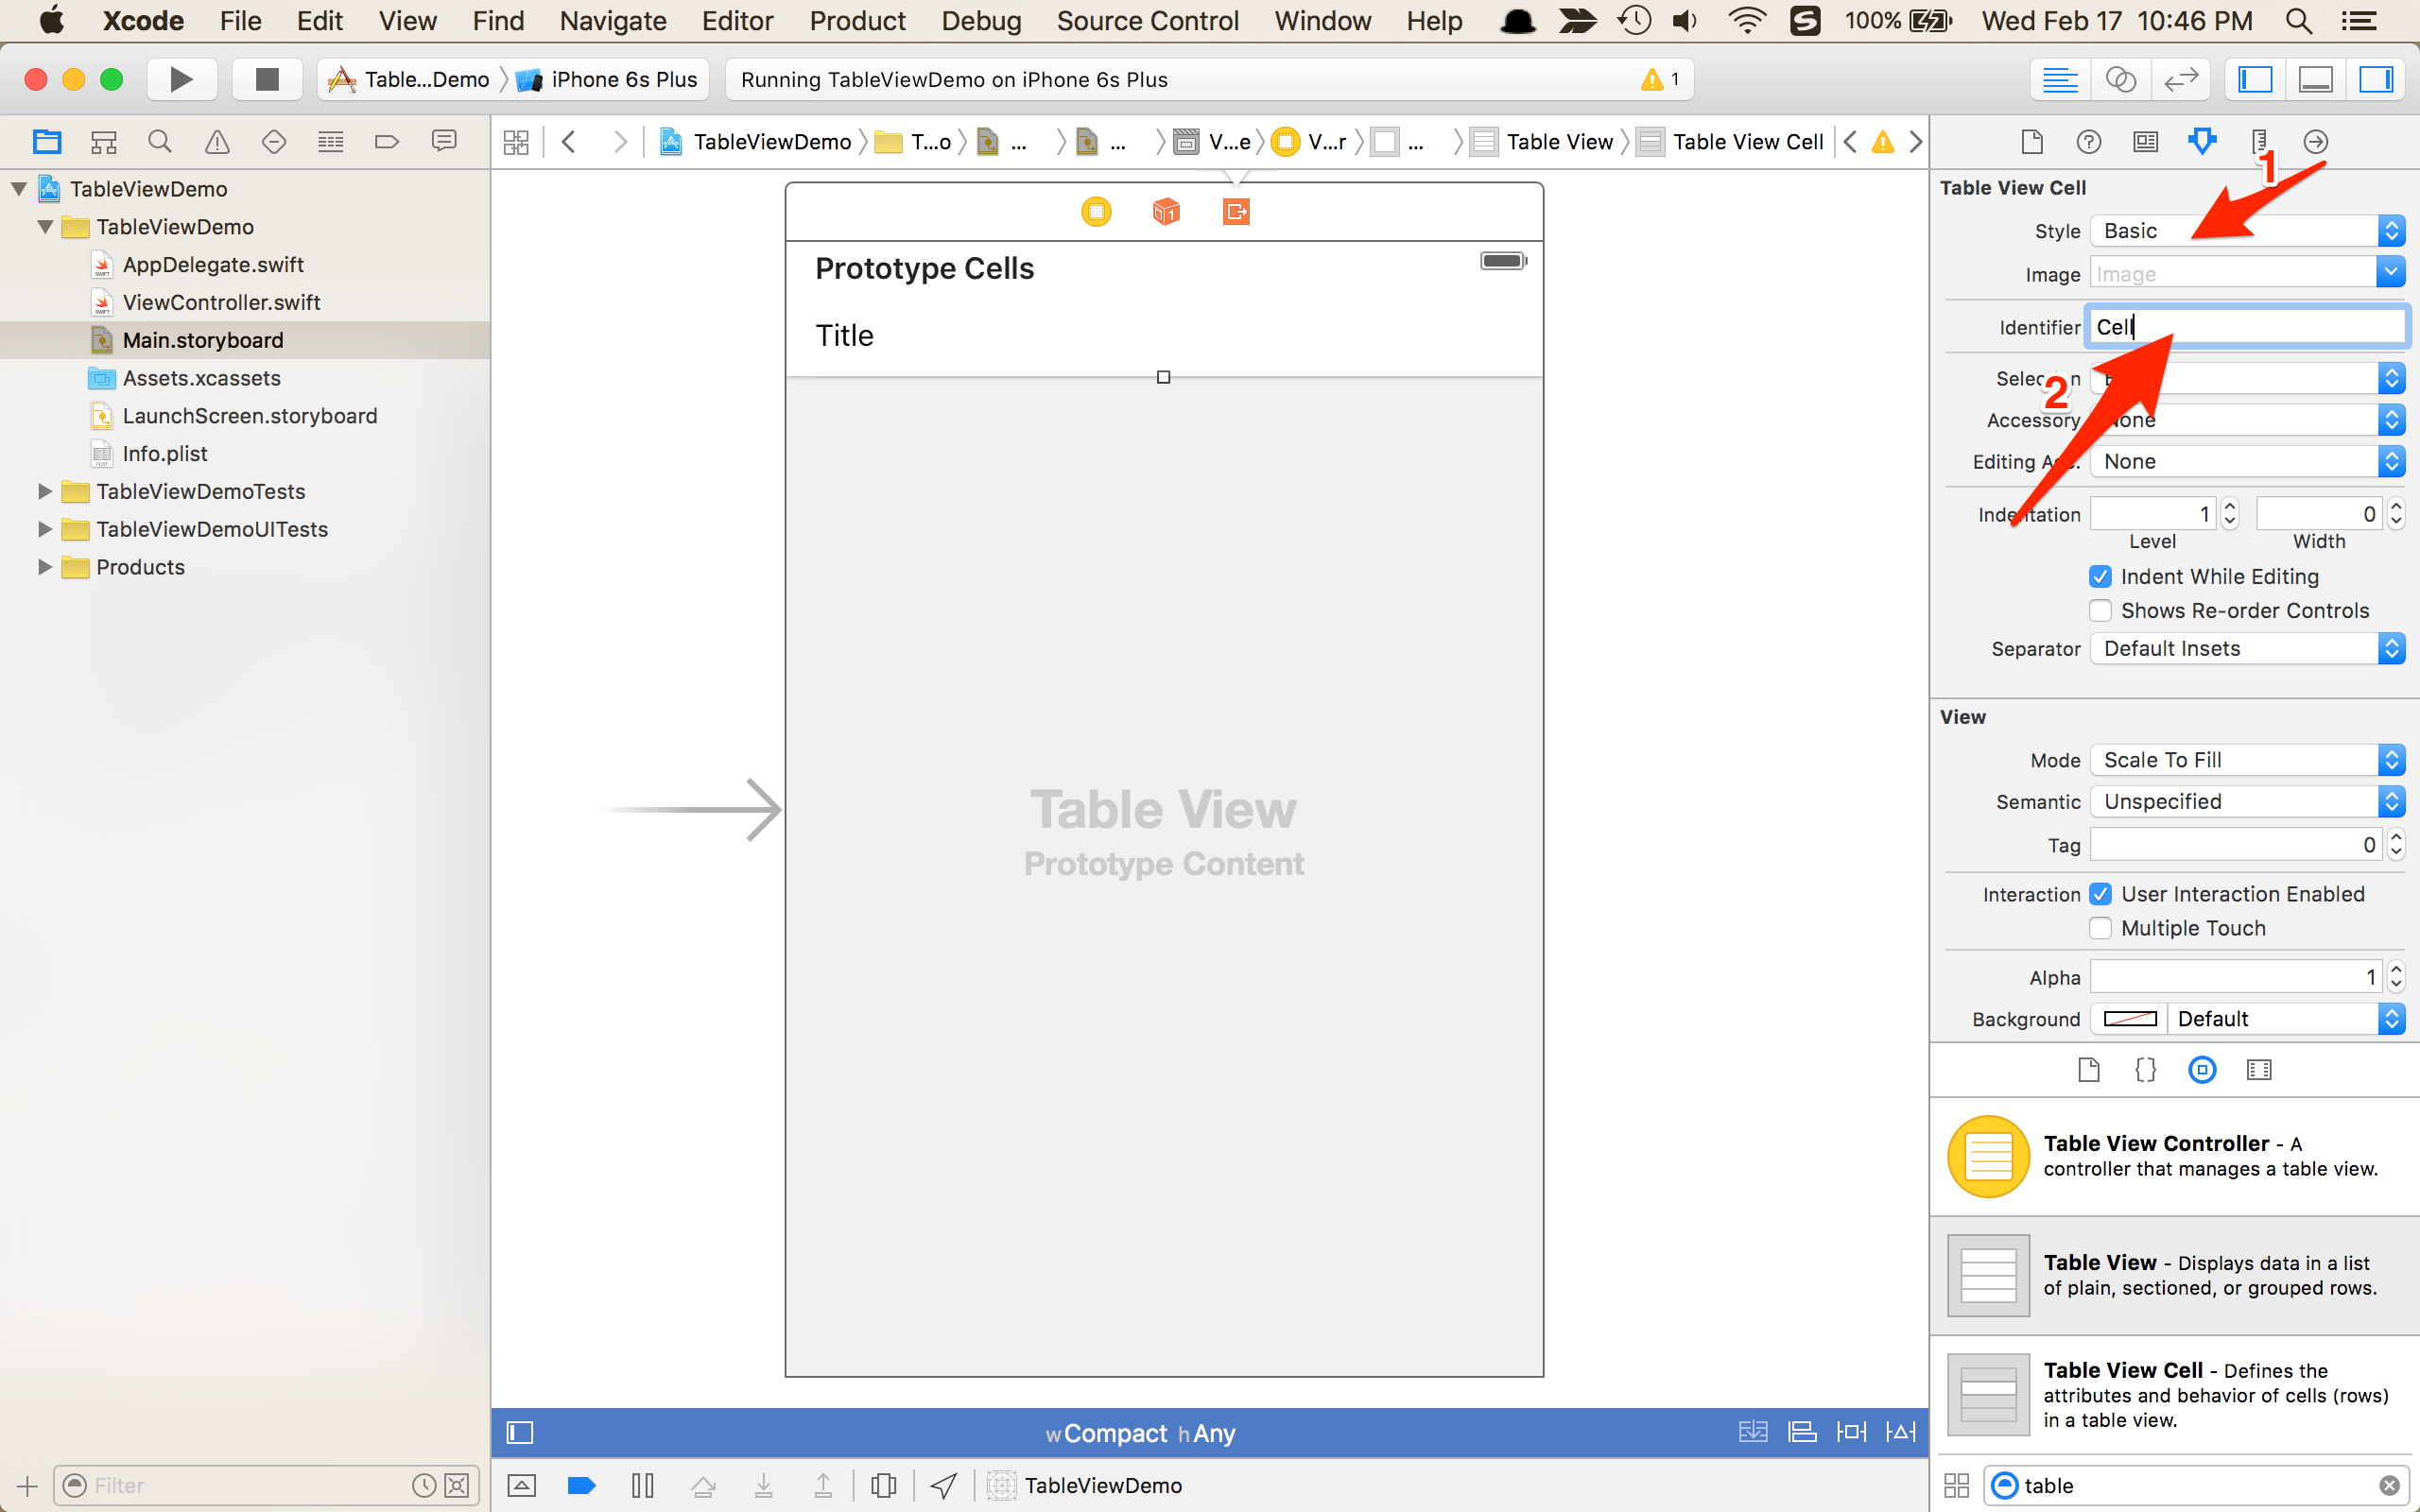
将Table View的Prototype Cells设成1,接着选中Prototype Cells,在右上角的属性试图中的Stype选择Basic,设置Identifier为Cell(可以为任意,会在后面的代码文件中使用),如图

给列表绑定数据
经过上面的操作,已经可以看到列表了,只是每个单元格都是空的,没有任何数据
这里提供一个颜色数组,它的每个元素将会被显示到相应的单元格中
var colors = ["Red","Yellow","Green","Gray","Orange","Black","White"]
在ViewController类中需要实现UITableViewDataSource和UITableViewDelegate两个协议,然后需要实现2个方法
func tableView(tableView: UITableView, numberOfRowsInSection section: Int) -> Int { return colors.count }
这里返回给定数组的大小,就是整个列表有多少行
func tableView(tableView: UITableView, cellForRowAtIndexPath indexPath: NSIndexPath) -> UITableViewCell { let cell = tableView.dequeueReusableCellWithIdentifier("Cell", forIndexPath: indexPath) cell.textLabel?.text = colors[indexPath.row] return cell }
上面的”Cell”就是在storyboard里的Identifier,这个函数返回一个cell,cell上显示一串字符。dequeueReusableCellWithIdentifier方法会重复利用单元格,提高效率,节省资源。常见的像微博里的消息列表,设备的每一屏只显示几条消息,下拉刷新一次,单元格还是这几个,只不过内容被重新填充了。
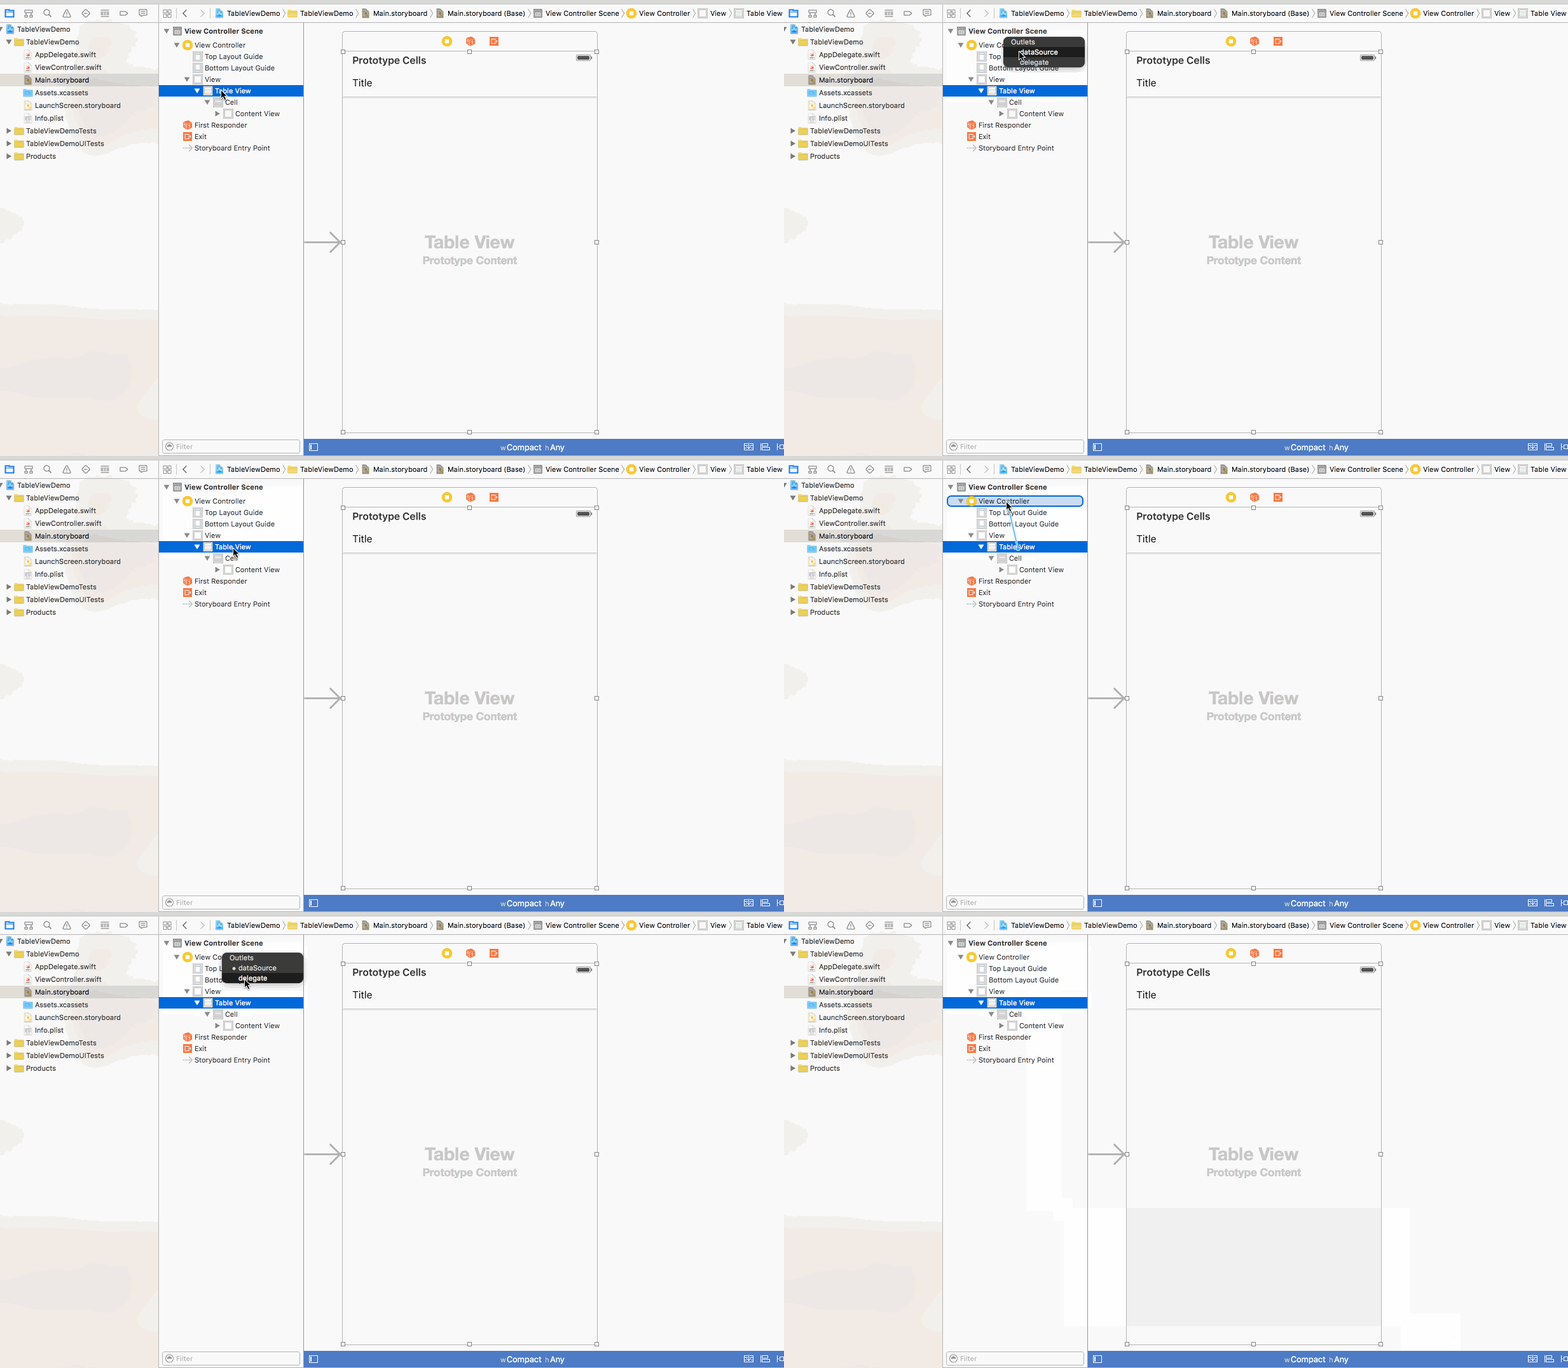
最后一步,切换到storyboard中,打开View Controller Scene,将Table View与View Controller做一个绑定,按住control键,拖动Table View到View Controller上放开,选择dataSource,重复一次,选择delegate

至此,列表的数据才被正确地显示了出来,可以在模拟器上查看
源码下载
https://github.com/djstava/SwiftForiOS/tree/master/TableViewDemo
 PHP Dependency Injection Container: A Quick StartMay 13, 2025 am 12:11 AM
APHPDependencyInjectionContainerisatoolthatmanagesclassdependencies,enhancingcodemodularity,testability,andmaintainability.Itactsasacentralhubforcreatingandinjectingdependencies,thusreducingtightcouplingandeasingunittesting.
 Dependency Injection vs. Service Locator in PHPMay 13, 2025 am 12:10 AM
Select DependencyInjection (DI) for large applications, ServiceLocator is suitable for small projects or prototypes. 1) DI improves the testability and modularity of the code through constructor injection. 2) ServiceLocator obtains services through center registration, which is convenient but may lead to an increase in code coupling.
 PHP performance optimization strategies.May 13, 2025 am 12:06 AM
PHPapplicationscanbeoptimizedforspeedandefficiencyby:1)enablingopcacheinphp.ini,2)usingpreparedstatementswithPDOfordatabasequeries,3)replacingloopswitharray_filterandarray_mapfordataprocessing,4)configuringNginxasareverseproxy,5)implementingcachingwi
 PHP Email Validation: Ensuring Emails Are Sent CorrectlyMay 13, 2025 am 12:06 AM
PHPemailvalidationinvolvesthreesteps:1)Formatvalidationusingregularexpressionstochecktheemailformat;2)DNSvalidationtoensurethedomainhasavalidMXrecord;3)SMTPvalidation,themostthoroughmethod,whichchecksifthemailboxexistsbyconnectingtotheSMTPserver.Impl
 How to make PHP applications fasterMay 12, 2025 am 12:12 AM
TomakePHPapplicationsfaster,followthesesteps:1)UseOpcodeCachinglikeOPcachetostoreprecompiledscriptbytecode.2)MinimizeDatabaseQueriesbyusingquerycachingandefficientindexing.3)LeveragePHP7 Featuresforbettercodeefficiency.4)ImplementCachingStrategiessuc
 PHP Performance Optimization Checklist: Improve Speed NowMay 12, 2025 am 12:07 AM
ToimprovePHPapplicationspeed,followthesesteps:1)EnableopcodecachingwithAPCutoreducescriptexecutiontime.2)ImplementdatabasequerycachingusingPDOtominimizedatabasehits.3)UseHTTP/2tomultiplexrequestsandreduceconnectionoverhead.4)Limitsessionusagebyclosin
 PHP Dependency Injection: Improve Code TestabilityMay 12, 2025 am 12:03 AM
Dependency injection (DI) significantly improves the testability of PHP code by explicitly transitive dependencies. 1) DI decoupling classes and specific implementations make testing and maintenance more flexible. 2) Among the three types, the constructor injects explicit expression dependencies to keep the state consistent. 3) Use DI containers to manage complex dependencies to improve code quality and development efficiency.
 PHP Performance Optimization: Database Query OptimizationMay 12, 2025 am 12:02 AM
DatabasequeryoptimizationinPHPinvolvesseveralstrategiestoenhanceperformance.1)Selectonlynecessarycolumnstoreducedatatransfer.2)Useindexingtospeedupdataretrieval.3)Implementquerycachingtostoreresultsoffrequentqueries.4)Utilizepreparedstatementsforeffi


Hot AI Tools

Undresser.AI Undress
AI-powered app for creating realistic nude photos

AI Clothes Remover
Online AI tool for removing clothes from photos.

Undress AI Tool
Undress images for free

Clothoff.io
AI clothes remover

Video Face Swap
Swap faces in any video effortlessly with our completely free AI face swap tool!

Hot Article

Hot Tools

VSCode Windows 64-bit Download
A free and powerful IDE editor launched by Microsoft

WebStorm Mac version
Useful JavaScript development tools

mPDF
mPDF is a PHP library that can generate PDF files from UTF-8 encoded HTML. The original author, Ian Back, wrote mPDF to output PDF files "on the fly" from his website and handle different languages. It is slower than original scripts like HTML2FPDF and produces larger files when using Unicode fonts, but supports CSS styles etc. and has a lot of enhancements. Supports almost all languages, including RTL (Arabic and Hebrew) and CJK (Chinese, Japanese and Korean). Supports nested block-level elements (such as P, DIV),

SAP NetWeaver Server Adapter for Eclipse
Integrate Eclipse with SAP NetWeaver application server.

Notepad++7.3.1
Easy-to-use and free code editor


