Home >Web Front-end >JS Tutorial >Hammer.js + carousel principle implements simple sliding screen function_javascript skills
Hammer.js + carousel principle implements simple sliding screen function_javascript skills
- WBOYWBOYWBOYWBOYWBOYWBOYWBOYWBOYWBOYWBOYWBOYWBOYWBOriginal
- 2016-05-16 15:16:381723browse
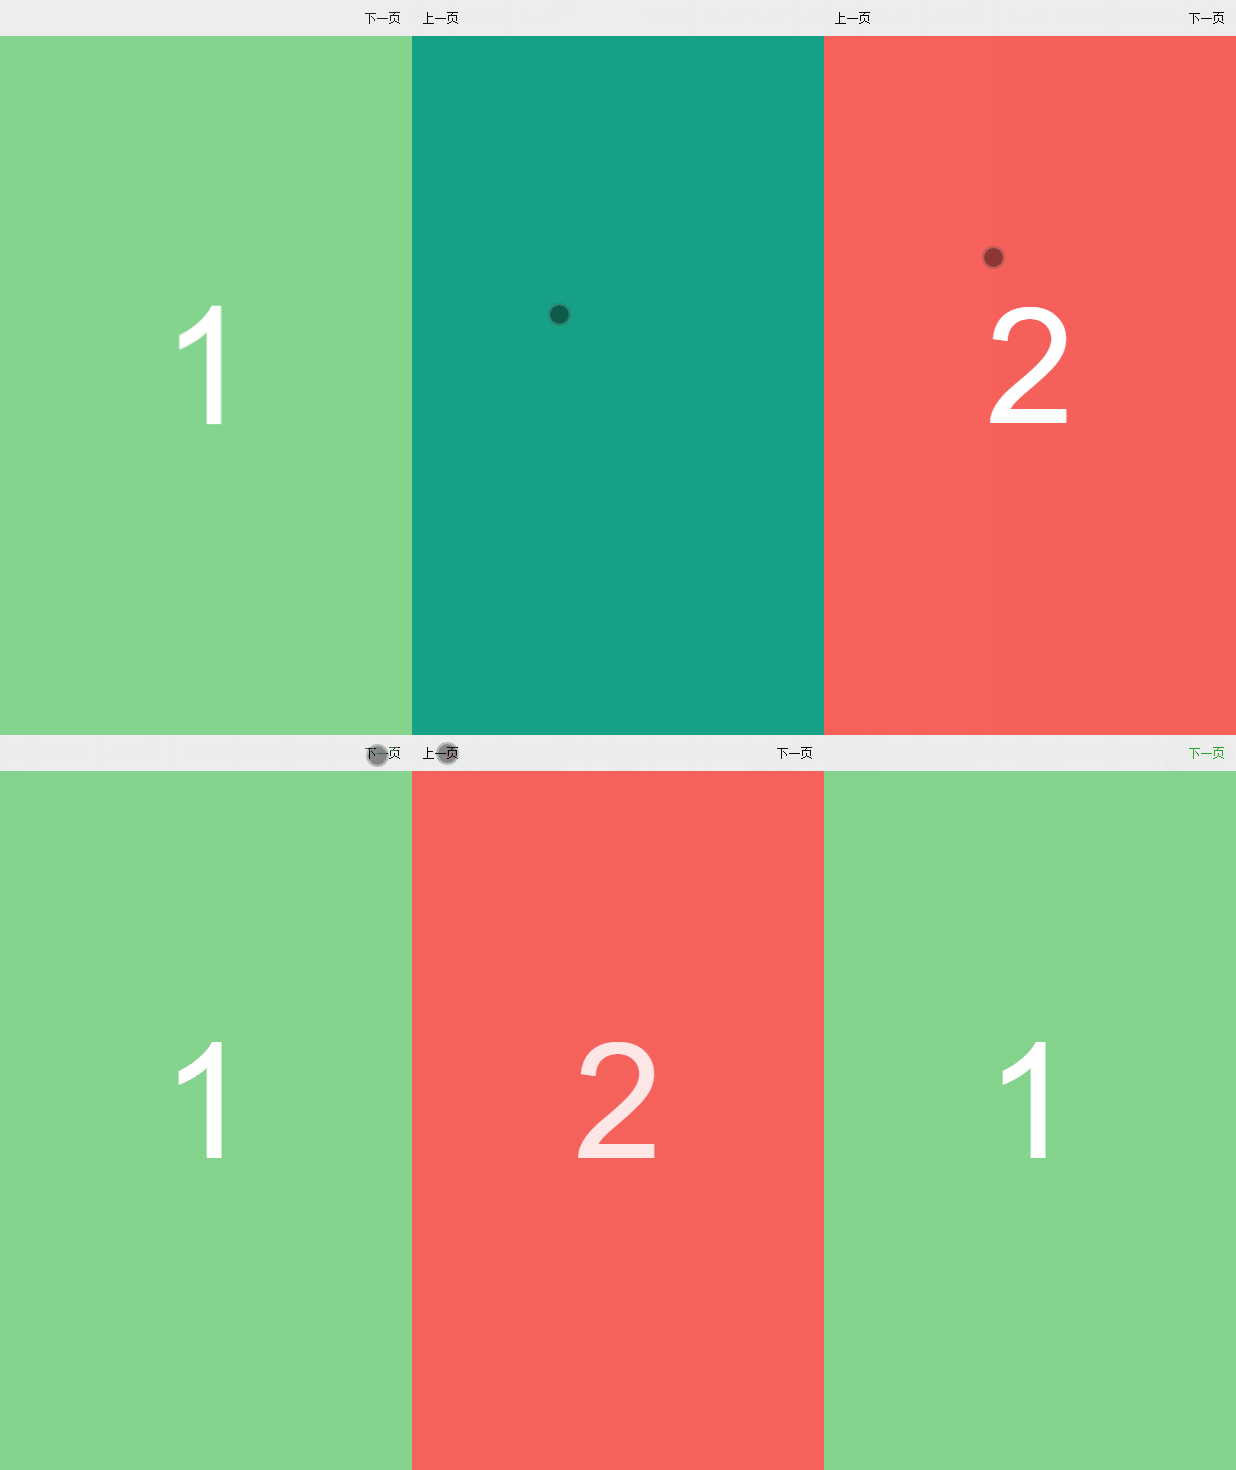
I recently had a task to make a very small h5 application with only 2 screens. It needed to do horizontal full-screen sliding switching and some simple animation effects. I used fullpage.js and jquery to do this kind of thing before, and the performance It wasn't very good, so I wanted to make a simple thing myself to implement it. Finally, I used zepto + hammer.js and carousel to solve this problem. The effect was pretty good. When Gzip was not enabled on the entire page, the data size of all resource requests was about 200KB. This article summarizes the implementation ideas of this method.
Effect demonstration:
1. Implementation points
1) The sliding screen draws on bootstrap’s carousel plug-in, but it is not as complicated as it is. You only need to draw on its carousel implementation ideas;
2) The triggering of sliding screen switching is different from that of PC. PC is usually triggered by the click callback of the element. For the sliding screen page, it can be processed by the window's hashchange event, so as long as it is set through the hyperlink The switch can be triggered by changing the anchor point or location.hash through js;
3) Considering that mobile needs to support gesture operations, you can use the gesture library hammer.js. The API is very simple and easy to use;
4) You can use animate.css for animation effects, but you don’t need to put all its code into the code. You only need to copy the code related to the required animation effects;
5) Instead of jquery, zepto is preferred;
6) The sliding screen effect uses transition animation. In order to respond to the callback at the end of the animation, you can consider using transition.js. This is also a tool provided by Bootstrap, but it can only be used with jquery by default. You need to change it slightly. Used in conjunction with zepto.
These key points are relatively rough, and the following content will introduce them in detail one by one.
2. html structure
The html structure of the empty sliding page is as follows:
<div id="container" class="container">
<section id="page-1" class="page page--1">
</section>
<section id="page-2" class="page page--2">
</section>
<section id="page-3" class="page page--3">
</section>
</div>
html,
body {
height: 100%;
-webkit-tap-highlight-color: transparent;
}
.container,
.page {
position: absolute;
top: 0;
left: 0;
width: 100%;
height: 100%;
overflow: hidden;
}
.page {
overflow: hidden;
display: none;
-webkit-transition: -webkit-transform .4s ease;
transition: transform .4s ease;
-webkit-backface-visibility: hidden;
backface-visibility: hidden;
}
.container and .page adopt absolute positioning and full-screen layout when initialized. Each section.page represents a page and is not displayed by default. All pages are positioned the same, which means that if all pages are displayed, these pages will overlap.
The html structure of the demo page is:
<div id="container" class="container">
<section id="page-1" class="page page--1">
<div class="page__jump"><a href="#page-2" title="">下一页</a></div>
<p class="page__num animated">1</p>
</section>
<section id="page-2" class="page page--2">
<div class="page__jump"><a href="#page-1" title="">上一页</a><a href="#page-3" title="">下一页</a></div>
<p class="page__num animated">2</p>
</section>
<section id="page-3" class="page page--3">
<div class="page__jump"><a href="#page-2" title="">上一页</a></div>
<p class="page__num animated">3</p>
</section>
</div>
Demo related css will not be displayed. Among them, animated is required to apply animate.css, which is an animation library available on github.
3. Implementation ideas of sliding screen switching
Sliding screen switching is achieved by controlling the two pages to be slid through js to add and delete the css classes defined below:
.page.page--active,
.page.page--prev,
.page.page--next {
display: block;
}
.page.page--next,
.page.page--active.page--active-right {
-webkit-transform: translate3d(100%, 0, 0);
transform: translate3d(100%, 0, 0);
}
.page.page--prev,
.page.page--active.page--active-left {
-webkit-transform: translate3d(-100%, 0, 0);
transform: translate3d(-100%, 0, 0);
}
.page.page--next.page--next-left,
.page.page--prev.page--prev-right,
.page.page--active {
-webkit-transform: translate3d(0, 0, 0);
transform: translate3d(0, 0, 0);
}
.page--active indicates the currently displayed page. After the page is initialized, use the following js call to add .page—active:
to the first page.
var $activePage;
//初始化显示第一页
(function () {
$activePage = $('#page-1');
$activePage.addClass('page--active');
})();
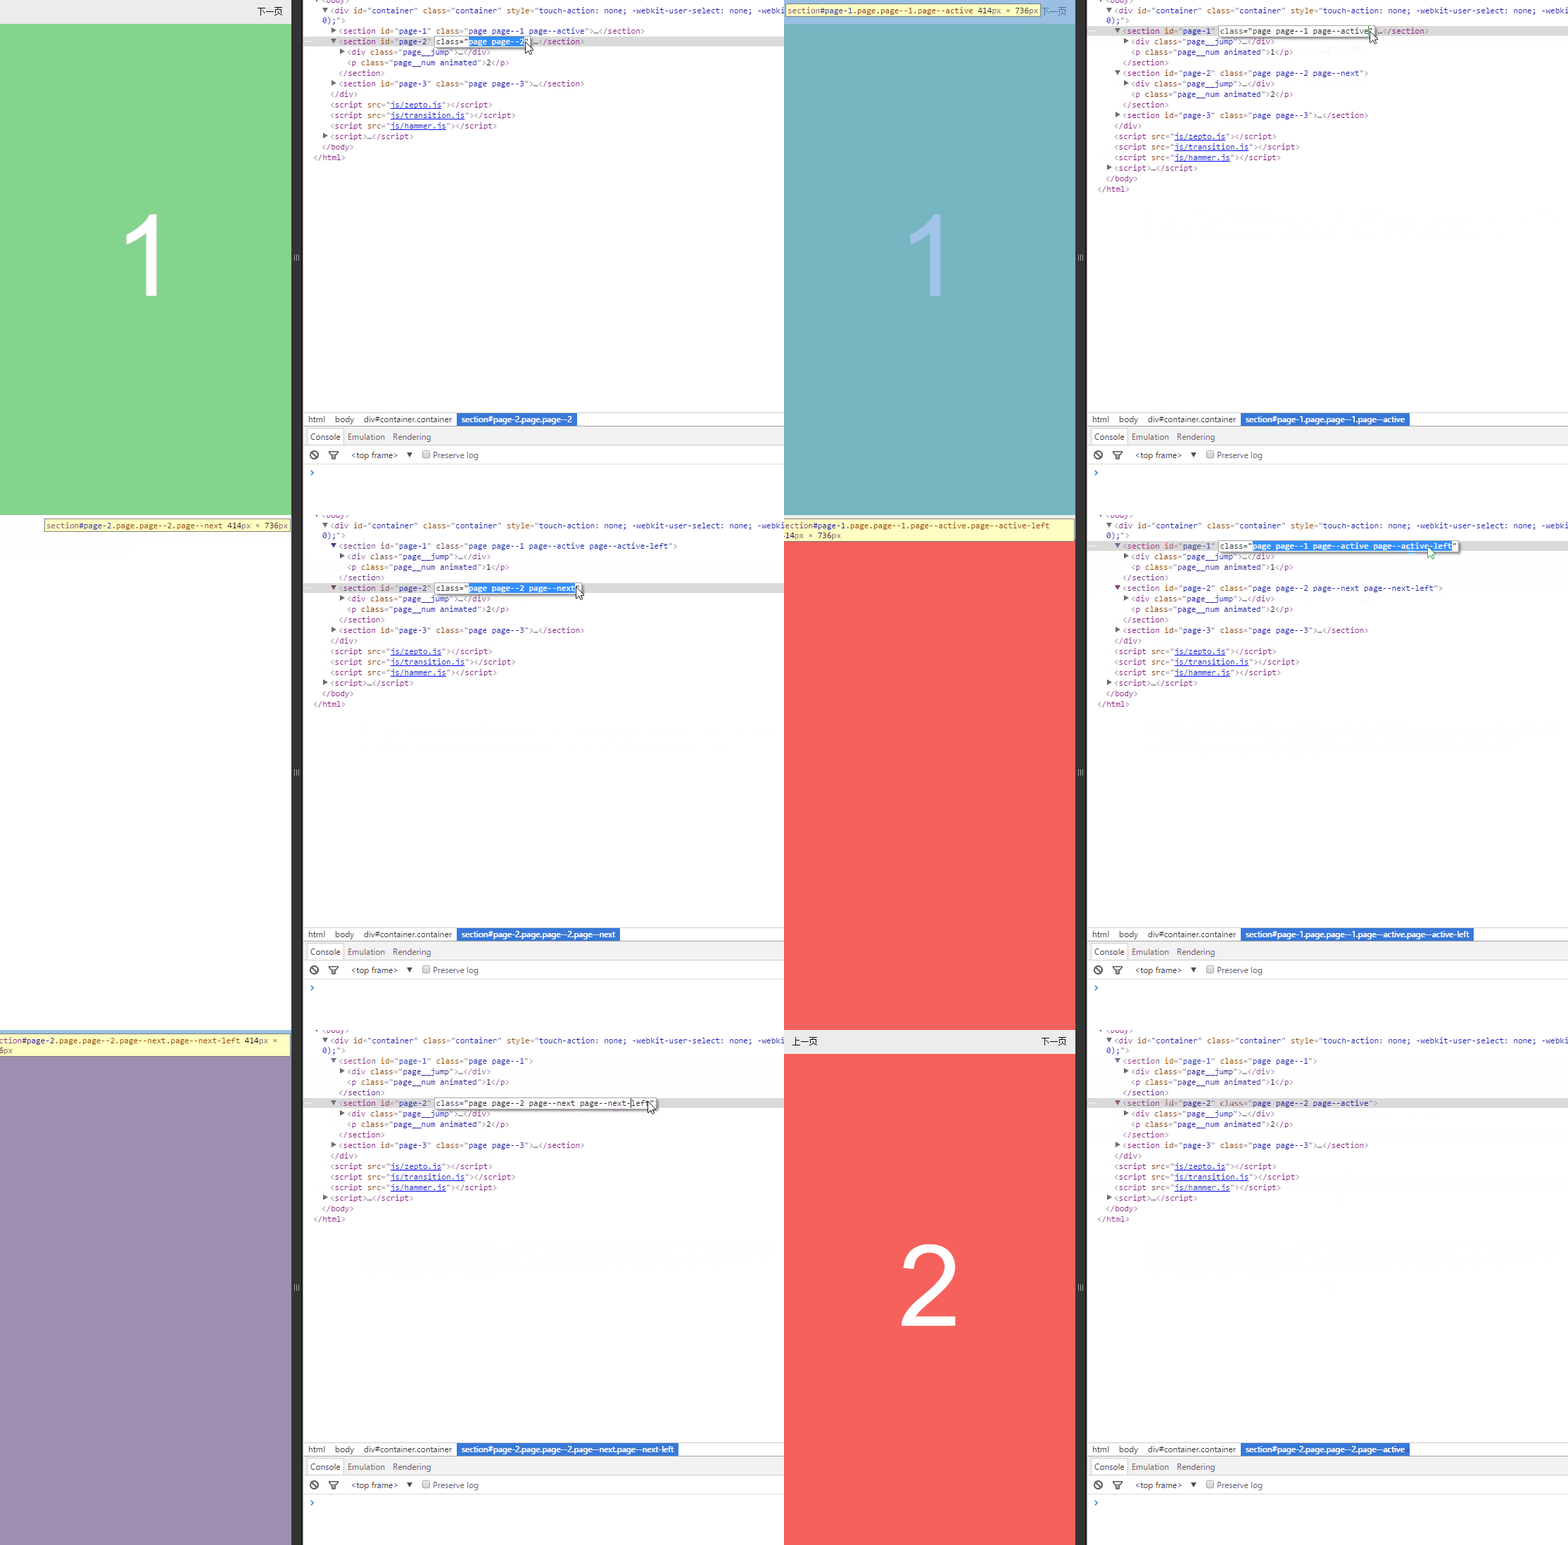
这样页面默认就显示了第一页。以向左滑屏说明这些css的使用原理:
第一步,找到下一页的section,添加page--next类,将它定位当前页的右边,为滑屏做准备;
第二步,找到当前页的section,给它添加page--active-left,由于这个类改变了translate3D属性的值,所以当前页会往左滑动一屏;
在第二步的同时,给下一页的section,添加page--next-left,由于这个类改变了translate3D属性的值,所以下一页会往左滑动一屏;
第三步,在当前页跟下一页滑屏动画结束后,找到原来的当前页,移除掉page--active和page--active-left类;
在第三步的同时,找到下一页,移除掉page--next和page--next-left类,添加page--active。
gif图说明如下:
向右滑屏原理类似:
第一步,找到上一页的section,添加page--prev类,将它定位当前页的左边,为滑屏做准备;
第二步,找到当前页的section,给它添加page--active-right,由于这个类改变了translate3D属性的值,所以当前页会往右滑动一屏;
在第二步的同时,给上一页的section,添加page--prev-right,由于这个类改变了translate3D属性的值,所以上一页会往右滑动一屏;
第三步,在当前页跟上一页滑屏动画结束后,找到原来的当前页,移除掉page--active和page--active-right类;
在第三步的同时,找到上一页,移除掉page--prev和page--prev-right类,添加page--active。
综合以上实现原理,封装成JS函数如下:
var TRANSITION_DURATION = 400, sliding = false; function getSlideType($targetPage) {
var activePageId = $activePage.attr('id'),
targetPageId = $targetPage.attr('id');
return activePageId < targetPageId ? 'next' : activePageId == targetPageId ? '' : 'prev';
}
function slide(targetPageId) {
var $targetPage = $('#' + targetPageId);
if (!$targetPage.length || sliding) return;
var slideType = getSlideType($targetPage),
direction = slideType == 'next' ? 'left' : 'right';
if (slideType == '') return;
sliding = true;
$targetPage.addClass('page--' + slideType);
$targetPage[0].offsetWidth;
$activePage.addClass('page--active-' + direction);
$targetPage.addClass('page--' + slideType + '-' + direction);
$activePage
.one($.transitionEnd.end, function () {
$targetPage.removeClass(['page--' + slideType, 'page--' + slideType + '-' + direction].join(' ')).addClass('page--active');
$activePage.removeClass(['page--active', 'page--active-' + direction].join(' '));
$activePage = $targetPage;
sliding = false;
})
.emulateTransitionEnd(TRANSITION_DURATION);
}
由于$activePage在页面初始化的时候默认指定为第一页,在每次滑屏结束后都会更新成最新的当前页,所以调用的时候只要把目标页的ID传给slide函数即可。以上代码可能会有疑问的是:
1)$targetPage[0].offsetWidth的作用,这个代码用来触发浏览器的重绘,因为目标页原来是display: none的,如果不触发重绘的话,下一步添加css类后将看不到动画效果;
2)$.transitionEnd.end以及emulateTransitionEnd的作用,这个在下一部分说明。
4. 浏览器css动画结束的回调及模拟
bootstrap提供了一个工具,transition.js,用来判断浏览器是否支持css动画回调事件,以及在浏览器没有在动画结束后自动触发回调的特殊情况下通过模拟的方式来手动触发回调,原先这个工具只能配合jquery使用,为了在zepto中使用,必须稍微改变一下,下面就是改变之后的代码:
(function(){
var transition = $.transitionEnd = {
end: (function () {
var el = document.createElement('transitionEnd'),
transEndEventNames = {
WebkitTransition: 'webkitTransitionEnd',
MozTransition: 'transitionend',
OTransition: 'oTransitionEnd otransitionend',
transition: 'transitionend'
};
for (var name in transEndEventNames) {
if (el.style[name] !== undefined) {
return transEndEventNames[name];
}
}
return false;
})()
};
$.fn.emulateTransitionEnd = function (duration) {
var called = false,
_this = this,
callback = function () {
if (!called) $(_this).trigger(transition.end);
};
$(this).one(transition.end, function () {
called = true;
});
setTimeout(callback, duration);
return this;
};
})();
$.transitionEnd.end表示当前浏览器支持的动画结束事件的名称。$.fn.emulateTransitionEnd是一个扩展了Zepto原型的一个方法,传入一个动画的过渡时间,当这个时间段过完之后,如果浏览器没有自动触发回调事件,called就始终是false,setTimeout会导致callback被调用,然后callback内部就会手动触发动画结束的回调。为什么要通过这个方式来模拟动画结束,是因为浏览器即使支持动画结束事件的回调,但是有些时候并不会触发这个事件,或者在动画结束后不能立即触发,影响回调的准确性。传入的duration应该与执行动画的元素,在css上设置的transtion-duration相同,注意以下代码中标黄的部分:
var TRANSITION_DURATION = 400 ;
$activePage
.one($.transitionEnd.end, function () {
$targetPage.removeClass(['page--' + slideType, 'page--' + slideType + '-' + direction].join(' ')).addClass('page--active');
$activePage.removeClass(['page--active', 'page--active-' + direction].join(' '));
$activePage = $targetPage;
sliding = false;
})
.emulateTransitionEnd(TRANSITION_DURATION);
.page {
overflow: hidden;
display: none;
-webkit-transition: -webkit-transform .4s ease;
transition: transform .4s ease;
-webkit-backface-visibility: hidden;
backface-visibility: hidden;
}
5. hashchange事件
PC端滑屏都是给元素添加点击事件触发的,移动端可以利用window的hashchange事件:
$(window).on('hashchange', function (e) {
var hash = location.hash;
if (!hash) hash = '#page-1';
slide(hash.substring(1));
});
location.hash = '#page-1';
hashchange事件,在js代码中通过改变loaction.hash或者是点击2fc8db3327435aa54ad74d366b04c0cb下一页5db79b134e9f6b82c0b36e0489ee08ed这样的超链接时,都会触发,所以只要在这个事件的回调去做滑屏切换即可。这样那些上一页和下一页的链接元素都不用加事件了。
6. hammer.js使用简介
hammer.js是一个手势库,支持常用的手势操作,使用简单,引入它的js之后,通过以下的方式来支持手势滑屏:
//初始化手势滑动
var container = document.getElementById('container'),
mc = new Hammer.Manager(container),
Swipe = new Hammer.Swipe();
mc.add(Swipe);
mc.on('swipeleft', function (e) {
swipteTo('next', e);
});
mc.on('swiperight', function (e) {
swipteTo('prev', e);
});
function swipteTo(slideType, e) {
var $targetPage = $activePage[slideType]('.page');
$targetPage.length && (location.hash = '#' + $targetPage.attr('id'));
}
Use the entire container element as the sliding stage. When the swipeleft event is heard, it means that the page slides to the left, and the page should display the next page; when the swiperight event is heard, it means that the page slides to the right, and the page should display the next page.
7. Conclusion
The use of animate.css will not be introduced in detail. It is relatively simple. This is its github address: https://github.com/daneden/animate.css, which is very easy to use. Animation library. This article records some recent work experience. Technical things sometimes cannot be fully explained in words, so I can only do my best to explain some issues in a little more detail. What is wrong and what is wrong? If you have any questions, please explain them to me in the comment area and I will check them carefully. In addition, I am not very familiar with the mobile terminal. If you have better insights, you are welcome to share them with us. Thank you for reading, and it’s New Year soon. I wish you good luck in the Year of the Monkey!
Related articles
See more- An in-depth analysis of the Bootstrap list group component
- Detailed explanation of JavaScript function currying
- Complete example of JS password generation and strength detection (with demo source code download)
- Angularjs integrates WeChat UI (weui)
- How to quickly switch between Traditional Chinese and Simplified Chinese with JavaScript and the trick for websites to support switching between Simplified and Traditional Chinese_javascript skills


