
Home >Web Front-end >JS Tutorial >jQuery implements imitation ios time selection based on muipicker_jquery
jQuery implements imitation ios time selection based on muipicker_jquery

- WBOYWBOYWBOYWBOYWBOYWBOYWBOYWBOYWBOYWBOYWBOYWBOYWBOriginal
- 2016-05-16 15:14:202682browse
First let’s look at the original muipicker example
<!DOCTYPE html>
<html>

 <head>
 <meta charset="utf-8">
 <meta name="viewport" content="width=device-width,initial-scale=1,minimum-scale=1,maximum-scale=1,user-scalable=no" />
 <title></title>
 <!--标准mui.css-->
 <link rel="stylesheet" href="../css/mui.min.css">
 <!--App自定义的css-->
 <link rel="stylesheet" type="text/css" href="../css/app.css" />
 <link href="../css/mui.picker.css" rel="stylesheet" />
 <link href="../css/mui.poppicker.css" rel="stylesheet" />
 <!--<link rel="stylesheet" type="text/css" href="../css/mui.picker.min.css" />-->
 <style>
  .mui-btn {
  font-size: 16px;
  padding: 8px;
  margin: 3px;
  }
  h5.mui-content-padded {
  margin-left: 3px;
  margin-top: 20px !important;
  }
  h5.mui-content-padded:first-child {
  margin-top: 12px !important;
  }
  .ui-alert {
  text-align: center;
  padding: 20px 10px;
  font-size: 16px;
  }
 </style>
 </head>

 <body>
 <header class="mui-bar mui-bar-nav">
  <a class="mui-action-back mui-icon mui-icon-left-nav mui-pull-left"></a>
  <h1 class="mui-title">picker(选择器)</h1>
 </header>
 <div class="mui-content">
  <div class="mui-content-padded">
  <h5 class="mui-content-padded">原生 SELECT</h5>
  <select class="mui-btn mui-btn-block">
   <option value="item-1">item-1</option>
   <option value="item-2">item-2</option>
   <option value="item-3">item-3</option>
   <option value="item-4">item-4</option>
   <option value="item-5">item-5</option>
  </select>
  <br />
  <p>原生 SELECT(选择框)在不同的设备上UI可能会有差异,并且不支持多级联动(多个 SELECT 可实现,但较麻烦),故mui封装了picker组件,参见如下示例。</p>
  <h5 class="mui-content-padded">普通示例</h5>
  <button id='showUserPicker' class="mui-btn mui-btn-block" type='button'>一级选择示例 ...</button>
  <div id='userResult' class="ui-alert"></div>
  <h5 class="mui-content-padded">级联示例</h5>
  <button id='showCityPicker' class="mui-btn mui-btn-block" type='button'>二级联动示例 ...</button>
  <div id='cityResult' class="ui-alert"></div>
  <button id='showCityPicker3' class="mui-btn mui-btn-block" type='button'>三级联动示例 ...</button>
  <div id='cityResult3' class="ui-alert"></div>
  </div>
 </div>
 <script src="../js/mui.min.js"></script>
 <!--<script src="../js/mui.picker.min.js"></script>-->
 <script src="../js/mui.picker.js"></script>
 <script src="../js/mui.poppicker.js"></script>
 <script src="../js/city.data.js" type="text/javascript" charset="utf-8"></script>
 <script src="../js/city.data-3.js" type="text/javascript" charset="utf-8"></script>
 <script>
  (function($, doc) {
  $.init();
  $.ready(function() {
   //普通示例
   var userPicker = new $.PopPicker();
   userPicker.setData([{
   value: 'ywj',
   text: '董事长 叶文洁'
   }, {
   value: 'aaa',
   text: '总经理 艾AA'
   }, {
   value: 'lj',
   text: '罗辑'
   }, {
   value: 'ymt',
   text: '云天明'
   }, {
   value: 'shq',
   text: '史强'
   }, {
   value: 'zhbh',
   text: '章北海'
   }, {
   value: 'zhy',
   text: '庄颜'
   }, {
   value: 'gyf',
   text: '关一帆'
   }, {
   value: 'zhz',
   text: '智子'
   }, {
   value: 'gezh',
   text: '歌者'
   }]);
   var showUserPickerButton = doc.getElementById('showUserPicker');
   var userResult = doc.getElementById('userResult');
   showUserPickerButton.addEventListener('tap', function(event) {
   userPicker.show(function(items) {
    userResult.innerText = JSON.stringify(items[0]);
    //返回 false 可以阻止选择框的关闭
    //return false;
   });
   }, false);
   //-----------------------------------------
   //级联示例
   var cityPicker = new $.PopPicker({
   layer: 2
   });
   cityPicker.setData(cityData);
   var showCityPickerButton = doc.getElementById('showCityPicker');
   var cityResult = doc.getElementById('cityResult');
   showCityPickerButton.addEventListener('tap', function(event) {
   cityPicker.show(function(items) {
    cityResult.innerText = "你选择的城市是:" + items[0].text + " " + items[1].text;
    //返回 false 可以阻止选择框的关闭
    //return false;
   });
   }, false);
   //-----------------------------------------
   //   //级联示例
   var cityPicker3 = new $.PopPicker({
   layer: 3
   });
   cityPicker3.setData(cityData3);
   var showCityPickerButton = doc.getElementById('showCityPicker3');
   var cityResult3 = doc.getElementById('cityResult3');
   showCityPickerButton.addEventListener('tap', function(event) {
   cityPicker3.show(function(items) {
    cityResult3.innerText = "你选择的城市是:" + (items[0] || {}).text + " " + (items[1] || {}).text + " " + (items[2] || {}).text;
    //返回 false 可以阻止选择框的关闭
    //return false;
   });
   }, false);
  });
  })(mui, document);
 </script>
 </body>

</html>
On this basis, it is modified into a plug-in similar to ios time selection.
Just replace the data inside with the data below.
(function($, doc) {
    $.init();
    $.ready(function() {
      //普通示例

//      年月
      var yearArray = new Array();
      for (var i = 0; i < 10; i ++) {
        var monthArray = new Array();
        for (var j = 0; j < 12; j ++) {
          var month = new Object();
          month.value = j + 1 + "月";
          month.text = j + 1 + "月";
          monthArray.push(month);
        }
        var year = new Object();
        year.value = i + 2016 + "年" ;
        year.text = i + 2016 + "年";
        year.children = monthArray;
        yearArray.push(year);
      };

//年月日
      var yearArray = new Array();
      for (var i = 0; i < 10; i ++) {
        var monthArray = new Array();
        for (var j = 0; j < 12; j ++) {
          //月的最后一天
          var year = i + 2016;
          var month = j;
          var lastDay = new Date(year, month + 1, 0).getDate();//month 要加1,原本month是从0开始的,但是因为0是这个月的上个月,所以到了上个月.
          if(year == 2016 && month == 1) {
            console.log("lastday" + lastDay);
          }
          var dayArray = new Array();
          for(var k = 0; k < lastDay; k ++) {
            var day = new Object();
            day.value = k + 1 + "日";
            day.text = k + 1 + "日";
            dayArray.push(day);
          }
          var month = new Object();
          month.children = dayArray;
          month.value = j + 1 + "月";
          month.text = j + 1 + "月";
          monthArray.push(month);
        }
        var year = new Object();
        year.value = i + 2016 + "年" ;
        year.text = i + 2016 + "年";
        year.children = monthArray;
        yearArray.push(year);
      };
      console.log(yearArray);

//      小时分钟
      var hoursec = new Array();
      for (var i = 0; i < 24; i ++) {
        var hsChildrenArray = new Array();
        for (var j = 0; j < 60; j ++) {

          var childrenObject = new Object();
          var secTrue = j ;
          if(j < 10) {
            var secTrue = j ;
            childrenObject.value = "0" + secTrue;
            childrenObject.text = "0" + secTrue;
          }else {
            childrenObject.value = secTrue ;
            childrenObject.text = secTrue;
          }

          hsChildrenArray.push(childrenObject);
        }

        var object = new Object();
        if(i < 10) {
          object.value = "0" + i + ":" ;
          object.text = "0" + i + ":";
        }else {
          object.value = i +":" ;
          object.text = i + ":";
        }
        object.children = hsChildrenArray;
        hoursec.push(object);
      };
    });
  })(mui, document);
Rendering:
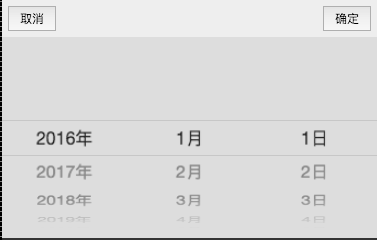
Year Month Day
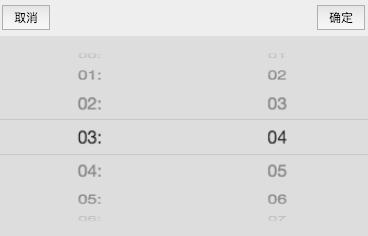
Hours and Minutes
The effect can only be seen on the mobile phone or in the mobile phone simulator of chrome.
Finally attach the github address of muipicker https://github.com/dcloudio/mui/tree/master/examples/hello-mui
Statement:
The content of this article is voluntarily contributed by netizens, and the copyright belongs to the original author. This site does not assume corresponding legal responsibility. If you find any content suspected of plagiarism or infringement, please contact admin@php.cn
Previous article:Use Javascript to move and sort select drop-down menus_jqueryNext article:Use Javascript to move and sort select drop-down menus_jquery
Related articles
See more- An in-depth analysis of the Bootstrap list group component
- Detailed explanation of JavaScript function currying
- Complete example of JS password generation and strength detection (with demo source code download)
- Angularjs integrates WeChat UI (weui)
- How to quickly switch between Traditional Chinese and Simplified Chinese with JavaScript and the trick for websites to support switching between Simplified and Traditional Chinese_javascript skills