
 Web Front-endJS TutorialJavaScript implements the drag-and-drop effect in PC web pages_javascript skills
JavaScript implements the drag-and-drop effect in PC web pages_javascript skills

A few years ago, I participated in the design and development of a real estate website project. I was responsible for the front-end work. Since the project manager has relatively high requirements, I referred to many excellent features of real estate websites and wanted to collect other people’s excellent designs and ideas. When we got together, the design draft and function implementation at that time were simply changed again and again. A good effect achieved today may have to be pushed back to the next day. Forget it, let’s not talk about this. Let’s talk about it. Let’s talk about the case we are going to explain today. I don’t know if you have visited Soufun.com (it is not suspected of advertising at all. Can Soufun pay some advertising fees?), there is one function that the product manager particularly likes, that is, the following This:

This is the current effect, maybe some changes. The original effect is that the picture inside can be dragged up, down, left, and right, and then the building number displayed on the house also moves with the picture. At that time, js The ability was not good enough, and the project manager's requirements were not achieved, but later the project manager rejected this effect and replaced it with another effect
Although the project manager didn’t want this effect, it left a knot in my heart at that time, and I can’t forget it to this day.
Okay, this is my original intention of writing this blog today. I hope it can provide an idea for students who want to achieve this kind of drag effect, but don’t know how to achieve it, so as not to leave any regrets for their youth. Of course, there are many ways to implement drag and drop. Here I will only introduce one method in JavaScript, and slowly understand the principle!
Okay, the jokes are over, let’s get down to business. We must first understand what drag is. You know it, and I know it, but I still want to describe it:
Drag and drop is a container. You can use the mouse to drag it around on the page. Nonsense, the precise description should be, move the mouse to the container, then press the mouse, be careful not to release it, and then drag The mouse and the container can follow the mouse. When you release the mouse, the container will stop there. A real-life example is that there is a box on the table. I put my hand on the box and then move the box. When my hand stops, the box stops. Take it away, the box won’t move, hehe, I understand!
Don’t think that the above is a lot of nonsense, we can get a lot of information from it, the summary is as follows:
Drag = mouse down + mouse movement + mouse up
This completes a drag and drop task. Well, it turns out that this is the principle of drag and drop. If you want to implement drag and drop, you can naturally implement the above three actions to simulate the drag and drop effect. Well, it corresponds to the syntax in JavaScript. Just need to implement these 3 actions:
onmousedown, onmousemove, onmouseup
The implemented code should be:
obj.onmousedown = function(ev){
   obj.onmousemove = function(ev){

   } ;
   obj.onmouseup = function(ev){

   };

}
Why should the next two actions be written in it? Let’s think about it carefully. Okay, the general idea of the first step is there. The next step is to consider how to make the object move with the mouse. The idea is probably like this:
First of all, the object needs to be positioned, because we need to manipulate its left and top values to make it move. Then we have to consider the mouse. The mouse displacement itself will have a distance. If we know that the mouse has moved How far away is it? Then give this distance to the object. Does the object move the same distance as the mouse? Doesn't this realize dragging? Haha, I have a little bit of ideas, and it feels cute~ The problem now is how to get the distance of the mouse. If you need to know more, please review the box model. I won’t go into it here. Many masters also have related blogs. I use one. Here’s a picture to show it:
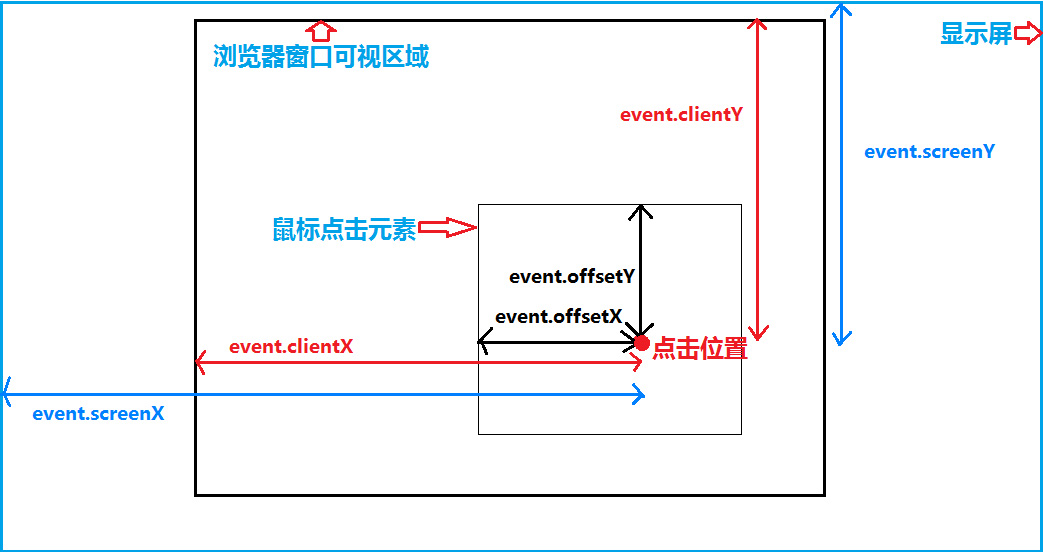
Explanation: The blue box is the width and height of the screen, the thick black box is the width and height of the browser's visible area (browser reduction effect), the thin black box is the object to be dragged by the mouse, as shown in the figure, get the coordinates of the mouse , you can use event.clientX, event.clientY to get it, oh;
The general principle of calculation can be referred to the figure below:

Explanation: The left is the initial position, the right is the target position, the origin is the mouse position, the big black box is the visible width of the browser, the small black box is the drag object, see the status of the drag object to the target position, and get the mouse The final position of the mouse, then subtract the difference between the mouse and the object, and then assign it to the top and left values of the object. You can also get the position difference of the mouse, and then add the difference to the initial top and left values. We use the first The second kind is also possible, try it yourself:
 obj.onmousedown = function(ev){
  var ev = ev || event;
  var disX = ev.clientX - this.offsetLeft,disY = ev.clientY - this.offsetTop;

  document.onmousemove = function(ev){
    var ev = ev || event;
    obj.style.left = ev.clientX - disX + 'px';
    obj.style.top = ev.clientY - disY + 'px';
  };
  document.onmouseup = function(ev){
    var ev = ev || event;
    document.onmousemove = document.onmouseup = null;
  };
}
这里说明一下:onmousemove和onmouseup之所以用document对象而不用obj对象,是因为如果用obj对象,鼠标在obj内部还好,如果在obj外面的话,拖拽会很怪异,你也可以改成obj体会一下,最后我们在鼠标弹起的时候将事件都清空;
上面的基本拖拽就算完成了,但是细心的同学一定会问,如果页面上有文字的话,拖拽物体会将文字选中,这效果岂不是怪怪的,没错,这是因为拖拽的时候触发了浏览器的默认选择事件,所以,在拖拽的时候,我们要清除这个默认事件,那怎么清除呢?
下面给一个兼容性写法:
if(ev.stopPropagation){
   ev.stopPropagation();
}else{
  ev.cancelBubble = true; //兼容IE
}
//简写成
ev.stopPropagation ? ev.stopPropagation() : ev.cancelBubble = true;
将上面的代码放在onmousedown下,鼠标按下就清除浏览器默认事件,文字就不会被选中了,好了,一个简单的拖拽效果就完成了,当然你现在是看不到效果,之所以不给demo链接是为了让你自己试着写一写,这样印象更深刻,
好了,那问题又来了,到这里就这样完了吗?。。。。。。按本人的风格,当然没有,干货还在后面!
如果我想实现这样一个效果,就是这一个大的容器里面(可以是box,也可以是document),怎么样能让我们的拖拽对象不跑出去呢,换句话说,拖到边缘就拖不动了,耶,是不是很多人想要实现的效果,哈哈,我们看看实现的原理是什么:
现实生活中,一个物体在一个盒子里跑不出去,是因为有堵墙,那我们只要能模拟出这堵墙,就可以把物体框起来,那这堵墙要怎么做呢?我们可以换个思路,当拖拽对象拖到边缘的时候,比如说拖到右边,我们将它的left固定住,是不是就不能再往右了,因为left值不能再加了,那么拖到底部,同理我们将top值固定住,就不能再往下拖了,理解吗?
最终的结果就是如下:
//左侧
if(obj.offsetLeft <=0){
  obj.style.left = 0;
};
//右侧
if(obj.offsetLeft >= pWidth - oWidth){
  obj.style.left = pWidth - oWidth + 'px';
};
//上面
if(obj.offsetTop <= 0){
  obj.style.top = 0;
};
//下面
if(obj.offsetTop >= pHeight - oHeight){
  obj.style.top = pHeight - oHeight + 'px';
};
说明:pWidth,pHeight 表示父级元素的宽高(这里是表示相对于父级的宽高限制),oWidth,oHeigt表示拖拽元素的宽高
最后,我将整个拖拽代码整理了一下:
/*
      参数说明:
      元素绝对定位,父级相对定位,如果父级为window,则可以不用
      传一个参数,表示父级为window,物体相对于window范围拖动
      传2个参数,则父级为第二个参数,物体相对于父级范围拖动
      参数为id值
    */
    function drag(obj,parentNode){
      var obj = document.getElementById(obj);
      if(arguments.length == 1){
        var parentNode = window.self;
        var pWidth = parentNode.innerWidth,pHeight = parentNode.innerHeight;
      }else{
        var parentNode = document.getElementById(parentNode);
        var pWidth = parentNode.offsetWidth,pHeight = parentNode.offsetHeight;
      }
      obj.onmousedown = function(ev){
        var ev = ev || event;
        var disX = ev.clientX - this.offsetLeft,disY = ev.clientY - this.offsetTop;
        var oWidth = obj.offsetWidth,oHeight = obj.offsetHeight;

        //阻止冒泡时间
        ev.stopPropagation ? ev.stopPropagation() : ev.cancelBubble = true;


        document.onmousemove = function(ev){
          var ev = ev || event;
          obj.style.left = ev.clientX - disX + 'px';
          obj.style.top = ev.clientY - disY + 'px';

          //左侧
          if(obj.offsetLeft <=0){
            obj.style.left = 0;
          };
          //右侧
          if(obj.offsetLeft >= pWidth - oWidth){
            obj.style.left = pWidth - oWidth + 'px';
          };
          //上面
          if(obj.offsetTop <= 0){
            obj.style.top = 0;
          };
          //下面
          if(obj.offsetTop >= pHeight - oHeight){
            obj.style.top = pHeight - oHeight + 'px';
          };
        };
        document.onmouseup = function(ev){
          var ev = ev || event;
          document.onmousemove = document.onmouseup = null;
        };
      }

    }
说明:我这里处理的效果是,如果传一个参数,表示相对的对象是window对象,如果传2个参数,第一个是拖拽对象,第二个为相对父级
开篇就说了,搜房网的那个图片拖拽效果是我的一个心结,我写了一个类似的效果,供大家参考,因为自己没有买服务器,所以效果我就不展示了,直接把代码贴出来,供大家参考:
css:
<style>
.box{
  width:600px;
  height:400px;
  margin:50px auto;
  position:relative;
  overflow:hidden;
}
#box{
  width:1000px;
  height:800px;
  position:absolute;
  left:50%;
  top:50%;
  margin:-400px 0 0 -500px;
}
#pic{ width:800px; height:600px; background:url(images/pic1.jpg) no-repeat; position:absolute; left:100px; top:100px; }
#pic:hover{
  cursor:move;
}
</style>
html:
<div class="box">
    <div id="box">
      <div id="pic"></div>
    </div>
  </div>
javascript:
window.onload = function(){

    drag("pic","box");
    function drag(obj,parentNode){
      var obj = document.getElementById(obj);
      if(arguments.length == 1){
        var parentNode = window.self;
        var pWidth = parentNode.innerWidth,pHeight = parentNode.innerHeight;
      }else{
        var parentNode = document.getElementById(parentNode);
        var pWidth = parentNode.offsetWidth,pHeight = parentNode.offsetHeight;
      }
      obj.onmousedown = function(ev){
        var ev = ev || event;
        var disX = ev.clientX - this.offsetLeft,disY = ev.clientY - this.offsetTop;
        var oWidth = obj.offsetWidth,oHeight = obj.offsetHeight;

        //阻止冒泡时间
        ev.stopPropagation ? ev.stopPropagation() : ev.cancelBubble = true;


        document.onmousemove = function(ev){
          var ev = ev || event;
          obj.style.left = ev.clientX - disX + 'px';
          obj.style.top = ev.clientY - disY + 'px';

          //左侧
          if(obj.offsetLeft <=0){
            obj.style.left = 0;
          };
          //右侧
          if(obj.offsetLeft >= pWidth - oWidth){
            obj.style.left = pWidth - oWidth + 'px';
          };
          //上面
          if(obj.offsetTop <= 0){
            obj.style.top = 0;
          };
          //下面
          if(obj.offsetTop >= pHeight - oHeight){
            obj.style.top = pHeight - oHeight + 'px';
          };
        };
        document.onmouseup = function(ev){
          var ev = ev || event;
          document.onmousemove = document.onmouseup = null;
        };
      }

    }


  }
效果完全是用的那个封装代码块,引用起来也挺方便,有人会问了,你这用的id获取DOM元素,一个页面只能用一次啊,如果页面多次使用呢,有道理,解决方案之一,那就命名不同的id呗,又不犯法,方案二,获取id的地方改成获取class,但是要注意的是,getElementsByClassName是获取的class集合,需要改写一下,这里我就不写了,有兴趣的同学自行改写一下,好了,到这里真的结束了!

 JavaScript in Action: Real-World Examples and ProjectsApr 19, 2025 am 12:13 AM
JavaScript's application in the real world includes front-end and back-end development. 1) Display front-end applications by building a TODO list application, involving DOM operations and event processing. 2) Build RESTfulAPI through Node.js and Express to demonstrate back-end applications.
 JavaScript and the Web: Core Functionality and Use CasesApr 18, 2025 am 12:19 AM
The main uses of JavaScript in web development include client interaction, form verification and asynchronous communication. 1) Dynamic content update and user interaction through DOM operations; 2) Client verification is carried out before the user submits data to improve the user experience; 3) Refreshless communication with the server is achieved through AJAX technology.
 Understanding the JavaScript Engine: Implementation DetailsApr 17, 2025 am 12:05 AM
Understanding how JavaScript engine works internally is important to developers because it helps write more efficient code and understand performance bottlenecks and optimization strategies. 1) The engine's workflow includes three stages: parsing, compiling and execution; 2) During the execution process, the engine will perform dynamic optimization, such as inline cache and hidden classes; 3) Best practices include avoiding global variables, optimizing loops, using const and lets, and avoiding excessive use of closures.
 Python vs. JavaScript: The Learning Curve and Ease of UseApr 16, 2025 am 12:12 AM
Python is more suitable for beginners, with a smooth learning curve and concise syntax; JavaScript is suitable for front-end development, with a steep learning curve and flexible syntax. 1. Python syntax is intuitive and suitable for data science and back-end development. 2. JavaScript is flexible and widely used in front-end and server-side programming.
 Python vs. JavaScript: Community, Libraries, and ResourcesApr 15, 2025 am 12:16 AM
Python and JavaScript have their own advantages and disadvantages in terms of community, libraries and resources. 1) The Python community is friendly and suitable for beginners, but the front-end development resources are not as rich as JavaScript. 2) Python is powerful in data science and machine learning libraries, while JavaScript is better in front-end development libraries and frameworks. 3) Both have rich learning resources, but Python is suitable for starting with official documents, while JavaScript is better with MDNWebDocs. The choice should be based on project needs and personal interests.
 From C/C to JavaScript: How It All WorksApr 14, 2025 am 12:05 AM
The shift from C/C to JavaScript requires adapting to dynamic typing, garbage collection and asynchronous programming. 1) C/C is a statically typed language that requires manual memory management, while JavaScript is dynamically typed and garbage collection is automatically processed. 2) C/C needs to be compiled into machine code, while JavaScript is an interpreted language. 3) JavaScript introduces concepts such as closures, prototype chains and Promise, which enhances flexibility and asynchronous programming capabilities.
 JavaScript Engines: Comparing ImplementationsApr 13, 2025 am 12:05 AM
Different JavaScript engines have different effects when parsing and executing JavaScript code, because the implementation principles and optimization strategies of each engine differ. 1. Lexical analysis: convert source code into lexical unit. 2. Grammar analysis: Generate an abstract syntax tree. 3. Optimization and compilation: Generate machine code through the JIT compiler. 4. Execute: Run the machine code. V8 engine optimizes through instant compilation and hidden class, SpiderMonkey uses a type inference system, resulting in different performance performance on the same code.
 Beyond the Browser: JavaScript in the Real WorldApr 12, 2025 am 12:06 AM
JavaScript's applications in the real world include server-side programming, mobile application development and Internet of Things control: 1. Server-side programming is realized through Node.js, suitable for high concurrent request processing. 2. Mobile application development is carried out through ReactNative and supports cross-platform deployment. 3. Used for IoT device control through Johnny-Five library, suitable for hardware interaction.


Hot AI Tools

Undresser.AI Undress
AI-powered app for creating realistic nude photos

AI Clothes Remover
Online AI tool for removing clothes from photos.

Undress AI Tool
Undress images for free

Clothoff.io
AI clothes remover

Video Face Swap
Swap faces in any video effortlessly with our completely free AI face swap tool!

Hot Article
Hot Tools

EditPlus Chinese cracked version
Small size, syntax highlighting, does not support code prompt function

PhpStorm Mac version
The latest (2018.2.1) professional PHP integrated development tool

Zend Studio 13.0.1
Powerful PHP integrated development environment

WebStorm Mac version
Useful JavaScript development tools

MantisBT
Mantis is an easy-to-deploy web-based defect tracking tool designed to aid in product defect tracking. It requires PHP, MySQL and a web server. Check out our demo and hosting services.

