
Home >Web Front-end >JS Tutorial >jQuery Learning Lesson 6 Implementing an Ajax TreeView_jquery
jQuery Learning Lesson 6 Implementing an Ajax TreeView_jquery

- WBOYWBOYWBOYWBOYWBOYWBOYWBOYWBOYWBOYWBOYWBOYWBOYWBOriginal
- 2016-05-16 18:27:12968browse
The final effect is a directory file viewer, as shown in the figure: 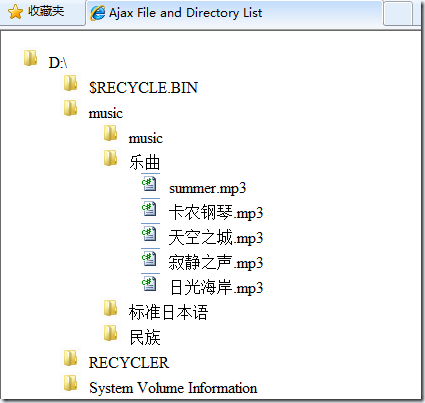
The principle is that when the user clicks on a directory, the path to the directory is sent. To the server, the server returns the file and directory information in this directory. On the server side, define a class as follows to represent the file information to be transferred:
Copy code The code is as follows:
public class FileInformation
{
public string FullPath
{
get; set;
}
public string Name
{
get; set;
}
public string Info
{
get; set;
}
public bool IsFolder
{
get; set;
}
}
where FullPath is the full path of the file, used to obtain its subfolders/files, Name is the name of the file, used for display, and IsFolder is used to distinguish whether this piece of data is a file or a file folder so that it can be displayed with different icons. The last Info is some additional information, which is not used in this example. The C# code to obtain file information in a directory based on a path is very simple, and is posted here by the way:
Copy the code The code is as follows:
public class FileManager
{
public static List
{
List
DirectoryInfo info = new DirectoryInfo(fullpath);
if (info.Exists)
{
foreach (DirectoryInfo d in info.GetDirectories())
{
res.Add (new FileInformation
{
FullPath = d.FullName, Name = d.Name,IsFolder = true,
Info = "Any More Information goes here"
});
}
foreach (FileInfo f in info.GetFiles())
{
res.Add(new FileInformation
{
FullPath = f.FullName,Name = f.Name,IsFolder = false,
Info = "Any More Information goes here"
});
}
}
return res;
}
}
In this example Use JSON data format to transfer this information. So this data needs to be serialized. In .Net 3.5, there is a ready-made class for serializing entity classes into JSON data. The usage method is as follows
Copy the code The code is as follows :
public static string ToJson
{
DataContractJsonSerializer d = new DataContractJsonSerializer(typeof(T));
System.IO.MemoryStream ms = new System.IO.MemoryStream();
d.WriteObject(ms, obj);
string strJSON = System.Text.Encoding.UTF8.GetString(ms.ToArray());
ms.Close ();
return strJSON;
}
If it is .net 2.0, you can find some third-party components and it is not troublesome to write one yourself.
At this point, the main work on the server side has been completed. Create a new Genric Handler file, filelist.ashx, with the following code. Simply respond to the request and output the data:
Copy the code The code is as follows:
public class FileList : IHttpHandler {
public void ProcessRequest (HttpContext context) {
string path = context.Request.QueryString["path"];
string data = JsonHelper.ToJson
context.Response.Write(data);
}
public bool IsReusable {
get {
return false;
}
}
}
Consider the writing of client html code below. The most important are the two events, that is, clicking the mouse to send an ajax request, processing the returned json data to generate html code, and clicking the mouse again to clear the html code. Here, ul li is used to display this treeview. There is an invisible span in li, which contains the complete path of the file. It will be used as a parameter to initiate an ajax request, but it is invisible to the user.
The HTML code is very simple, just 4 lines:
Copy code The code is as follows:
First you need to initialize a root directory, for example D:, the code is as follows:
Copy the code The code is as follows:
$(function() {
$('
$('li').hover(function() {
$(this).css('cursor', 'pointer');
},
function() { $(this).css('cursor', 'default'); });
$('li.folder').toggle(LoadFile, CloseFolder);
});
Construct a li node, add it to ul, then set the style of the mouse action, and finally bind event handlers, LoadFile and CloseFolder to it.
Copy code The code is as follows:
function LoadFile(event) {
if (this == event.target) {
var path = $(this).find('span').html();
var node = $('
- ');
- ').addClass('folder').html(this.Name).append($('').addClass( 'fullpath').html(this.FullPath)));
}
else {
node.append($('- ').addClass('file').html(this .Name).append($('').addClass('fullpath').html(this.FullPath)));
}
});
node.find(' li.folder').toggle(LoadFile, CloseFolder);
});
}
}
- ').addClass('file').html(this .Name).append($('').addClass('fullpath').html(this.FullPath)));
$( this).append(node);
$.getJSON('filelist.ashx', { path: path }, function(data) {
$.each(data, function() {
if ( this.IsFolder) {
node.append($('
First, determine whether the event's target and this are the same object. In order to avoid multiple triggers when clicking on a child node event rises. First use the find and html functions to get the complete path. Construct a ul node and add it to the current li. At this time, ul is empty, and then an ajax request is initiated to obtain server-side data. Generate a li for each piece of data, judge whether it is a directory, generate li with different classes, and add it to the node. Finally, don’t forget to bind event handlers to the newly added nodes as well. The code is relatively simple, and the code for closing the directory node is even simpler,
Copy the code The code is as follows:
function CloseFolder(event) {
if (this == event.target)
$(this).find('ul').remove();
}
This example has now been completed. There are still a few lines of css missing and will not be listed again.
The functions and styles implemented in this example are relatively rough, but it is not difficult to make more extensions and beautifications on this basis. For example, you can add some ready-made animation effects:
Copy code The code is as follows:
function CloseFolder (event) {
if (this == event.target) {
var node = $(this).find('ul');
node.hide('slow', function() { $(this).find('ul').remove(); });
}
}
Hide first, then delete. Similarly, you can hide it immediately after loading and then fade it out.
Statement:
The content of this article is voluntarily contributed by netizens, and the copyright belongs to the original author. This site does not assume corresponding legal responsibility. If you find any content suspected of plagiarism or infringement, please contact admin@php.cn
Previous article:JavaScript object-oriented programming (1) Basics_js object-orientedNext article:JavaScript object-oriented programming (1) Basics_js object-oriented
Related articles
See more- An in-depth analysis of the Bootstrap list group component
- Detailed explanation of JavaScript function currying
- Complete example of JS password generation and strength detection (with demo source code download)
- Angularjs integrates WeChat UI (weui)
- How to quickly switch between Traditional Chinese and Simplified Chinese with JavaScript and the trick for websites to support switching between Simplified and Traditional Chinese_javascript skills