
Home >Web Front-end >JS Tutorial >About js drag and drop upload [A process of drag and drop upload to modify avatar]_javascript skills
About js drag and drop upload [A process of drag and drop upload to modify avatar]_javascript skills

- WBOYWBOYWBOYWBOYWBOYWBOYWBOYWBOYWBOYWBOYWBOYWBOYWBOriginal
- 2016-05-16 18:04:501602browse
Many modern browsers now support drag-and-drop file reading operations, and their advantages will not be repeated again. The front-end time used drag and drop to improve the avatar upload process of the website, and made a summary of the key points and practical experience.
Let’s take a look at the overall view first: 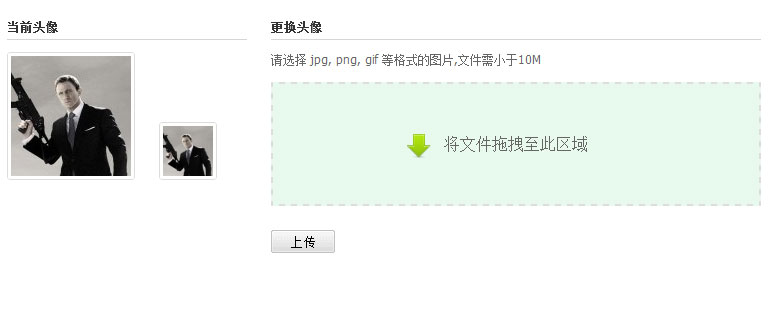
1. The file drag-and-drop acceptance area should be clearly marked and should be as large as possible (due to layout reasons, the drag-and-drop box of this interface is not Not big). You can use dashed box and other styles to attract users to drag and drop files. It is best to have obvious text prompts and icons.
2. In the interactive experience, when a file is dragged into the browser window, the drag and drop area can be used to change the background color, etc. to invite the user for a drop operation.
Implementation code:
doc.bind({
'dragenter':function(e){
$("#brsbox").addClass("dragbrowse");
dropbox.addClass("shine");
return false;
},
'dragleave':function(e){
dropbox.removeClass("shine");
return false;
},
'drop':function(e){
stopdft(e);}
});
dropbox.bind({
'dragenter':function(e){
dropbox.addClass("candrop");
stopdft (e);},
'dragleave':function(e){
dropbox.removeClass("candrop");
stopdft(e);},
'dragover':function(e ){
stopdft(e);},
'drop':function(e){
}
For browsers that do not support drag and drop:
Unfortunately, some browsers do not support drag-and-drop reading of files, including more modern browsers such as IE9. Therefore, we must prepare ordinary file browsing and uploading as a backup solution for browsers that do not support drag and drop.
When drag-and-drop file reading is not supported, the interface is as follows:

The code to implement detection is as follows:
it.detectDragable = function(){
filedrag = !!window.FileReader;
if(!filedrag) return;
$("#avtcnt").addClass('dragable');
Processing when placing files:

When the file is placed in the acceptable area, please note that no matter whether the file you drag and drop on the mouse is single or multiple, the e.dataTransefer.files transferred between the browser and the operating system are always plural. That is, multiple files. This also means that you need to loop through the files carried by the mouse.
The code is as follows:
dropdom.addEventListener ('drop',function(e){
it.handlefile(e.dataTransfer.files);
stopdft(e);},false);
};
it.handlefile = function(files){
var noimg = 0;
for(var i=0; i
if(!file.type.match(/image*/)){
noimg ;
if(noimg ==files.length){
QSL.optTips('Please select jpg, png, gif Pictures in other formats');
return false;
}
continue;
}
var reader = new FileReader();
reader.onload = function(e ){
var img = document.createElement('img');
img.src = reader.result;
setTimeout(function(){
it.imgSize = {
w: img.width,
h:img.height
};
},500);
dropdom.innerHTML="";
img.className ='localimg';
it .imgData = reader.result;
dropdom.appendChild(img);
imagedata.empty().val(reader.result);
dropbox.addClass("droped");
clearner. show();
};
reader.readAsDataURL(file);
}
브라우저로 드래그한 파일 처리
stopdft(e)는 기본적으로 브라우저가 파일을 열지 못하도록 방지하는 것입니다. 대신 스크립트는 끌어서 놓은 파일을 처리합니다.
이 과정에서는 이미지 파일이 필요하므로 e.dataTransfer.files 객체를 조작하여 이미지 유형의 파일을 찾는 것이 편리합니다.
그렇지 않은 경우 메시지가 표시됩니다.
파일 읽기를 위한 키 코드:
var reader = new FileReader();
reader.onload = function(e){
var img = document. ('img');
img.src = reader.result;
reader.readAsDataURL(file)
이 예에서는 이미지의 높이 및 너비 속성을 읽어야 합니다. . 그래서 우리는 다음 작업을 수행했습니다.
setTimeout(function(){
it.imgSize = {
w:img.width,
h:img.height
};
}, 500);
로컬 파일을 읽는 중이지만 이미지가 실제로 읽히는지 확인하는 데 여전히 지연이 있습니다. 그렇지 않으면 일부 브라우저에서는 너비와 높이 값을 얻지 못할 수 있습니다. (다른 쉬운 방법이 있나요? 지적해주세요)
기존 이미지 삭제 및 드래그 영역 재설정:
로컬 이미지를 탐색하고 읽은 후 사용자에게 삭제 및 재설정 옵션을 제공합니다. (물론 직접 올리는 것이 더 쉽습니다)
dropbox.attr("class","dropbox")
.empty()
.text("이 영역으로 파일을 드래그하세요.")
imgData = '' ;
it.imgData = '';
it.imgSize = {w:0,h:0}
picsub.removeClass("업로드 중")
.find("버튼 ").removeAttr("disabled")
.text("Upload");
imagedata.val('');
clearner.hide();
파일을 읽기 위해 드래그 앤 드롭하는 과정은 기본적으로 여기에서 완료됩니다.
끌어서 놓기를 사용하여 로컬 파일을 읽을 때의 다른 장점:
사진 업로드 및 변경의 일반적인 프로세스는 다음과 같습니다. 사진 선택 - 사진 업로드 - 성공적으로 업로드 - 서버가 사진 클라이언트 검색 효과를 반환합니다.
그리고 드래그 앤 드롭을 사용하면 로컬 파일을 읽는 경우 서버에서 사진을 반환하는 단계를 저장하고 reader.result에서 반환된 데이터를 직접 사용할 수 있습니다.
이렇게 하면 서버에서 이미지를 읽는 데 따른 지연이 줄어들고 왕복 데이터 트래픽이 절약됩니다. 따라서 서버측 이미지가 성공적으로 업로드되었고 이미지 미리보기가 로컬 데이터를 검색하는지 확인하세요.
코드:
var t = document.getElementById("target"),
p = document.getElementById("preview") ,
b = browserImage,
s = [],
ts = []
if(url=='data'){
t.src = b.imgData; >p.src = b.imgData;
posImage(b.imgSize.w,b.imgSize.h);
}else{
var cutimg = new Image()
cutimg.onload = function() {
t.src = url;
p.src = url;
posImage(cutimg.width,cutimg.height)
}
cutimg.src = url;
이미지 업로드 성공 후 처리
전체 DEMO 미리보기
(정적 파일은 업로드 성공 후 표시되지 않습니다. (:)데모 스크립트
Related articles
See more- An in-depth analysis of the Bootstrap list group component
- Detailed explanation of JavaScript function currying
- Complete example of JS password generation and strength detection (with demo source code download)
- Angularjs integrates WeChat UI (weui)
- How to quickly switch between Traditional Chinese and Simplified Chinese with JavaScript and the trick for websites to support switching between Simplified and Traditional Chinese_javascript skills