


Step 1: Establish a workspace
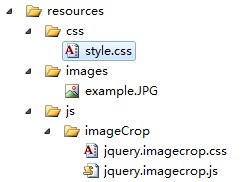
First, we need to create a workspace for our tutorial, establish the file hierarchy as shown in the figure, and create a corresponding empty file.
< ;title>
< ;/head>
[/code]
style.css
* {
margin : 0;
outline : 0;
padding : 0;
}
/*Initialize web page style*/
body {
background-color : #ededed;
color : #646464;
font-family : 'Verdana', 'Geneva', sans-serif;
font-size : 12px;
text-shadow : 0 1px 0 #ffffff;
}
h1 {
font-size : 24px;
font-weight : normal;
margin : 0 0 10px 0;
}
div#wrapper {
margin : 25px 25px 25px 25px;
}
/*Select the div with the id of wrapper*/
div.image-decorator {
-moz-border-radius : 5px 5px 5px 5px;/*Sharpening of boxes for Firefox browsers* /
-moz-box-shadow : 0 0 6px #c8c8c8;/*Border shadow processing of the box for Firefox browser*/
-webkit-border-radius : 5px 5px 5px 5px;/*WebKit Is an open source browser engine*/
-webkit-box-shadow : 0 0 6px #c8c8c8;
background-color : #ffffff;
border : 1px solid #c8c8c8;
border- radius : 5px 5px 5px 5px;
box-shadow : 0 0 6px #c8c8c8;
display : inline-block; /* Render the object as an inline object, but render the object's content as a block object. Adjacent inline objects will be rendered on the same line, allowing spaces. Supported browsers are: Opera, Safari*/
height : 360px;
padding : 5px 5px 5px 5px;
width : 480px;
}
The above we By changing the background color and setting some basic styles, we can make our page more readable.
Step 3: Write a basic jQuery plug-in
Let’s start writing a basic jQuery plug-in. Before writing, if you, the reader, have never had the experience of writing a jQuery plug-in, it is recommended to read the official instructions first. Plug-in tutorial (http://docs.jquery.com/Plugins/Authoring), this is the English version, the Chinese version is not found, the author plans to translate it, so stay tuned.
Open /resources/js/imageCrop/jquery.imagecrop.js and add the js code as shown below
//Generally, please include the plug-in code you write in '(function($) { // Plug-in code here}) (jQuery);'
(function($) {
$.imageCrop = function(object, customOptions) {};
$.fn.imageCrop = function (customOptions) {
//Iterate over each object
/ /Iterate over each object
this.each(function () {
var currentObject = this,
image = new Image();
//When the object is loaded, append ImageCrop cutting function
image.onload = function () {
$.imageCrop(currentObject, customOptions);
};
//Reset the address of the image because sometimes the image is cached Cannot be loaded quickly
image.src = currentObject.src;
});
//Unless your plug-in returns a certain value, the function is usually required to return the 'this' keyword
//This is used to keep programming chained
return this;
};
}) (jQuery);
We have just extended jQuery by adding a new method attribute on the jQuery.fn object. Now we have a basic plugin that iterates over each object and attaches the imageCrop function to it when it's loaded. Noticed that the cached image might not be downloaded quickly, so reset its image address.
Step 4: Add customizable options
With customizable options, users will have more choices and the plug-in will be more flexible. (Note: The following codes are in order)
/ / Encapsulating the plugin's options in a constant object is far better than passing a long list of parameters to pass.
//This allows expansion by default in the plug-in
var defaultOptions = {
allowMove: true,
allowResize: true,
allowSelect: true,
minSelect: [ 0, 0],
outlineOpacity: 0.5,
overlayOpacity: 0.5,
selectionPosition: [0, 0],
selectionWidth: 0,
selectionHeight: 0
};
// Set the options as default options
var options = defaultOptions;
// Then merge it with the customer-customized options
setOptions(customOptions);
Above we define an array containing default options, and then use the setOption function to merge the default options and customized options. Now let us write the merge function body
// Will Default options and customer-customized options are merged
function setOptions(customOptions) {
options = $.extend(options, customOptions);
};
$.extend() The function implements the function of merging two or more objects into the first object.
Options
The following list explains each option in the plugin
allowMove – Specifies whether the selection can be moved (the default value is true.)
allowResize – Specifies whether the selection area can be resized (the default value is true)
allowSelect – Specifies whether the user can resize the selection area (the default value is true)
minSelect – The minimum size of a new selection area (The default size is [0, 0])
outlineOpacity – the transparency of the outline (the default value is 0.5)
overlayOpacity – the transparency of the overlay (the default value is 0.5)
selectionPosition – the selection area Position (default is [0, 0])
selectionWidth – the width of the selection area (the default value is 0)
selectionHeight – the length of the selection area (the default value is 0)
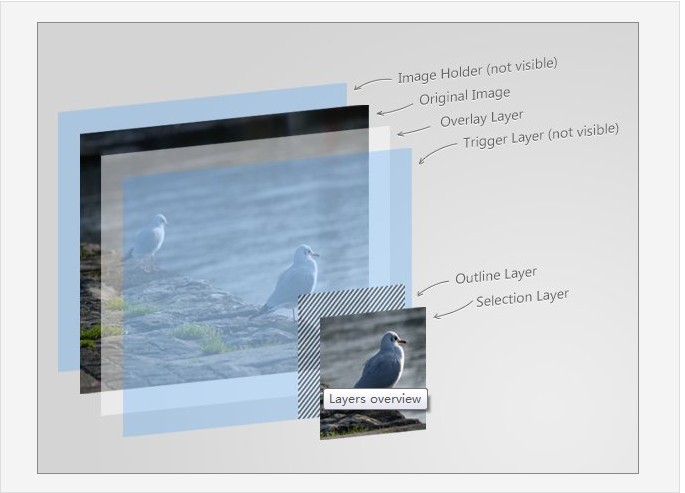
Step 5: Create an image layer
In this step we will change the structure of the document to prepare for the next step: the surface of the plug-in
// Initialize the image layer
var $image = $(object);
// Initialize an image support layer
var $holder = $(' ')
.css({
position: 'relative'
})
.width($image.width())
.height($image. height());
// imag is included in the holder layer. wrap() function
$image.wrap($holder)
.css({
position: 'absolute'
});
As you can see, the containing layer and the image have the same size and are positioned relative to each other. Then we use the .wrap function to make the image contained within it
On top of the image is the overlay:
//Initialize an overlay and place it on top of the image
var $overlay = $('')
.css({
opacity: options.overlayOpacity,
position: 'absolute'
})
.width($image.width())
.height($image.height())
.insertAfter($image);
This layer is also the same size as the image, but is absolutely positioned. We get transparency from options.outlineOpacity. This element has an Id, so we can change its style by changing the css via the plugin. At the end we use the .insertAfter($image) method to place the overlay just below the image layer.
The lower layer is the trigger layer
//Initialize a trigger layer and place it on top of the overlay
var $trigger = $('')
.css({
backgroundColor: '#000000',
opacity: 0,
position: 'absolute'
})
.width($image.width())
.height($image. height())
.insertAfter($overlay);
This time it will not be visible to the user, but it will handle some events.
Next is the border layer and selection layer
//Initialize a border layer and place it on top of the trigger layer
var $outline = $('')
.css ({
opacity: options.outlineOpacity,
position: 'absolute'
})
.insertAfter($trigger);
// Initialize a selection layer and set it Above the border layer
var $selection = $('')
.css({
background: 'url(' $image.attr('src') ') no-repeat',
position: 'absolute'
})
.insertAfter($outline);
.attr() method is used to return a specific The value of the attribute, we use it to get the address of the image and use it as the background of the selection layer
Absolute positioning inside relative positioning
A relatively positioned element can control an absolutely positioned element , so that the absolutely positioned element is inside the relatively positioned element. This is also why the containing layer is relatively positioned, and all its child elements are absolutely positioned
Step 6: Update the interface
First we need to initialize some global variables
//Initialize global variables
var selectionExists,
selectionOffset = [0, 0],
selectionOrigin = [0, 0];
selectionExists will tell us whether there is a selection area, selectionOffset will contain the offset relative to the starting point, selectionOrigin Will contain the starting point of the selection area
The following condition is used for the selection area to exist when the plugin is loaded
//Indicates whether the size of the selection area is larger than the smallest, and then sets whether the selection area exists based on it
if (options.selectionWidth > options. minSelect[0] &&
options.selectionHeight > options.minSelect[1])
selectionExists = true;
else
selectionExists = false;
Now we will call updateInterface to initialize the plug-in. Interface
//Call the 'uploadInterface' function for the first time to initialize the plug-in interface
updateInterface();

 Python vs. JavaScript: Use Cases and Applications ComparedApr 21, 2025 am 12:01 AM
Python is more suitable for data science and automation, while JavaScript is more suitable for front-end and full-stack development. 1. Python performs well in data science and machine learning, using libraries such as NumPy and Pandas for data processing and modeling. 2. Python is concise and efficient in automation and scripting. 3. JavaScript is indispensable in front-end development and is used to build dynamic web pages and single-page applications. 4. JavaScript plays a role in back-end development through Node.js and supports full-stack development.
 The Role of C/C in JavaScript Interpreters and CompilersApr 20, 2025 am 12:01 AM
C and C play a vital role in the JavaScript engine, mainly used to implement interpreters and JIT compilers. 1) C is used to parse JavaScript source code and generate an abstract syntax tree. 2) C is responsible for generating and executing bytecode. 3) C implements the JIT compiler, optimizes and compiles hot-spot code at runtime, and significantly improves the execution efficiency of JavaScript.
 JavaScript in Action: Real-World Examples and ProjectsApr 19, 2025 am 12:13 AM
JavaScript's application in the real world includes front-end and back-end development. 1) Display front-end applications by building a TODO list application, involving DOM operations and event processing. 2) Build RESTfulAPI through Node.js and Express to demonstrate back-end applications.
 JavaScript and the Web: Core Functionality and Use CasesApr 18, 2025 am 12:19 AM
The main uses of JavaScript in web development include client interaction, form verification and asynchronous communication. 1) Dynamic content update and user interaction through DOM operations; 2) Client verification is carried out before the user submits data to improve the user experience; 3) Refreshless communication with the server is achieved through AJAX technology.
 Understanding the JavaScript Engine: Implementation DetailsApr 17, 2025 am 12:05 AM
Understanding how JavaScript engine works internally is important to developers because it helps write more efficient code and understand performance bottlenecks and optimization strategies. 1) The engine's workflow includes three stages: parsing, compiling and execution; 2) During the execution process, the engine will perform dynamic optimization, such as inline cache and hidden classes; 3) Best practices include avoiding global variables, optimizing loops, using const and lets, and avoiding excessive use of closures.
 Python vs. JavaScript: The Learning Curve and Ease of UseApr 16, 2025 am 12:12 AM
Python is more suitable for beginners, with a smooth learning curve and concise syntax; JavaScript is suitable for front-end development, with a steep learning curve and flexible syntax. 1. Python syntax is intuitive and suitable for data science and back-end development. 2. JavaScript is flexible and widely used in front-end and server-side programming.
 Python vs. JavaScript: Community, Libraries, and ResourcesApr 15, 2025 am 12:16 AM
Python and JavaScript have their own advantages and disadvantages in terms of community, libraries and resources. 1) The Python community is friendly and suitable for beginners, but the front-end development resources are not as rich as JavaScript. 2) Python is powerful in data science and machine learning libraries, while JavaScript is better in front-end development libraries and frameworks. 3) Both have rich learning resources, but Python is suitable for starting with official documents, while JavaScript is better with MDNWebDocs. The choice should be based on project needs and personal interests.
 From C/C to JavaScript: How It All WorksApr 14, 2025 am 12:05 AM
The shift from C/C to JavaScript requires adapting to dynamic typing, garbage collection and asynchronous programming. 1) C/C is a statically typed language that requires manual memory management, while JavaScript is dynamically typed and garbage collection is automatically processed. 2) C/C needs to be compiled into machine code, while JavaScript is an interpreted language. 3) JavaScript introduces concepts such as closures, prototype chains and Promise, which enhances flexibility and asynchronous programming capabilities.


Hot AI Tools

Undresser.AI Undress
AI-powered app for creating realistic nude photos

AI Clothes Remover
Online AI tool for removing clothes from photos.

Undress AI Tool
Undress images for free

Clothoff.io
AI clothes remover

Video Face Swap
Swap faces in any video effortlessly with our completely free AI face swap tool!

Hot Article
Hot Tools

MinGW - Minimalist GNU for Windows
This project is in the process of being migrated to osdn.net/projects/mingw, you can continue to follow us there. MinGW: A native Windows port of the GNU Compiler Collection (GCC), freely distributable import libraries and header files for building native Windows applications; includes extensions to the MSVC runtime to support C99 functionality. All MinGW software can run on 64-bit Windows platforms.

SublimeText3 English version
Recommended: Win version, supports code prompts!

SublimeText3 Chinese version
Chinese version, very easy to use

VSCode Windows 64-bit Download
A free and powerful IDE editor launched by Microsoft

DVWA
Damn Vulnerable Web App (DVWA) is a PHP/MySQL web application that is very vulnerable. Its main goals are to be an aid for security professionals to test their skills and tools in a legal environment, to help web developers better understand the process of securing web applications, and to help teachers/students teach/learn in a classroom environment Web application security. The goal of DVWA is to practice some of the most common web vulnerabilities through a simple and straightforward interface, with varying degrees of difficulty. Please note that this software

