Home >Web Front-end >JS Tutorial >Image cropping effect code based on jQuery HttpHandler (applicable to forums, SNS)_jquery
Image cropping effect code based on jQuery HttpHandler (applicable to forums, SNS)_jquery
- WBOYWBOYWBOYWBOYWBOYWBOYWBOYWBOYWBOYWBOYWBOYWBOYWBOriginal
- 2016-05-16 18:02:411224browse
正文:
为了使层次分明及便于阅读, 整个解决方案如下: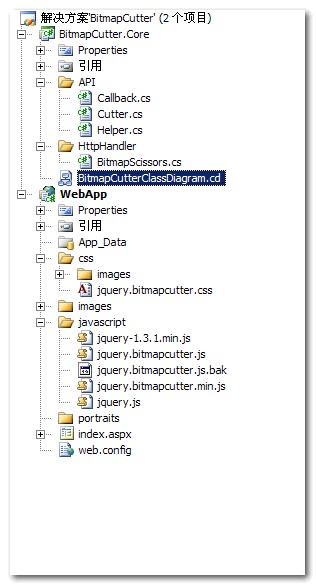
其中BitmapCutter.Core是图片的服务器端处理程序, 类图为:
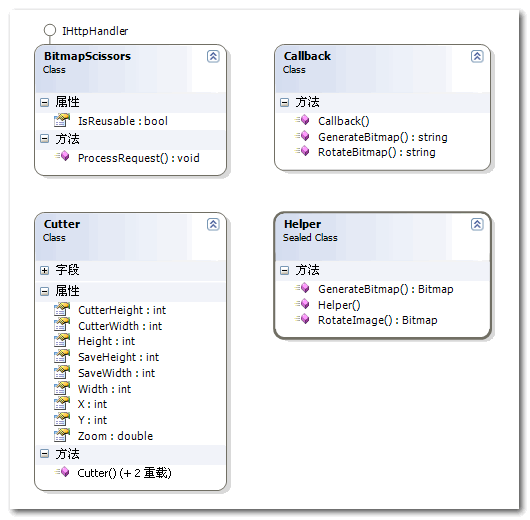
简单说明下, 更多说明可查看源码注释 :
Cutter为裁剪对象, 用于存储客户端通过AJAX提交的数据.
Helper为图片处理类, 包括图片翻转(RotateImage()), 图片裁剪(GenerateBitmap()).
Callback为服务器端图片处理类, 通过使用Cutter封装客户端AJAX提交的数据, 然后调用Helper中的方法来完成图片处理.
BitmapScissors是一个HttpHandler, 通过客户端返回的 'action' 来调用Callback中的方法:
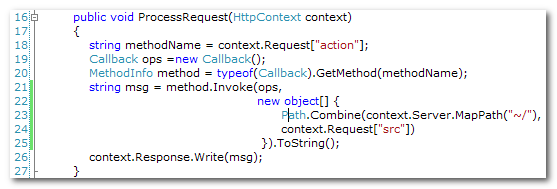
注: 此处用了反射来根据'action'值动态调用Callback中的方法, 如不习惯或认为不妥的请自行更改...
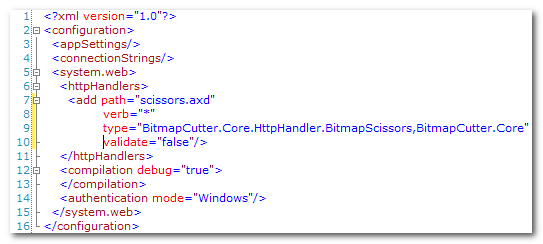
客户端AJAX提交的Url为"scissors.axd", 实际为BitmapScissors类(如修改了服务器端处理程序, 请在Web.config中根据实际进行httpHandler节点配置), 本例为:
Ok, 下面开始介绍重点, $.fn.bitmapcutter插件的实现:
先来上张效果图,标记下bitmapcutter中的Dom对象, 额, 喜欢刚大木的漫迷比较多, 就来张洛克昂的吧:
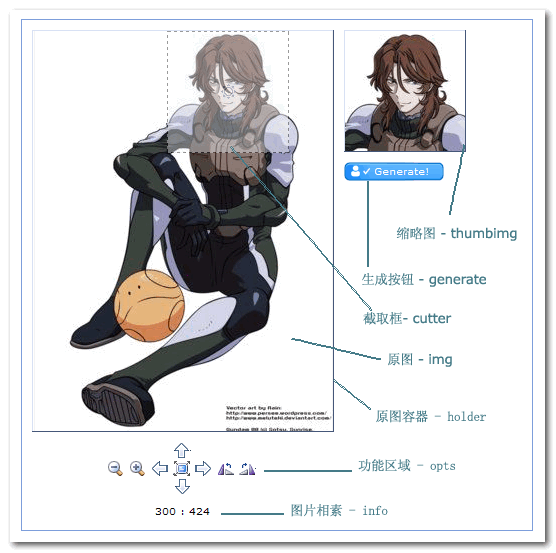
说明:
holder为原图承载容器, 当原图过大时可只显示部分, 通过平移来查看未显示区域的图象, holder为div, 设置position样式为relative, 这样原图img(同为img对象)的position样式为absolute时, 即可通过控制其left, top 值来进行图片的平移显示, 注意holder的overflow必须设置成hidden, 这样img将会被包裹在holder中,超出holder边界的img将会被隐藏.
cutter为截取框, 可进行拖拽以选择自己敢兴趣的截取区域, 拖拽区域在holder容器内, 同时会在thumbimg(原理与holder+img相同)内生成缩略图.
opts - 功能区域, 提供所有可用的功能按钮, 包括: 放大, 缩小, 左移, 右移, 上移, 下移, 还原, 左旋转, 右旋转.
info - 图片相素, 用于显示当前待截取图片的宽高比.
原理:
熟悉css的话应该很容易看出来, 利用相对定位的灵活性和js对css的控制.
插件说明:
由于插件的代码比较多, 这里就拣重点的讲了:
1. 全局变量:

由于在整个裁剪过程中会频繁的使用一些数据和jQuery对象, 所以定义了一个全局变量用来存储.
$originalSize: 原图的相素, 在首次加载原图时获取, 不可改变, 主要是为放大, 缩小和还原提供一对基础数据(长,宽).
$zoomValue: 当前缩放比, 在执行放大或缩小时同步.
$thumbimg: 裁剪区域缩略图的jQuery对象, 在该dom被创建时赋值.
$img: 原图jQuery对象, 在该dom被创建时获取.
$cutter: 裁剪区域, 同样在dom被创建时获取.
2. 插件:
为了方便图象的控制, 同样编写了几个附加插件, 如果同学们在使用中有重名的请设法避免 ;-)
$.fn.f: 用于获取jQuery对象的样式值, 例如width, height, left, top等.
$.fn.loadBitmap: 用于预载入图片以获取正确的相素.
$.fn.scaleBitmap: 用于缩放图片..缩放比率来自全局变量$zoomValue.
$.fn.dragndrop: 我的上一个插件$.fn.Drags的定制版, 主要是为了实现某一dom对象在特定元素内的拖拽.
3. API:
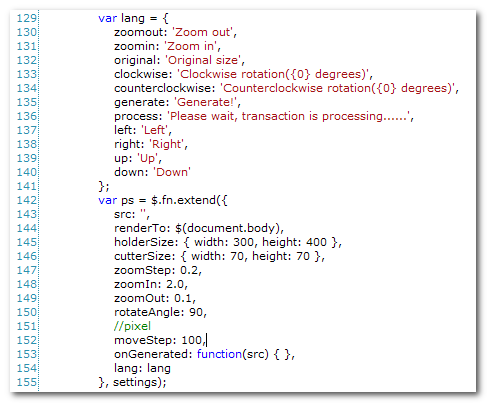
$.fn.bitmapCutter的API包括:
src(String): 待裁剪图片的路径(相对于程序主目录), 默认为空, 必须,
renderTo(String(Selector)|jQuery Object): bitmapCutter插件容器, jQuery对象或选择器, 默认为$(document.body),
holderSize(Object): holder对象的大小, 包括width和height两个值, 默认为{ width: 300, height: 400 },
cutterSize(Object): cutter对象的大小(生成头像大小), 包括width和height两个值, 默认为{ width: 70, height: 70 },
zoomStep(Float): 每次缩放的比率更改幅度, 默认为0.2,
zoomIn(Float): 放大时与原图的最大比, 默认为2.0,
zoomOut(Float): 缩小时于原图的最大比, 默认为0.1,
rotateAngle(Int): 图片翻转角度, 可取值为 90, 180, -90, -180, 默认为 90,
moveStep(Int): 原图平移时的平移象素, 默认为100,
onGenerated(Function): 成功生成头像时触发事件数, bitmapCutter向此方法传递一个参数 'src', 表示新裁剪生成的头像路径. 此属性的默认值为 function(src) { },
lang(Object): 功能区域各按钮的Tooltip, lang的API为:
zoomout(String): 放大, 默认值 'Zoom out',
zoomin(String): 缩小, 默认值'Zoom in',
original(String): 原始大小, 默认值'Original size',
clockwise(String): 顺时针旋转, 默认值'Clockwise rotation({0} degrees)', 需包含 {0} 以便格式化时使用rotateAngle值填充,
counterclockwise(String): 逆时针旋转, 默认值'Counterclockwise rotation({0} degrees)', 需包含 {0} 以便格式化时使用rotateAngle值填充,
generate(String): 生成头像, 默认值'Generate!',
process(String): 生成头像时的提示语, 默认值为'Please wait, transaction is processing......',
left(String): 左平移, 默认值'Left',
right(String): 右平移, 默认值'Right',
up(String): 上移, 默认值'Up',
down(String): 下移, 默认值'Down'
API原型为:
4. 开发技巧:
为了便于代码管理及功能优化, 将功能进行了归纳, 大致可分为:
缩放(zoom): 细分为放大和缩小,
翻转(rotate): 细分为顺时针和逆时针,
移动(move): 细分为上|右|下|左平移.
所以直接编写三个 '基类' (具体实现看源码):
izoom(zv): 提供图片放大或缩小功能, zv为当前缩放比,
irotate(angle): 提供图片旋转功能, angle为当前旋转角度,
imove(direction): 提供原图平移功能, direction为移动方向, 包括'left','up','right','down'.
那么现在需要的就是细分各个功能:
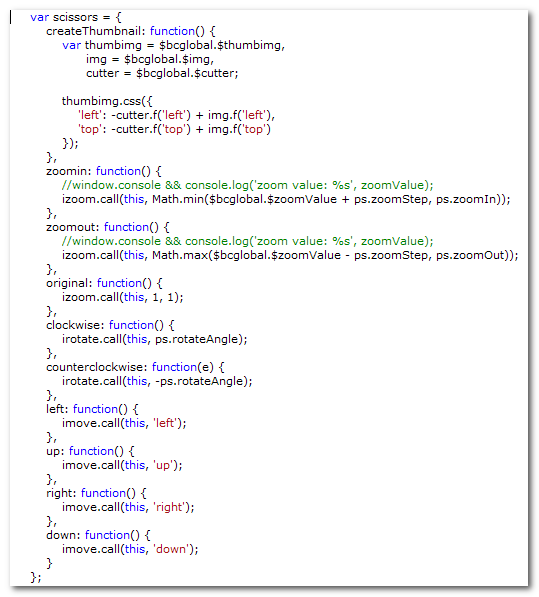
这里我使用了一个对象scissors来封装这些操作, 使用call来 '继承', 当然你也可以使用 '冒充' 或者 '原型链' 这些手段来实现. 这样的话在绑定这些方法的时候使用eval和json就可以很轻松的完成:

看不明白?那么贴上Html树呢?

5. 自问自答
Q: 为什么要在服务器端来实现旋转效果?
A: 为了实现大众化和浏览器兼容, 所以我放弃了滤镜和Canvas.
Q: Photoshop and other image processing software all implement inversion effect when cropping, why not implement it?
A: I think a program should also consider efficiency when taking into account the UI. If it implements inversion, cutter An img also needs to be built into the object to synchronize with thumbimg, so the memory accumulation when rotating the image is very scary.
Q: What are the advantages of such a thing compared to Flash and Siverlight?
A: Well, actually I originally planned to use Flash to do it, but considering the popularity issue (how many .Net developers will be as ?), jQuery HttpHandler is a good choice, with open API and open source code. I think it is much easier and more enjoyable than asking everyone to change a .fla.
Q: What are the disadvantages?
A: As we all know, the browser cache is a double-edged sword. In bitmapCutter, it is very annoying. In order to refresh the image after rotation, you can only add it to the src of img. A stamp (random number? time? whatever..), but this will bring an inevitable result - browser memory accumulation (this threat has been minimized so far;-)), Well..!@#$%
6. Note
No special processing is done for gif type images, so only the first frame will be retrieved and the avatar format will be Png. If necessary, modify the source code yourself.
The tail method of jquery.bitmapcutter.js is to simulate c# string. format, required.
Supports keyboard operation, the arrow keys control panning, - controls zooming in and out, you can delete it from the source code if you don’t like it.
7. Simple example in demo
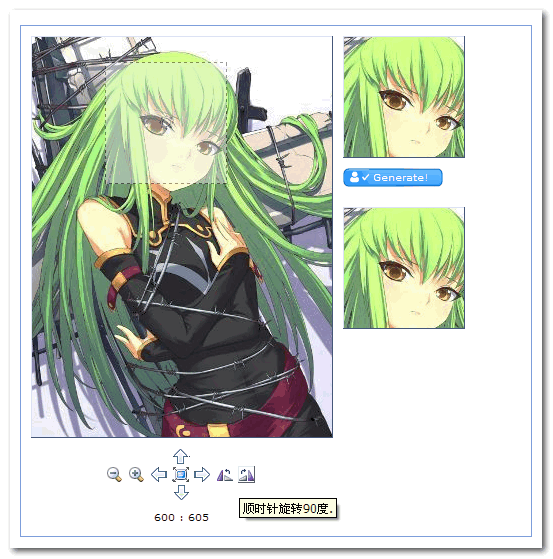
Use a picture of C.C to capture the avatar, set the length and width of the capture frame to 120:120, the container is a div with the id of container, the angle of each rotation is 90, and the prompt of the clockwise rotation function button is 'Rotate clockwise' {0} degree.'
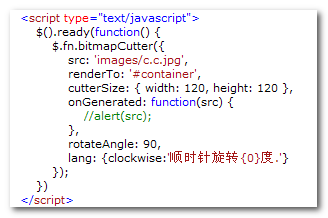
Effect:
8. Source code package (many test pictures):
Related articles
See more- An in-depth analysis of the Bootstrap list group component
- Detailed explanation of JavaScript function currying
- Complete example of JS password generation and strength detection (with demo source code download)
- Angularjs integrates WeChat UI (weui)
- How to quickly switch between Traditional Chinese and Simplified Chinese with JavaScript and the trick for websites to support switching between Simplified and Traditional Chinese_javascript skills

