
Home >Web Front-end >JS Tutorial >Introduction to jWiard, a powerful wizard control based on JQuery_jquery
Introduction to jWiard, a powerful wizard control based on JQuery_jquery

- WBOYWBOYWBOYWBOYWBOYWBOYWBOYWBOYWBOYWBOYWBOYWBOYWBOriginal
- 2016-05-16 18:00:121310browse
I won’t post the code of my current project. I will directly transfer the author’s example because the changes are not big. As long as we make some modifications, it can meet our own needs.
Original address Click hereDownload
Author’s official website It’s just in English. If your English is good, you can read the original text, for fear that I may express it incorrectly.
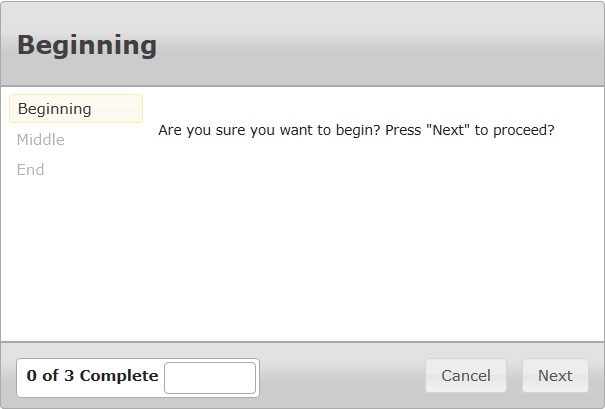
I wonder if children’s shoes use guided development in their daily development? Someone asked, what is guided development? In fact, it is very simple, just let the user complete a step, and then click Next. After completing a step, click Next. This, according to my master, can greatly improve the user experience.
OK, let’s not talk nonsense. Let’s take the simplest example first:
Example 1:
1.1 Of course, since it is JQuery, it is inevitable to reference the JQuery library. You can download relevant class libraries above.
JQuery Class and Style
1.2 Then start writing HTML code, which is also very simple.
HTML Code
Are you sure you want to?
You can still go back. Or press "Next" again to confirm.
< ;div title="End">
Done, click "Finish" to end
You can add relevant divs in the above HTML code, but don’t forget to assign a title value to the outermost one.
1.3 js starts calling.
JS Call
$(".jWizard") .jWizard({
menuEnable: true,
counter: {
enable: true,
progressbar: true
},
effects: { enable: true }
}) ;
OK, so far, the above basic steps have been implemented, and the effect is as follows:
Example 2: Adding an event to next
In the first version I am working on now, at the beginning, there were operations such as uploading files, verifying files, etc., and it was easy to put them directly on the page. Create a button and then trigger its javascript code. This can meet the needs of basic functions, but it also seriously damages the user experience. Because today's users are very lazy and can do less things, but they will never do more. So, if you put a button and the user doesn't want to click it, and then clicks next, then the user you need will not get it, and an error will be reported.
Therefore, we can integrate some operations into Next, which will be very convenient, and the page will become very neat and elegant.
The rest of the code can be basically unchanged. Now I will mainly talk about the event mechanism in js. The code is as follows:
var $w = $("#events-test");
$w.validate({ errorClass: "ui-state-error-text" });
$w
.jWizard({
buttons: {
cancelType: "reset", // The action triggered when the "Cancel" button is clicked. For example, in my project, I jump to the first page and start again.
finishType: "submit" // The action triggered when "finish" is clicked in the last step, that is, submission.
},
// The action triggered when the "Cancel" button is clicked, such as what I did. In the project, it jumps to the first page and starts again.
cancel: function(event, ui) {
$w.jWizard("firstStep");
}, // Triggered when previous is clicked. Action. For example, in my project, when all emails are sent, the user cannot go to the previous page, so I want to disable the previous page function. It is very simple, as follows;
previous: function(event, ui) {
// if(ui.currentStepIndex==7){return false;} That’s it. 7 refers to the sequential number of your div, starting from 0, haha. Just know how to count.
},
next: function(event, ui) {
// The same thing applies here, it is the same as above in controlling the next page. There is a function for uploading data. If not, you cannot let it upload. In this case, you can set a bool value first, and then,
if(fileUploadComplete){ $.get("@Url.Action("VerificationSchema", "Home")", // Children who are learning MVC here should be familiar with it. In fact, it is the method VerificationSchema function (data) { // The data returned after successful acquisition var newData = eval(data); // Because json is used, eval is used for conversion schemaVerification=newData.HasErrors; if(newData.HasErrors) { var listing1 = document.getElementById("listing1"); listing1.innerHTML = "Congruations.Please go on."; } else { document.getElementById("ErrorNotification").innerHTML="Sorry.Your Schema wrong, please check it."; var listing1 = document.getElementById ("listing1"); listing1.innerHTML = newData.Result; } },"json");} else { //This is mainly to prompt alert("Please firstly Upload the Excel File you need" when no data is selected. ); return false; } break; },
finish: function(event, ui) {
alert("Thank you!");
}
})
/**The bindings below are event handlers, they will all be executed before proceeding to the callback*/
/**ui = {
type: "previous|next|first|last|manual",
currentStepIndex: [int],
nextStepIndex: [int]
};*/
// This event handler is specifically used for form validation
.bind("jwizardchangestep", function (event, ui) {
/ / "manual" is always triggered by the user, never jWizard itself
if (ui.type !== "manual") {
var $currentStep = $w.find(".jw-step:eq( " ui.currentStepIndex ")"),
$inputs = $currentStep.find("input:text");
/**I am assuming you have `jquery.validate.js` running in this callback*/
if ($inputs.length > 0 && !$inputs.valid()) {
$currentStep.find("label.error").effect("highlight");
return false;
}
}
} )
// This event handler is for handling custom navigation through the wizard
.bind("jwizardchangestep", function (event, ui) {
// "manual" is always triggered by the user, never jWizard itself
if (ui.type !== "manual") {
// This is actually more important, because this is where you choose the implementation of the corresponding div. You only need to add the javascript code of the corresponding module Just integrate it here.
switch (ui.currentStepIndex) {
// 첫 번째 단계에서 사용자는 이용 약관에 동의해야 합니다.
case 0:
if ($("#agree").is( ":not(:checked)")) {
// 이 효과를 사용하여 사용자에게 피드백을 제공합니다
$("#agree").parent(). effect("pulsate");
거짓을 반환합니다.
}
휴식;
// 세 번째 단계에서 (제로 인덱스) 사용자 이름이 채워지면 openid 단계를 건너뛴다는 의미입니다.
사례 2:
if ($("#username").val() != "") {
// 이벤트 객체에 이 값을 설정함으로써 jWizard에게 nextStepIndex
event.nextStepIndex = 4;를 재정의하도록 지시합니다.
// 최소한 event.preventDefault()를 호출해야 합니다. 이것이 작동하려면
false를 반환하세요.
}
휴식;
}
}
// nextStepIndex를 사용하면 사용자가 특정 단계에서 *시작하려고* 할 때 사용자를 가로챌 수 있습니다.
switch (ui.nextStepIndex) {
// in 이 경우 마법사의 마지막 단계에 대한 요약을 표시합니다.
case 4:
var oFormValues = {
name: $("#name").val(),
email: $("#email").val(),
사용자 이름: $("#username").val(),
openid: 정의되지 않음
};
$("#summary-name").children("td").text(oFormValues.name);
$("#summary-email").children("td").text(oFormValues.email);
if (oFormValues.username != "") {
$("#summary-username").show().children("td").text(oFormValues.username);
$("#summary-openid").hide().children("td").text("");
} else {
var $openid = $w.find("input:radio:checked[name=openid]");
oFormValues.openid = ($openid.length === 1) ? $openid.val() : $("#openid-other").val();
$("#summary-username").hide().children("td").text("");
$("#summary-openid").show().children("td").text(oFormValues.openid);
}
휴식;
}
});
// 사용자가 3단계에서 openid 링크를 클릭하면(제로 인덱스) 마법사가 openid 단계로 이동합니다.
$("#openid").click(function () {
$w.jWizard("changeStep", 3);
false 반환
});
// openid 라디오 버튼이 선택된 경우 `other` 텍스트 상자를 비웁니다.
$w.find("input:radio[name=openid]").change(function (event) {
$("#openid-other").val("")
});
// `other` openid 텍스트 상자를 사용하는 경우 라디오 버튼을 비웁니다.
$("#openid-other").change(function (event) {
if (this.value != "") {
$w.find("input:radio[name=openid]").removeAttr("checked")
}
});
sum,저는 매우 유용합니다.
算上了 以就是我的一点点经验,就不说了,吃饭时间到了,如果有需要的童鞋做开发的时候,如果遇到问题,可以进行共同讨论,呵呵 共同进步嘛。
具体效果에서这里 。
Related articles
See more- An in-depth analysis of the Bootstrap list group component
- Detailed explanation of JavaScript function currying
- Complete example of JS password generation and strength detection (with demo source code download)
- Angularjs integrates WeChat UI (weui)
- How to quickly switch between Traditional Chinese and Simplified Chinese with JavaScript and the trick for websites to support switching between Simplified and Traditional Chinese_javascript skills