Home >Web Front-end >JS Tutorial >Combining JavaScript and DOM to dynamically create table instances_Basic knowledge
Combining JavaScript and DOM to dynamically create table instances_Basic knowledge
- WBOYWBOYWBOYWBOYWBOYWBOYWBOYWBOYWBOYWBOYWBOYWBOYWBOriginal
- 2016-05-16 17:45:501708browse
This article briefly introduces some basic and powerful methods of DOM 1.0 and how to use them in JavaScript. You can learn how to dynamically create, retrieve, control, and delete HTML elements. These DOM methods also apply to XML. All browsers that fully support DOM 1.0 can run the examples in this article well, such as IE5, Firefox, etc.
Overview - Sample1.html
This article introduces DOM through example code. Please start by trying the HTML example below. It uses DOM 1 methods to dynamically create an HTML table from JavaScript. It creates a small table consisting of four cells containing text content. The text content of the cell is: "The cell is the yth row and the xth column", which indicates the number of rows and columns of the cell in the table.
<script> <br>function start() { <br>//Get the body tag<br>var mybody = document.getElementsByTagName("body")[0]; <br><br>// Create a <table> element and a <tbody> element <br>mytable = document.createElement("table"); <br>mytablebody = document.createElement("tbody"); <br><br>//Create all cells<br>for(var j = 0; j < 2; j ) { <BR>// Create a <tr>Element<br>mycurrent_row = document.createElement("tr"); <br>for(var i = 0; i < 2; i ) { <BR>// Create a <td>Element<br>mycurrent_cell = document.createElement("td"); <br>//Create a text node<br>currenttext = document.createTextNode("The cell is the "j"th row, "i"th column"); <br>// Add the created text node to <td> <br>mycurrent_cell.appendChild(currenttext); <br>// Add column <td> to the row<tr> <br>mycurrent_row.appendChild (mycurrent_cell); <br>} <br>// Add row <tr> to <tbody> <br>mytablebody.appendChild(mycurrent_row); <br>} <br>// Add <tbody> to <table> <br>mytable.appendChild(mytablebody); <br>//Add <table> to <body> <br>mybody.appendChild(mytable); <br>// Add the table mytable The border attribute is set to 2 <br>mytable.setAttribute("border", "2"); <br>} <br></script>
Note the order in which we create elements and text nodes :
1. Create the < table > element
2. Create the child element < tbody > of < table >
3. Use a loop to create the child element < of < tbody > ; tr >
4. Use loops to create sub-elements < tb >
for each < tr > respectively. 5. Create text nodes
After creating the < table >, < tbody >, < tr >, < td > elements and text nodes, we add them to their parent nodes in reverse order.
1. Add the created text node to < td >
mycurrent_cell.appendChild(currenttext);
2. Add column < td > to row < tr >
mycurrent_row.appendChild(mycurrent_cell);
3. Add the line < tr > to < tbody >
mytablebody.appendChild(mycurrent_row);
4. Add < tbody > to < table >
mytable.appendChild(mytablebody);
5. Add < table > to < body >
mybody.appendChild(mytable);
Remember this method. You will use this frequently when working with the W3C DOM. First, you build elements from top to bottom; then you add them to parent nodes from bottom to top.
This is the HTML generated by the JavaScript code:
...
| The cell is row 0, column 0 | The cell is row 0 Row 0, column 1 |
| The cell is row 1, column 0 | The cell is the Row 1, Column 1 |
...
This is the DOM object tree of the table element and its child elements generated by the code: 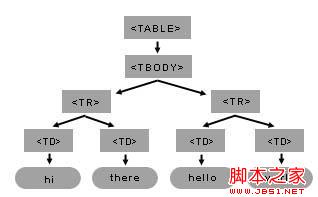
You only need to use a few DOM methods to construct such a table and its child elements. Remember to always keep in mind the model tree of constructs you will create; this will make writing code easier. In the < table > tree in the figure, < table > has a child element < tbody >. < tbody > has two child elements. Each child element of < tbody > (< tr >) has two child elements < td >. Finally, each < td > has one child element: a text node.
Basic DOM methods - Sample2.html
The getElementByTagName method applies to documents and elements, so the document root object has the same getElementByTagName method as all element objects. You can use element.getElementsByTagName(tagname) to get a list of all child elements of an element, selecting them using the tag name.
element.getElementsByTagName returns a list of child elements with a specific tag name. You can get an element from this list of child elements by calling the item method (passing it an index parameter). Please note that the index of the first child element of the list is 0. The next topic continues the previous Table example. The following example is simpler and shows some basic methods:
<script> <br>function start() { <br>// Get a list containing all body elements (there will be only one) <br>// Then select the first element in the list <br>myBody = document.getElementsByTagName("body")[0]; <br><br>//Get all p elements in the body element <br>myBodyElements = myBody.getElementsByTagName("p"); <br><br>//Get the second element of the p element list (index from 0 start) <br>myP = myBodyElements[1]; <br>} <br></script>
hi
hello
In this example, we set the myP variable to the DOM object representing the second p element in the body.
1. Get a list containing all body elements
myBody = document.getElementsByTagName("body")[0];
Because a valid html document has only one body element, this list has only one item. We get it by picking the first element of the list using [0].
2. Get all p elements in the blog sub-element
myBodyElements = myBody.getElementsByTagName("p");
3. Select the second item in the p element list
myP = myBodyElements[1];
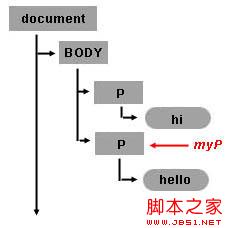
Once you obtain the DOM object of an html element, you can set its properties. For example, if you want to set the style background color attribute, you only need to add:
myP.style.background = "rgb(255,0,0)";
Use document.createTextNode("..") to create a text node
Use the document object to call the createTextNode method to create your text node. You just need to enter the text content. The return value is an object representing this text node.
myTextNode = document.createTextNode("world");
The above code creates a TEXT_NODE type (text block) node whose text data is "word", and the variable myTextNode points to this node object. You need to set this text node to the byte point of other node elements to insert this text into your html page.
Insert elements using appendChild(..)
So, by calling myP.appendChild([node_element]), you set this text node to the byte point of the second p element.
myP.appendChild(myTextNode);
Test this example and notice that the words "hello" and "world" are joined together: "helloworld". So when you see the html page, the two text nodes hello and world appear to be one node, but in fact there are two nodes in this document model. The second node is a new TEXT_NODE type node and is the second byte point of the second p tag. The image below shows the text node just created in the document tree. 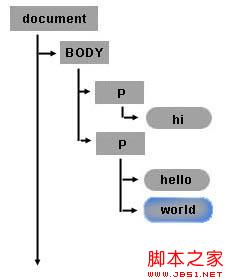
createTextNode and appendChild are a simple way to add space between hello and world. It is important to note that the appendChild method will be added after the last child node, just like world is added after hello. So if you want to add a text node between hello and world you need to use the insertBefore method instead of appendChild.
Create new elements using the document object and the createElement(..) method
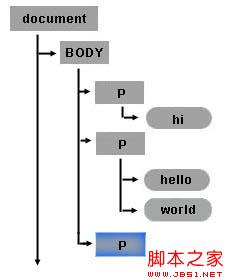
You can use the createElement method to create a new HTML element or any other element you want. For example, if you want to add a byte point to the < body > element < p > element, you can use myBody in the previous example to add a new element node. To create a node just call document.createElement("tagname"). For example:
myNewPTAGnode = document.createElement("p");
myBody.appendChild(myNewPTAGnode);
Use the removeChild(..) method to delete nodes
Each node can be deleted. The following line of code deletes the text node containing the word world in myP (the second < p > element).
myP.removeChild(myTextNode);
Finally you can add the text node myTextNode containing the word world to the newly created < p > element:
myNewPTAGnode.appendChild(myTextNode);
The modified object tree finally looks like this: 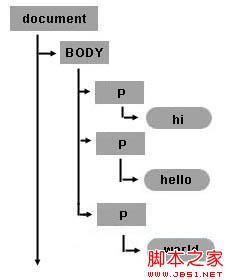
Dynamicly create a table (back to Sample1.html)
The rest of the article Will return to Sample1.html. The following figure shows the object tree structure of the table created in the example.
Review the HTML table structure
Create element nodes and add them to the document tree
The basics of creating the table in sample1.html Steps:
There is a new line of code at the end of the start function, which uses another DOM method setAttribute to set the border attribute of the table. The setAttribute method has two parameters: attribute name and attribute value. You can set any attribute of any element using the setAttribute method.
<script> <br>function start() { <br> // Get body <br>var mybody = document.getElementsByTagName("body")[0]; <br><br>// Create <table> and <tbody> elements <br>mytable = document.createElement( "table"); <br>mytablebody = document.createElement("tbody"); <br><br>//Create all cells<br>for(var j = 0; j < 2; j ) { <BR>// Create a <tr> element <br>mycurrent_row = document.createElement("tr"); <br><br>for(var i = 0; i < 2; i ) { <br> // Create a <td> element <br>mycurrent_cell = document.createElement("td"); <br>// Create a text node<br>currenttext = document.createTextNode("The cell is the "j" row , "i" column"); <br>// Add the created text node to the <td> element <br>mycurrent_cell.appendChild(currenttext); <br>// Add <td> to the < tr>Row<br>mycurrent_row.appendChild(mycurrent_cell); <br>} <br>// Add <tr>line to <tbody> <br>mytablebody.appendChild(mycurrent_row); <br>} <br><br>// Add <tbody> to <table> <br>mytable.appendChild(mytablebody); <br>// Add <table> to <body> <br>mybody.appendChild( mytable); <br>// Set the border attribute of mytable to 2; <br>mytable.setAttribute("border","2"); <br>} <br></script>
< /head>
DOM and CSS processing tables
Getting a text node from the table This example introduces two new DOM properties. First use the childNodes attribute to get the byte point list of mycel. This childNodes list contains all byte nodes, regardless of their name and type. Like the getElementsByTagName method, it returns a list of byte points, use [ x ] to get the desired byte point item. This example stores myceltext as the text node in the second cell of the second row of the table. Finally, it creates a new text node containing the data attribute of myceltext and makes it a child of the < body > element, showing the final result of this example.
If your object is a text node, you can use the data attribute to get its content
Copy the code
// mycel The first item in the byte point list
myceltext=mycel.childNodes[0];
//The content of currenttext is the data of myceltext
currenttext=document.createTextNode(myceltext.data);
mybody.appendChild(currenttext);
Get an attribute value
There is a cell at the end of sample1 that uses the setAttribute method of the mytable object . This cell is used to set the border attribute of this table. Use the getAttribute method to get this attribute:
mytable.getAttribute("border");
Hide columns by changing the style attribute
When you use a JavaScript variable to point to an object, you can immediately set its style attribute. The following code is a modification of sample1.html. The cells in the second column are hidden, and the background of the cells in the first column is changed to red. Note that the style attribute is set directly.
Copy code
Related articles
See more- An in-depth analysis of the Bootstrap list group component
- Detailed explanation of JavaScript function currying
- Complete example of JS password generation and strength detection (with demo source code download)
- Angularjs integrates WeChat UI (weui)
- How to quickly switch between Traditional Chinese and Simplified Chinese with JavaScript and the trick for websites to support switching between Simplified and Traditional Chinese_javascript skills

