


LUKS, which stands for Linux Unified Key Setup, is a robust disk encryption method used by the Linux Kernel. It is implemented using the cryptsetup package. The cryptsetup command-line tool encrypts a volume disk in real-time using a symmetric encryption key derived from a passphrase that must be entered every time a volume, partition, or entire disk (including a USB stick) is mounted in the filesystem hierarchy. It employs the aes-cbc-essiv:sha256 cipher for encryption.
LUKS is highly recommended for encrypting entire block devices such as hard disks, USB sticks, flash disks, partitions, and volume groups on Linux systems. It is particularly useful for securing removable storage media, laptop hard drives, or Linux swap files, though it is not advised for file-level encryption.
NTFS, or New Technology File System, is a proprietary file system developed by Microsoft.
Ubuntu 24.04 offers full support for LUKS encryption and also provides native support for NTFS for Windows systems through the ntfs-3g package.
To illustrate this, I have added a new hard disk to an Ubuntu 24.04 system (identified as /dev/vdb), which will be divided into two partitions:
- The first partition (
/dev/vdb1- primary) will be used for LUKS encryption. - The second partition (
/dev/vdb2- extended) will be formatted as NTFS for compatibility with both Linux and Windows systems.
These partitions will be set to mount automatically on Ubuntu 24.04 after a reboot.
Step 1: Create Disk Partitions
1. Once the hard disk is physically connected to your machine, use the ls command to list all /dev devices (the new disk will be /dev/vdb) or check the newly added HDD with the fdisk command.
<code>ls /dev/vd*
sudo fdisk -l /dev/vdb</code>

Since no filesystem has been written yet, the disk does not contain a valid partition table.
2. Next, use the cfdisk disk utility to partition the hard disk into two parts. This utility provides a text-based interface for disk partitioning.
<code>sudo cfdisk /dev/vdb</code>
If you are using cfdisk for the first time on this disk, you may need to select a partition table type (e.g., MBR for older systems or GPT for newer systems).

3. The cfdisk utility will open in interactive mode. Select the "Free Space" on your hard disk and navigate to the "New" option using the left/right arrow keys.

4. Choose the partition type (Primary or Extended) if prompted and set the size of the partition (in MB or GB) to create the first partition.

5. After creating the first partition, select "Free Space" again and choose "New" to create the second partition.

6. Choose the partition type (Primary or Extended) if prompted and set the size of the partition (in MB or GB) to create the second partition.

7. After reviewing and verifying the partitions, select "Write" to confirm and save the partitions.

8. Select "Quit" to exit the cfdisk utility.

Congratulations! Your partitions have been successfully created and are now ready to be formatted and used.
Step 2: Format New Partitions
9. To verify the disk's Partition Table again, use the fdisk command, which will display detailed partition table information.
<code>sudo fdisk -l /dev/vdb</code>

10. To format the first partition as ext4, use the following command:
<code>sudo mkfs.ext4 /dev/vdb1</code>

11. To format the second partition as NTFS, you need to install ntfs-3g and then format the second partition as NTFS.
<code>sudo apt install ntfs-3g
sudo mkfs.ntfs /dev/vdb2</code>

Step 3: Mount New Partitions
12. To make the partitions available, they must be mounted to mount points on the filesystem.
<code>sudo mkdir /mnt/partition1
sudo mkdir /mnt/partition2</code>
13. Next, mount the partitions to the newly created mount directories.
<code>sudo mount /dev/vdb1 /mnt/partition1
sudo mount /dev/vdb2 /mnt/partition2</code>

14. To enable auto-mounting of partitions, you need to find the UUIDs of the partitions using the blkid command.
<code>sudo blkid /dev/vdb1
sudo blkid /dev/vdb2</code>

15. Next, edit the /etc/fstab file and add entries for the new partitions using their UUIDs.
<code>UUID=7a1e356f-f782-4835-bd1c-5e6d64378869 /mnt/partition1 ext4 defaults 0 2
UUID=0A9AABBB53B3165A /mnt/partition2 ntfs defaults 0 2</code>
Step 4: New Partition Encryption
16. To encrypt partitions using cryptsetup, you need to install the cryptsetup tool as shown below:
<code>sudo apt install cryptsetup [On <b>Debian</b> Based Systems]
sudo dnf install cryptsetup [On <b>RedHat</b> Based Systems]</code>
17. Now, encrypt the first partition on the hard disk by issuing the following command, which will prompt you to confirm and enter a passphrase to unlock the encrypted partition.
<code>sudo cryptsetup luksFormat /dev/vdb1</code>

18. To activate this encrypted partition, it must be initialized with a name entry in the /dev/mapper directory using the cryptsetup package.
<code>sudo cryptsetup open --type luks /dev/vdb1 <strong>crypted_volume</strong></code>
19. Next, format the encrypted partition and mount it.
<code>sudo mkfs.ext4 /dev/mapper/crypted_volume
sudo mkdir /mnt/encrypted1
sudo mount /dev/mapper/crypted_volume /mnt/encrypted1</code>

20. For the second partition, initialize encryption using the following command.
<code>sudo cryptsetup luksFormat /dev/vdb2</code>

21. To activate this second encrypted partition, it must be initialized with a name entry in the /dev/mapper directory using the cryptsetup package.
<code>sudo cryptsetup open --type luks /dev/vdb2 crypted_volume2</code>
22. Next, format the second encrypted partition and mount it.
<code>sudo mkfs.ntfs /dev/mapper/crypted_volume2
sudo mkdir /mnt/encrypted2
sudo mount /dev/mapper/crypted_volume2 /mnt/encrypted2</code>

Step 4: Mount Encrypted Partitions Automatically
23. To automatically unlock and mount the encrypted partitions at boot, you need to update /etc/crypttab and /etc/fstab.
<code>sudo nano /etc/crypttab</code>
24. Use the blkid command to find the UUIDs of the partitions.
<code>sudo blkid /dev/vdb1
sudo blkid /dev/vdb2</code>
25. Then add encrypted partition entries in the /etc/crypttab file.
<code>crypted_volume UUID=d29f57c3-fe00-41d5-8095-d68f7f04823d none luks
crypted_volume2 UUID=1DF9CC677F758914 none luks</code>
26. Similarly, edit /etc/fstab and specify your device name, mount point, filesystem type, and other options.
<code>sudo nano /etc/fstab</code>
Add entries for the filesystems:
<code>/dev/mapper/crypted_volume /mnt/encrypted1 ext4 defaults 0 2
/dev/mapper/crypted_volume2 /mnt/encrypted2 ntfs defaults 0 2</code>
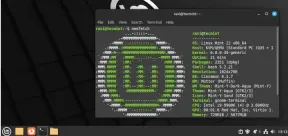
27. Finally, verify that the encrypted partitions are mounted correctly.
<code>df -hT</code>

As you can see, both disk partitions were automatically mounted on the Ubuntu filesystem hierarchy. As a precaution, avoid using automatically encrypted volumes from the fstab file on physically remote servers if you cannot access the reboot sequence to provide your encrypted volume password.
These settings can also be applied to all types of removable media such as USB sticks, flash memory, and external hard disks to protect important, secret, or sensitive data from eavesdropping or theft.
The above is the detailed content of LUKS: Linux Hard Disk Data Encryption with NTFS in Linux. For more information, please follow other related articles on the PHP Chinese website!

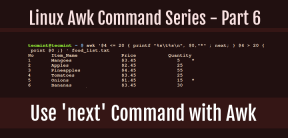 How to Use 'next' Command with Awk in Linux - Part 6May 15, 2025 am 10:43 AM
In this sixth installment of our Awk series, we will explore the next command, which is instrumental in enhancing the efficiency of your script executions by skipping redundant processing steps.What is the next Command?The next command in awk instruc
 How to Efficiently Transfer Files in LinuxMay 15, 2025 am 10:42 AM
Transferring files in Linux systems is a common task that every system administrator should master, especially when it comes to network transmission between local or remote systems. Linux provides two commonly used tools to accomplish this task: SCP (Secure Replication) and Rsync. Both provide a safe and convenient way to transfer files between local or remote machines. This article will explain in detail how to use SCP and Rsync commands to transfer files, including local and remote file transfers. Understand the scp (Secure Copy Protocol) in Linux scp command is a command line program used to securely copy files and directories between two hosts via SSH (Secure Shell), which means that when files are transferred over the Internet, the number of
 10 Most Popular Linux Desktop Environments of All TimeMay 15, 2025 am 10:35 AM
One fascinating feature of Linux, in contrast to Windows and Mac OS X, is its support for a variety of desktop environments. This allows desktop users to select the most suitable and fitting desktop environment based on their computing requirements.A
 How to Install LibreOffice 24.8 in Linux DesktopMay 15, 2025 am 10:15 AM
LibreOffice stands out as a robust and open-source office suite, tailored for Linux, Windows, and Mac platforms. It boasts an array of advanced features for handling word documents, spreadsheets, presentations, drawings, calculations, and mathematica
 How to Work with PDF Files Using ONLYOFFICE Docs in LinuxMay 15, 2025 am 09:58 AM
Linux users who manage PDF files have a wide array of programs at their disposal. Specifically, there are numerous specialized PDF tools designed for various functions.For instance, you might opt to install a PDF viewer for reading files or a PDF edi
 How to Filter Command Output Using Awk and STDINMay 15, 2025 am 09:53 AM
In the earlier segments of the Awk command series, our focus was primarily on reading input from files. However, what if you need to read input from STDIN?In Part 7 of the Awk series, we will explore several examples where you can use the output of o
 Clifm - Lightning-Fast Terminal File Manager for LinuxMay 15, 2025 am 09:45 AM
Clifm stands out as a distinctive and incredibly swift command-line file manager, designed on the foundation of a shell-like interface. This means that users can engage with their file system using commands they are already familiar with.The choice o
 How to Upgrade from Linux Mint 21.3 to Linux Mint 22May 15, 2025 am 09:44 AM
If you prefer not to perform a new installation of Linux Mint 22 Wilma, you have the option to upgrade from a previous version.In this guide, we will detail the process to upgrade from Linux Mint 21.3 (the most recent minor release of the 21.x series


Hot AI Tools

Undresser.AI Undress
AI-powered app for creating realistic nude photos

AI Clothes Remover
Online AI tool for removing clothes from photos.

Undress AI Tool
Undress images for free

Clothoff.io
AI clothes remover

Video Face Swap
Swap faces in any video effortlessly with our completely free AI face swap tool!

Hot Article
Hot Tools

Safe Exam Browser
Safe Exam Browser is a secure browser environment for taking online exams securely. This software turns any computer into a secure workstation. It controls access to any utility and prevents students from using unauthorized resources.

DVWA
Damn Vulnerable Web App (DVWA) is a PHP/MySQL web application that is very vulnerable. Its main goals are to be an aid for security professionals to test their skills and tools in a legal environment, to help web developers better understand the process of securing web applications, and to help teachers/students teach/learn in a classroom environment Web application security. The goal of DVWA is to practice some of the most common web vulnerabilities through a simple and straightforward interface, with varying degrees of difficulty. Please note that this software

VSCode Windows 64-bit Download
A free and powerful IDE editor launched by Microsoft

SublimeText3 Chinese version
Chinese version, very easy to use

SublimeText3 Mac version
God-level code editing software (SublimeText3)

