


In the previous article, we introduced the basics of AI and how it fits into the world of Linux. Now, it’s time to dive deeper and set up your Linux system to start building your first AI model.
Whether you’re a complete beginner or have some experience, this guide will walk you through installing the essential tools you need to get started on Debian-based systems.
System Requirements for Ubuntu 24.04
Before we begin, let’s make sure your system meets the minimum requirements for AI development.
- Operating System: Ubuntu 24.04 LTS (or newer).
- Processor: A 64-bit CPU with at least 2 cores (Intel Core i5 or AMD Ryzen 5 or better recommended for smooth performance).
- RAM: Minimum 4 GB of RAM (8 GB or more recommended for more intensive AI models).
- Storage: At least 10 GB of free disk space (SSD is highly recommended for faster performance).
- Graphics Card (Optional): A dedicated GPU (NVIDIA recommended for deep learning) with at least 4 GB of VRAM if you plan to use frameworks like TensorFlow or PyTorch with GPU acceleration.
Step 1: Install Python on Ubuntu
Python is the most popular programming language for AI development, due to its simplicity, powerful, and huge library of tools and frameworks.
Most Linux systems come with Python pre-installed, but let’s make sure you have the latest version. If Python is installed, you’ll see something like Python 3.x.x.
python3 --version
If Python is not installed, you can easily install it using the package manager.
sudo apt update
sudo apt install python3
Next, you need to install pip (python package manager), which will help you install and manage Python libraries.
sudo apt install python3-pip
Step 2: Install Git on Ubuntu
Git is a version control tool that allows you to track changes in your code and collaborate with others, which is essential for AI development because many AI projects are shared on platforms like GitHub.
sudo apt install git
Verify the installation by typing:
git --version
You should see something like git version 2.x.x.

Step 3: Set Up a Virtual Environment in Ubuntu
A virtual environment helps you manage your projects and their dependencies in isolation, which means you can work on multiple projects without worrying about conflicts between different libraries.
First, make sure you have the python3-venv package installed, which is needed to create a virtual environment.
sudo apt install python3-venv
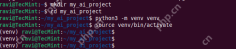
Next, you need to create a new directory for your project and set up a virtual environment:
mkdir my_ai_project
cd my_ai_project
python3 -m venv venv
source venv/bin/activate
After running the above commands, your terminal prompt should change, indicating that you’re now inside the virtual environment.
Step 4: Install AI Libraries on Ubuntu
Now that you have Python, Git, and Virtual Environment set up, it’s time to install the libraries that will help you build AI models.
Some of the most popular libraries for AI are TensorFlow, Keras, and PyTorch.
Install TensorFlow in Ubuntu
TensorFlow is an open-source library developed by Google that is widely used for machine learning and AI projects.
pip3 install tensorflow
Install Keras in Ubuntu
Keras is a high-level neural networks API, written in Python, that runs on top of TensorFlow.
pip3 install keras

Install PyTorch in Ubuntu
PyTorch is another popular AI library, especially for deep learning.
pip3 install torch

Step 5: Building Your First AI Model
Now that your system is ready, let’s build a simple AI model called a neural network using TensorFlow and Keras to classify handwritten digits from the famous MNIST dataset.
Create a new Python file called first_ai_model.py and open it in your favorite text editor.
sudo nano first_ai_model.py
At the top of the file, add the following imports to import the necessary libraries:
import tensorflow as tf
from tensorflow.keras import layers, models
Next, load the MNIST dataset, which contains 60,000 images of handwritten digits (0-9) to train our model.
(train_images, train_labels), (test_images, test_labels) = tf.keras.datasets.mnist.load_data()
Preprocess the data to normalize the images to values between 0 and 1 by dividing by 255.
train_images, test_images = train_images / 255.0, test_images / 255.0
Build the model by creating a simple neural network with one hidden layer.
model = models.Sequential([
    layers.Flatten(input_shape=(28, 28)),
    layers.Dense(128, activation='relu'),
    layers.Dense(10)
])
Compile the model by specifying the optimizer, loss function, and metrics for evaluation.
model.compile(optimizer='adam',
              loss=tf.keras.losses.SparseCategoricalCrossentropy(from_logits=True),
              metrics=['accuracy'])
Train the model using the training data.
model.fit(train_images, train_labels, epochs=5)
Finally, test the model on the test data to see how well it performs.
test_loss, test_acc = model.evaluate(test_images, test_labels)
print('Test accuracy:', test_acc)
Step 6: Run the AI Model
Once you’ve written the code, save the file and run it in your terminal:
python3 first_ai_model.py
The model will begin training, and after 5 epochs, it will display the test accuracy. The higher the accuracy, the better the model’s performance.
Congratulations, you’ve just built your first AI model!
Conclusion
In this guide, we covered how to set up your Linux system for AI development by installing Python, Git, and essential AI libraries like TensorFlow, Keras, and PyTorch.
We also walked through building a simple neural network to classify handwritten digits. With these tools and knowledge, you’re now ready to explore the exciting world of AI on Linux!
Stay tuned for more articles in this series, where we’ll dive deeper into AI development techniques and explore more advanced topics.
The above is the detailed content of How to Set Up Your Linux System for AI Development. For more information, please follow other related articles on the PHP Chinese website!

 How does the patch management process differ between Linux and Windows?May 09, 2025 am 12:01 AM
Linuxusesdecentralized,distribution-specificpackagemanagersforpatchmanagement,whileWindowsemploysacentralizedWindowsUpdatesystem.Linux'sapproachoffersflexibilitybutcanbecomplexacrossdistributions,whereasWindowsprovidesastreamlinedbutlessflexibleupdat
 Top 3 Open Source Virtual Data Room (VDR) for LinuxMay 08, 2025 am 11:35 AM
Virtual Data Rooms (VDRs) offer secure document storage and sharing, ideal for sensitive business information. This article explores three open-source VDR solutions for on-premises deployment on Linux, eliminating the need for cloud-based services a
 Upscayl: An Open-Source Image Upscaling Tool for LinuxMay 08, 2025 am 11:19 AM
Upscayl: Your Free and Open-Source Solution for High-Resolution Images on Linux Linux users who frequently work with images know the frustration of low-resolution pictures. Luckily, Upscayl offers a powerful, free, and open-source solution. This des
 Ghostty - A Feature-Rich Terminal Emulator for LinuxMay 08, 2025 am 11:14 AM
The terminal emulator landscape is evolving rapidly, with developers leveraging modern hardware, GPU acceleration, containerization, and even AI/LLMs to enhance console experiences. Enter Ghostty, a new open-source, cross-platform terminal emulator
 Innotop - A CLI Based top-like Monitor Tool for MySQLMay 08, 2025 am 10:48 AM
Innotop: Powerful MySQL monitoring command line tool Innotop is an excellent command line program, similar to the top command, used to monitor local and remote MySQL servers running under the InnoDB engine. It provides a comprehensive set of features and options to help database administrators (DBAs) track various aspects of MySQL performance, troubleshoot issues and optimize server configuration. Innotop allows you to monitor critical MySQL metrics, such as: MySQL replication status User statistics Query list InnoDB buffer pool InnoDB I/O Statistics Open table Locked table etc… The tool regularly refreshes its data to provide server status
 How to Back Up Linux Data with Restic ToolMay 08, 2025 am 10:34 AM
Restic: Your Comprehensive Guide to Secure Linux Backups Data loss can cripple a Linux system. Accidental deletions, hardware failures, or system corruption necessitate a robust backup strategy. Restic is a leading solution, providing speed, securi
 10 Top Most Popular Linux Distributions in 2024May 08, 2025 am 10:15 AM
Top 10 Most Popular Linux Distributions in 2025 Entering 2025, we are excited to share with Linux enthusiasts the most popular distribution this year so far. DistroWatch has always been the most reliable source of information about open source operating systems, with particular attention to Linux distributions and BSD versions. It continuously collects and presents a lot of information about Linux distributions, making them easier to access. While it doesn't measure the popularity or usage of a distribution very well, DistroWatch remains the most accepted measure of popularity within the Linux community. It uses page click ranking (PHR) statistics to measure the popularity of Linux distributions among website visitors. [You can
 Top 15 Tiling Window Managers for Linux in 2025May 08, 2025 am 10:08 AM
Linux Window Managers: A Comprehensive Guide to the Best Tiling Options Linux window managers orchestrate how application windows behave, quietly managing the visual arrangement of your open programs. This article explores top-tier tiling window man


Hot AI Tools

Undresser.AI Undress
AI-powered app for creating realistic nude photos

AI Clothes Remover
Online AI tool for removing clothes from photos.

Undress AI Tool
Undress images for free

Clothoff.io
AI clothes remover

Video Face Swap
Swap faces in any video effortlessly with our completely free AI face swap tool!

Hot Article
Hot Tools

SublimeText3 Mac version
God-level code editing software (SublimeText3)

SublimeText3 Linux new version
SublimeText3 Linux latest version

ZendStudio 13.5.1 Mac
Powerful PHP integrated development environment

SublimeText3 English version
Recommended: Win version, supports code prompts!

Safe Exam Browser
Safe Exam Browser is a secure browser environment for taking online exams securely. This software turns any computer into a secure workstation. It controls access to any utility and prevents students from using unauthorized resources.

