


Maximize Your Barn in Schedule 1: A Guide to Efficient Drug Production
Schedule 1 presents a unique opportunity to establish a thriving drug empire in Hyland Point. The barn, with its expansive space, offers the ideal headquarters, but optimizing its layout requires careful planning. This guide details an efficient barn setup for maximum production and minimal wasted space.

Optimal Barn Equipment Layout:
The following equipment list ensures high-quality, abundant production. Feel free to adjust based on your specific needs, but this configuration is designed for optimal efficiency.

| Equipment | Quantity | Source Locations |
|---|---|---|
| Bed | 11 | Warehouse, Hardware Store |
| Mixing Stations Mk2 | 8 | Warehouse |
| Packaging Station Mk2 | 2 | Warehouse, Hardware Store |
| Chemistry Station | 4 | Warehouse |
| Lab Oven | 8 | Warehouse |
| Cauldron | 4 | Warehouse |
| Large Storage Shelf | 17 | Hardware Store |
| Drying Rack | 6 | Warehouse |
| Air Pot | 18 | Warehouse |
| Suspension Rack | 18 | Warehouse |
| Full Spectrum Grow Light | 18 | Warehouse |
| Brick Press | 1 | Warehouse |
| Pot Sprinkler (no Botanists) | 12 | Warehouse |
Second Floor (Coca Leaf Cultivation):

The second floor, though smaller, is perfect for coca leaf cultivation. Maximize space by placing six Air Pots, along with Suspension Racks and Grow Lights, on each side. If you choose not to hire botanists, strategically position Pot Sprinklers. A large storage shelf in the center completes the setup. Two beds can be added, ensuring ample space for employee movement.
First Floor (Processing and Production):

The first floor's layout prioritizes workflow efficiency. Begin in the far left corner, placing four beds (two against the wall, two forming a square). Position a Brick Press between the wall-mounted beds. Place eight Mixing Stations Mk2 (four against the wall, four in front). Maintain sufficient walkway space.
Two large storage shelves can fit on the remaining northern wall space. Place two Packaging Stations Mk2 on the western wall, near the entrance. Utilize the southern wall entirely for storage shelves (eight total, plus two additional on the western wall).
Between the pillars, position four Chemistry Stations and four Lab Ovens, with an additional four Lab Ovens facing the opposite direction for easy access.
Employee Allocation and Automation:

Hire ten employees for optimal automation:
- Three Botanists: Manage the 18 Air Pots and six Drying Racks.
- Four Chemists: One for Chemistry Stations, one for Cauldrons, and two for Lab Ovens.
- Three Handlers: Two for Packaging Stations, one for general material handling.
Adjust employee and equipment numbers as needed. This setup provides a solid foundation for end-game success.

The above is the detailed content of Schedule 1: Best Barn Setup. For more information, please follow other related articles on the PHP Chinese website!

 Assassin's Creed Shadows The Corrupt Daikan WalkthroughMay 16, 2025 am 04:51 AM
This guide details the Assassin's Creed Shadows optional quest, "The Corrupt Daikan," providing a step-by-step walkthrough. Location: Omi region Quest Type: The League > Katsuhime > The Corrupt Daikan Unlock: Automatically after comp
 Tears of the Kingdom - Motsusis Shrine Walkthrough - The Legend of Zelda: Tears of the KingdomMay 16, 2025 am 04:50 AM
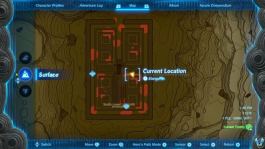
To reach the shrine, you must navigate to the upper section of the labyrinth and descend into a small chamber.Once inside this chamber, proceed to drop down on the western side to locate the shrine.The challenge lies in finding the shrine, which is q
 Tears of the Kingdom - Sinatanika Shrine Walkthrough - The Legend of Zelda: Tears of the KingdomMay 16, 2025 am 04:49 AM
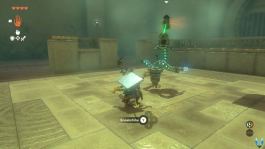
This is a straightforward combat training session focused on Sneakstrike, also known as stealth attacks. To execute a Sneakstrike, you must be in a crouched position and positioned directly behind your target. You will receive a prompt indicating whe
 Tears of the Kingdom - All Eldin Side-Quests - The Legend of Zelda: Tears of the Kingdom WalkthroughMay 16, 2025 am 04:47 AM
The Eldin region, a fiery and mountainous area, is the home of the Gorons and features the imposing Death Mountain at its center. This region is situated in the north-eastern section of the map, positioned to the west of the Akkala region, north of t
 Monster Hunter Wilds: Congalala (Large Monster)May 16, 2025 am 04:46 AM
Confronting the Congalala in Monster Hunter Wilds: A Comprehensive Guide This hefty beast, available for both capture and slaying, presents a unique challenge in Monster Hunter Wilds. Characterized by its pink fur, prominent crest (a male display o
 Best Graphics Settings for The Precinct on PCMay 16, 2025 am 04:45 AM
If you're seeking the ideal settings for The Precinct on your PC, you'll be pleased to know that this game performs smoothly, even on older GPUs. However, you can make some adjustments to enhance either the visuals or the frame rate, depending on you
 Tears of the Kingdom - A Bottled Cry for Help Walkthrough - The Legend of Zelda: Tears of the KingdomMay 16, 2025 am 04:44 AM
Begin your adventure by locating the Bottled Letter on the beach nestled between Hateno Bay and Kitano Bay, just south of the Hateno Research Lab.It appears someone is in a bit of a jam and is reaching out for assistance—anyone's help, really. They'v
 Tears of the Kingdom - A Picture for Dueling Peaks Stable Walkthrough - The Legend of Zelda: Tears of the KingdomMay 16, 2025 am 04:42 AM
You can initiate this quest by examining the empty picture frame located at Dueling Peaks Stable.The task requires us to capture an image of the most stunning sunrise. It appears that the ideal spot for this is at the summit of Tuft Mountain, which l


Hot AI Tools

Undresser.AI Undress
AI-powered app for creating realistic nude photos

AI Clothes Remover
Online AI tool for removing clothes from photos.

Undress AI Tool
Undress images for free

Clothoff.io
AI clothes remover

Video Face Swap
Swap faces in any video effortlessly with our completely free AI face swap tool!

Hot Article
Hot Tools

Atom editor mac version download
The most popular open source editor

Dreamweaver Mac version
Visual web development tools

SublimeText3 Chinese version
Chinese version, very easy to use

Safe Exam Browser
Safe Exam Browser is a secure browser environment for taking online exams securely. This software turns any computer into a secure workstation. It controls access to any utility and prevents students from using unauthorized resources.

SublimeText3 English version
Recommended: Win version, supports code prompts!

