


You might need to repair your Mac disk if your computer won’t start up, apps keep freezing, you can’t open certain documents, or the performance has slowed to a halt. Luckily, Apple includes a handy tool you can use to repair your Mac: Disk Utility.
In this guide, we’ll show you how to use Disk Utility to run First Aid and repair any disks connected to your Mac.
What is Disk Utility First Aid?
Disk Utility comes pre-installed on every Mac and offers a way to manage and repair the various disks you might use: startup disks, storage volumes, and even external drives. Disk Utility can partition, restore, or format different disks.

You can also use Disk Utility to run First Aid, repairing various problems affecting your Mac’s disk. It's one of the key apps for a faster Mac.
These issues could range from corrupted data to formatting issues and bad directory structures. But all you really need to know is that Disk Utility will scan the entire disk to find and repair these issues, which can affect your Mac’s performance if untreated.
As long as your OS X software isn’t too old, you can use Disk Utility to fix your device’s disk issues.
When should you run First Aid on Mac?
You should run Mac’s First Aid tool in Disk Utility when you need to check or repair your disks' health. Below are circumstances that require you to run First Aid on your Mac:
- Your external devices are experiencing issues. For example, they aren’t mounting, reading, or showing up on your computer.
- Your Mac doesn’t switch on.
- Your laptop or apps keep freezing.
- Your device crashes often.
- The error messages you receive point to your drive being the problem.
How to find Disk Utility on Mac
There are several ways to access Disk Utility on your Mac. Use any of the methods below to open Disk Utility:
- To open Disk Utility using the Launchpad, click on the Launchpad icon in the Dock (it’s next to the Finder icon), type Disk Utility in the search bar, and select the Disk Utility icon.
- To open Disk Utility from Finder, click on the Finder icon in the Dock, select Go > Utilities, and double-click the Disk Utility icon. You’ll find Disk Utility in the /Applications/Utilities folder.
- To open Disk Utility in macOS Recovery, boot up your Mac in macOS Recovery, select Disk Utility in the Recovery app window, and click Continue.
How to repair a Mac disk using Disk Utility if the laptop boots
At its essence, disk repair on Mac is as simple as opening the Disk Utility application, selecting a disk, and running First Aid. But before you jump in, you need to take a few other steps to protect yourself from data loss.
Some of these steps involve powering off your Mac, so you might want to print off or load these instructions on a separate device before continuing.
You should also set aside a decent amount of time. Repairing a healthy disk on your Mac only takes about five minutes. But if your disk is damaged or corrupt in any way, carrying out First Aid could take a couple of hours instead.
1. Back up your Mac
Even though you’re repairing the disk on your Mac, if the repair fails, it can actually leave your disk worse off than before you started. For this reason, we strongly urge you to back up all the data on your Mac before starting.
If problems with your disk prevent you from booting up your Mac, you won’t be able to make a backup first. Unfortunately, in this case, you’ll need to rely on any pre-existing Mac backups—if you have any.
2. Open Disk Utility on Mac
After backing up your Mac, your next step is to open Disk Utility. There are two ways to do this: from Finder in the Dock and using the Launchpad, also in the Dock. Follow the guide below to repair the Mac disk using Disk Utility.
2.1 Use Mac’s Finder
As the name suggests, Mac’s Finder feature is the simplest way to access useful tools like Disk Utility.
Here’s how to open Disk Utility from Finder:
- Click on the Finder icon in the Dock and select Go > Utilities.
- Double-click on Disk Utility on the list. You’ll find Disk Utility in the /Applications/Utilities folder.

2.2 Use the Launchpad
Likewise, the Launchpad is a quick way to open your Mac apps from wherever you are on your Mac.
Follow the steps below to open Disk Utility using the Launchpad:
- Click on the Launchpad icon in the Dock (you’ll find it next to the Finder icon), type Disk Utility in the search bar, and press Enter.
- Double-click on the Disk Utility icon.

3. Run Disk Utility on Mac
In Disk Utility, ensure all disks are shown (you can do this by selecting View > Show All Devices in the menu bar). You will see your disks listed to the left of the window. After you select your disk, its information will pop up on the screen. This includes its name and storage information, like how much storage you’ve used and how much is still available. You’re now ready to start repairing your disk.

How to repair a Mac disk using Disk Utility if your laptop can't boot
Is your Mac not booting up? Don’t worry; you can still access and run Disk Utility when this happens. You must boot in Recovery mode on Mac first.
When your laptop can’t boot, you have two options:
- Boot your Mac into Recovery Mode.
- Select your disk and run First Aid.
Let’s take an in-depth look at your options below.
1. Boot your Mac into Recovery Mode
If you need to repair the startup disk on your Mac, you’ll need to boot into Recovery Mode first. This is because you can’t repair the startup disk while your Mac is using it to run macOS.
Booting into Recovery Mode allows you to get around this by using a separate partition to run macOS. Before you run First Aid from Recovery on a Mac, you must first find out if your Mac runs on Apple Silicon, like the M1 chip, or an Intel processor found in older Mac models.
To check this, open the Apple menu in the top-left corner of the screen and select About This Mac. You’ll find it in your Mac’s profile, beneath your Mac model name to the right of the image in the window that appears. It should say either Chip (for Apple Silicon models) or Processor (for Intel models).

How to boot into Recovery Mode on an Apple Silicon Mac:
- Shut down your Mac and wait for it to finish powering off.
- Now restart your Mac by pressing the Power button, but keep holding the button down until you see a page of startup options appear.
- Click Options, then choose to Continue.
- You may be asked to choose a volume to recover. Select it and choose Next.
- If prompted, log in to your user account using an administrator password, then click Next.
How to boot into Recovery Mode on an Intel-powered Mac:
- Shut down your Mac and wait for it to finish powering off.
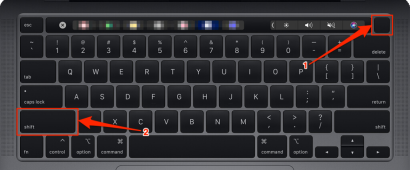
- Restart your Mac by pressing the Power button, then immediately press and hold Cmd R.
- Keep holding both keys until the macOS Recovery screen appears.
- If prompted, use an administrator password to log in to your user account.
If recovery mode doesn't work, there might be a simple fix, but it could also indicate a hardware problem.
2. Select your disk and run First Aid
When repairing a disk on your Mac, you need to start by repairing all the volumes inside it first, then the containers holding those volumes, and finally, you can repair the disk itself.
- From the Recovery Mode screen, click to open Disk Utility. If you can’t see it, go to Utilities > Disk Utility from the menu bar.
- When Disk Utility opens, select View > Show All Devices from the menu bar if it’s available. This will show all the disks, containers, and volumes connected to your Mac in the sidebar on the left. Containers and volumes appear nested inside each disk in the sidebar. It goes Disk > Container > Volume, with each level nested inside the previous one.


Follow these steps to repair the volumes, containers, and disks on your Mac:
- Select a volume, container, or disk from the sidebar in Disk Utility. Start with the bottom volume and work up before moving to the containers and the disk.
- Click the First Aid button at the top of the Disk Utility and choose to Run it. If you can’t see a Run button, click Repair Disk instead. You may need to enter your administrator password.
- When First Aid is complete, click Done and repeat these steps for the next volume, container, or disk.
- When you’ve finished repairing all the disks on your Mac, go to Apple > Restart from the menu bar and restart your Mac.

What to do if Disk Utility can't repair your Mac disk
You’ll see a report explaining its success when the first aid process is finished. Most of the time, you’ll see a big green check and know the repair went well. But on occasion, First Aid might spit out a list of unfixable errors with your Mac disk instead.
Luckily, there are still a few Mac disk repair tricks you can use when this happens:
- Check the connection.
- Format and erase your disk.
- Use a third-party disk repair app.
Let’s check out these options below.
1. Check the connection
You might be unable to repair the disk inside an external drive if your Mac doesn’t have a good connection. This can happen if the cable isn’t pushed in all the way, if there’s fluff in the port, or if there’s damage to the cable, port, or drive.
Shut down your Mac and unplug all the unnecessary accessories, then test the cable and port for your drive using a different device before trying to repair it again. If that fails, try using a different cable, port, or even a different Mac.
2. Format and erase your disk
When First Aid can’t repair a disk in your Mac, you might need to reformat it to get it working again. Formatting a disk erases all the data from it, which is why it’s so important to make a backup before starting this process.
If you’re happy to erase your data, follow this guide to format your disk and reset your Mac. When you’ve done that, restore your backup to get all your data back.
3. Use a third-party disk repair app
There are third-party apps you can use to repair your disk if Disk Utility fails you. Most of these apps come at a premium price, but if it’s between that and losing your data, you might want to give them a go.
Here are some of the most popular disk repair apps available:
- OnyX
- Disk Drill
- Drive Genius
You could also try MacKeeper. It is one of the leading apps for optimizing your Mac and cleaning and maintaining your disk. Its Find & Fix tool thoroughly scans your Mac’s disk and can fix other issues that look like disk problems on the spot. Here’s how to use it:
- Open MacKeeper on your Mac and select the Find & Fix option in the sidebar (it’s the first one on the list).
- Hit the Start Full Scan button at the bottom of the window and give the tool a few minutes to check your device.
- When the scan is finished, click the Fix Items Safely button and enjoy an improved Mac experience.


Are you experiencing issues with your Mac’s disk permissions? Check out our helpful Mac repair permissions guide for more information on how to fix it.
FAQs
How to reset MacBook using Disk Utility
To factory reset your Mac with Disk Utility, start by backing up your Mac. You may also want to unlink your apps, sign out of your iCloud account, and then use Disk Utility. To do this, restart your Mac and hold down the Command R keys when you hear the Mac tone (this tells you that your Mac is rebooting). When the macOS Utilities screen appears, click Disk Utility.
Once in Disk Utility, choose your Mac's system drive, which is usually named Macintosh HD, and click Erase. Choose either APFS or Mac Extended (Journaled) in the Format section. Click the Erase button, confirm your decision if prompted, and then wait for the process to finish. Once it's completed, close Disk Utility and select Reinstall macOS.
Follow the prompts until you get to the Setup Assistant screen. Once you get there, shut down your Mac by pressing the Command Q keys. After using Disk Utility, your Mac will be restored to working order.
Can’t unlock your disk? Learn what to do when Macintosh HD can't be unlocked.
What does First Aid do on Mac?
Mac’s First Aid tool is your device’s answer to any errors on your disks and volumes. Consider it your Mac’s clinic. It helps you check hard drive health and repair any small errors it finds with the directory structure and disk formatting.
If your Mac is freezing, getting stuck, crashing, or failing to turn on, you must use First Aid to resolve the issue. First Aid is also necessary when your external drives aren't showing up, mounting, or readable or when the error messages you get indicate something is wrong with your drive.
How long does First Aid take on Mac?
There is no set time for First Aid to run on Mac. For some users, it takes a few minutes. For others, it takes a couple of hours. It all depends on the health of your Mac. If First Aid runs for hours on end though, contact Apple Support.
Fix your Mac’s disk issues safely and quickly
Experiencing disk issues can be a huge inconvenience. Fortunately, you can save time by repairing your Mac’s disk yourself from the comfort of your home. Use the tips in our guide to repair your disk using Mac’s handy Disk Utility.
As far as maintenance and overall management go, use MacKeeper’s Find & Fix tool to catch any issues early and fix them quickly. The Find & Fix tool searches for minor device issues and helps you fix them on the spot by simply clicking a button.
The above is the detailed content of Mac Disk Utility: How to Repair Disk with First Aid? How to Recover It?. For more information, please follow other related articles on the PHP Chinese website!

 How to Install MacOS Sequoia Public BetaMay 15, 2025 am 10:39 AM
The MacOS Sequoia public beta program is now available, providing Mac users with an early chance to explore the new major MacOS system software update. However, it's important to note that, like all beta versions, MacOS Sequoia public beta may be mor
 How to Run Ubuntu Linux on Apple Silicon MacMay 15, 2025 am 10:37 AM
Interested in running Ubuntu Linux on your Apple Silicon Mac? It's now simpler than ever to run Ubuntu alongside MacOS without the hassle of partitioning, dual booting, or risking your Mac's operating system. Thanks to virtual machine technology, you
 How to See Individual Core CPU Usage on Mac with powermetricsMay 15, 2025 am 10:31 AM
There are multiple methods to track CPU usage on a Mac, with the most popular being Activity Monitor for the graphical interface and htop or top for command line users. While Activity Monitor can display an optional core graph and htop shows CPU core
 chronod on Mac – High CPU Use & Network Access Requests ExplainedMay 15, 2025 am 10:18 AM
Some Mac users occasionally find that the "chronod" process in MacOS either consumes a lot of system resources or requests access to a network connection. Sometimes, chronods are also marked by overly alert antivirus applications. While many people will ignore this situation, there are also curious Mac users who actively explore what specific processes that consume a lot of resources are, or what the intentions are of a process that requires or requires Internet access. So, what is chronod on Mac? Why does it use high CPU and system resources? Why does it require network access? Let's dive into the chronod process to better understand its functionality. What is chronod? The chronod process is
 Security Agent on Mac: What Is It & What Does It Do on MacBook Air/Pro?May 15, 2025 am 10:11 AM
What is Security Agent on MacSecurity Agent on Mac functions as a background process responsible for managing user authentication, system security notifications, and requests for application permissions. It collaborates with macOS's Security Server t
 2 of the Best Hex Editors for Mac: ImHex & Hex FiendMay 15, 2025 am 10:05 AM
Hex editors are specialized software tools designed for viewing and editing hexadecimal data as well as raw binary data within files. These tools are indispensable for programmers, developers, and reverse engineers who need to inspect, debug, and ana
 MacOS Sequoia 15 Beta 4 Available to DownloadMay 15, 2025 am 09:54 AM
Apple has unveiled the fourth beta release of MacOS Sequoia 15 for those engaged in the macOS Sequoia developer beta testing program. Typically, the corresponding build for public beta testers, labeled as macOS Sequoia public beta 2, is released shor
 FaceTime Not Working on Mac? Here's How to Fix ItMay 15, 2025 am 09:49 AM
Apple's FaceTime application is designed to connect Apple users seamlessly, offering features such as dual-camera support on smartphones for enhanced video chat experiences.Occasionally, though, FaceTime might not function as intended. This article d


Hot AI Tools

Undresser.AI Undress
AI-powered app for creating realistic nude photos

AI Clothes Remover
Online AI tool for removing clothes from photos.

Undress AI Tool
Undress images for free

Clothoff.io
AI clothes remover

Video Face Swap
Swap faces in any video effortlessly with our completely free AI face swap tool!

Hot Article
Hot Tools

Safe Exam Browser
Safe Exam Browser is a secure browser environment for taking online exams securely. This software turns any computer into a secure workstation. It controls access to any utility and prevents students from using unauthorized resources.

SublimeText3 English version
Recommended: Win version, supports code prompts!

MinGW - Minimalist GNU for Windows
This project is in the process of being migrated to osdn.net/projects/mingw, you can continue to follow us there. MinGW: A native Windows port of the GNU Compiler Collection (GCC), freely distributable import libraries and header files for building native Windows applications; includes extensions to the MSVC runtime to support C99 functionality. All MinGW software can run on 64-bit Windows platforms.

mPDF
mPDF is a PHP library that can generate PDF files from UTF-8 encoded HTML. The original author, Ian Back, wrote mPDF to output PDF files "on the fly" from his website and handle different languages. It is slower than original scripts like HTML2FPDF and produces larger files when using Unicode fonts, but supports CSS styles etc. and has a lot of enhancements. Supports almost all languages, including RTL (Arabic and Hebrew) and CJK (Chinese, Japanese and Korean). Supports nested block-level elements (such as P, DIV),

Dreamweaver CS6
Visual web development tools

