


Seeing that your account has been disabled in the App Store and iTunes is a huge inconvenience. You won’t be able to download new apps without signing in, and you also can’t update apps already on your device. The latter is especially important, as outdated software can leave you vulnerable to cyberattacks.
Thankfully, you’ll find several solutions when looking for a “your account has been disabled in the App Store and iTunes” fix. From unlocking your Apple ID account to contacting Apple’s support team, I’ll provide a list of ways to get back on track when encountering this issue.
But first let’s discuss the possible reasons why this issue can happen to you:
- Security reason: Apple might lock your ID for security reasons, but you can verify your identity to get back into your profile.
- Wrong choice of browser: You may use either outdated or incompatible version of the browser, which prevents you from loging into your iCloud account.
- Unverified time and date on your device: If you don’t have the correct time and date, your computer might think that someone is trying to remotely access your account.
- Entering incorrect sing-up details: If you forgot your sign-in information, resetting your password can help you log back into your account.
- Content and privacy restrictions: Check your settings on this regard as this can be a reason for limited accessing certain parts of your device, including the App Store.
- Outdated payment methods and unpaid charges: The absence/inability to proceed with regular payment for subscriptions can’t allow you to use the service further, which might result in your account getting disabled.
- Technical glitches: They can also stop your App Store and iTunes from working properly, but you can often fix these by logging out and back into your account.
How to fix “your account has been disabled in the App Store and iTunes”?
The following actions can all help you enable account in App Store again:
- Unlock Apple ID account
- Sign in using a browser
- Verify time and date on your device
- Reset Apple ID password
- Check restrictions
- View payment methods and update them
- Settle any unpaid charges
- Log out and back into the Apple ID
- Contact Apple support.
Unlock Apple ID account
If you enter the wrong password between six and 10 times, your account will be disabled. When this happens, it’s better to leave your profile alone for around 24 hours. If you remember the right password, you can then sign in with your correct details.
How to unlock Apple ID account on iPhone and iPad
To unlock an Apple ID account on your iPhone or iPad, sign in to your account by following these instructions.
- Open the Settings app
- Select Sign into your iPhone at the top of the screen
- Enter your Apple ID login details. If you need to use two-factor authentication, send the code to one of your trusted devices. Then, type the numbers you see from the iPhone or iPad you’re trying to sign into.
How to unlock Apple ID account on Mac
You can unlock your Mac’s Apple ID by following these steps instead.
- Open System Settings
- Go to Sign in at the top of the left-hand toolbar
- Enter your Apple ID login details. Like when logging into your iPhone or iPad, complete the two-factor authentication process if you’re asked to.
Considering that Apple discontinued iTunes on macOS in 2019, you might want to remove iTunes from Mac if you still see the program on your device.
Sign in using a browser
Logging into your Apple ID from a browser can help you get back into your account and, subsequently, to then use your profile with the App Store or iTunes. Here’s how to do it:
- Go to https://icloud.com
- Select Sign In
- If you’ve got an Apple ID on your iPhone, select Continue when your device asks if you want to sign in with it. Otherwise, hit Use a different Apple ID
- Enter your sign-in details. If you need to, you can verify with two-factor authentication.

Note: Signing into your Apple ID from a browser is an identical process on iPhone, iPad, and Mac.
Verify date and time on device
Verifying the time and date on your device can help show that you’re in the correct place, which could halt any potential ideas that a security threat is occurring.
How to verify time and date on iPhone and iPad
- Go to Settings > General > Date & Time
- Toggle Set Automatically to change the time to where you are. Otherwise, if you switch the toggle off, set the time manually and choose the correct time zone.


How to verify time and date on Mac
- Open System Settings and go to General > Date & Time
- Toggle Set time and date automatically on.
If you want to set the time and date manually:
- Toggle Set time and date automatically off
- Click on Set next to Date and time
- Customize the time to whatever you want and hit Set.


Reset Apple ID password
If you forget your password and can’t remember it, you can follow these steps to reset Apple ID password.
How to reset Apple ID password on iPhone and iPad
- Go to Settings and click on the Apple ID option at the top
- Choose the option that says you’ve forgotten your password
- Enter a new password after verifying your identity.
How to reset Apple ID password on Mac
Resetting a password on your Mac is easiest done via your web browser.
- Go to https://iforgot.apple.com
- Enter your Apple ID and complete the required CAPTCHA
- Select Continue
- Confirm your mobile number if you’re asked to, and hit Continue again
- Click on the Reset Apple password notification when asked to. After that, change your password.
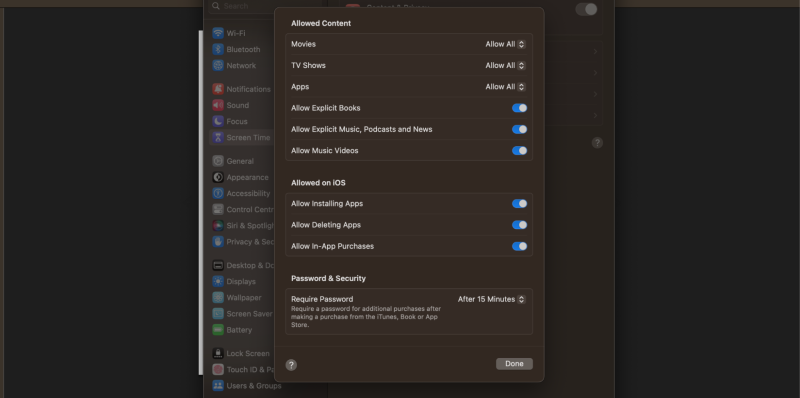
Check restrictions
Checking for restrictions on your device can help you determine whether you need to adjust these, which would allow you to use your Apple ID with the App Store or iTunes.
How to check for restrictions on iPhone and iPad
- Open the Settings app and go to Screen Time > Content & Privacy Restrictions
- Go to the iTunes & App Store purchases tab
- Check to ensure that you’ve allowed Installing Apps, Deleting Apps, and In-app Purchases.

Note: Content & Privacy Restrictions is turned off by default when you have Screen Time switched off.
How to check for restrictions on Mac
You can check for iTunes and App Store restrictions on your Mac by following these instructions instead.
- Open System Settings and go to Screen Time > Content & Privacy
- In Content & Privacy, go to Store Restrictions. Here, you can toggle your App Store requirements however you want.

View payment methods and update them
Updating your payment methods will allow you to make purchases again in the App Store.
How to view and update payment methods in an Apple ID account on iPhone and iPad
- Open the Settings app and click on your Apple ID
- Tap on Payment and Shipping
- Hit Edit if you need to remove your current payment method. To add a new option, select Add Payment Method and enter your related details.
How to view and update payment methods in an Apple ID account on Mac
- Go to the App Store and select your Apple ID in the bottom of the left-hand toolbar
- Tap Account Settings in the top right
- Go to Payment Information > Manage Payments
- Select Edit if you need to remove a banking method. To add something new, go to Add Payment and enter the required details.
Settle any unpaid charges
Settling unpaid charges will allow you to use your App Store or iTunes account as normal again.
The easiest way to settle unpaid charges on your account is to change your payment method to something that works, and you can do that by following the instructions listed in the “View payment methods and update them” section.
Log out and log in to the Apple ID
Logging out and back into your Apple ID will remove any glitches that might have disabled your account in the App Store or iTunes.
How to log out and into your Apple ID on iPhone and iPad
- Open the Settings app and click on your Apple ID at the top of your screen
- Select Sign Out at the bottom of the next window
- Enter your password
- Select Turn Off. Then, hit Sign Out on each following process until you’ve logged out of your account
- Enter your Apple ID details to log in again
- Verify your identity with two-factor authentication if needed.
How to log out and into your Apple ID on Mac
- Open System Settings and go to your Apple ID
- Select Sign Out at the bottom of your screen
- Choose which forms of data you want to keep before signing out
- Go to the Sign In section, which will be where you previously saw your Apple ID
- Enter your Apple ID details and verify with two-factor authentication if you’re asked to.
Considering that Apple no longer uses iTunes, opting to delete iTunes backup is a good idea for protecting yourself against viruses and other threats that might come from outdated software.
Contact Apple support
If none of the above options work and your account is still disabled, you can contact Apple’s support team. The best way to do that is via the Apple Support app.
- Download Apple Support from the App Store
- Sign in with your Apple ID
- Go to the search bar at the top of the homepage
- Mention that your account has been disabled in iTunes and/or the App Store and hit Next
- Apple will then provide a list of options for the best possible solutions. Hit Call or Chat under the Contact section to get in touch directly with Apple’s support team.


Fix the account disabled problem with these steps
When you see that your account has been disabled in the App Store and iTunes, you can try to fix the problem in numerous ways. Some options are simpler, such as signing out and into your account—whereas others will require you to update payment methods and check for restrictions. You can also contact Apple’s support team if needed.
The best way to ensure that you can always access your account is by keeping your software protected from viruses. On your Mac, you can use MacKeeper’s Antivirus solution for real-time updates and alerts.
The above is the detailed content of Your Account Has Been Disabled in the App Store and iTunes? How to Fix. For more information, please follow other related articles on the PHP Chinese website!

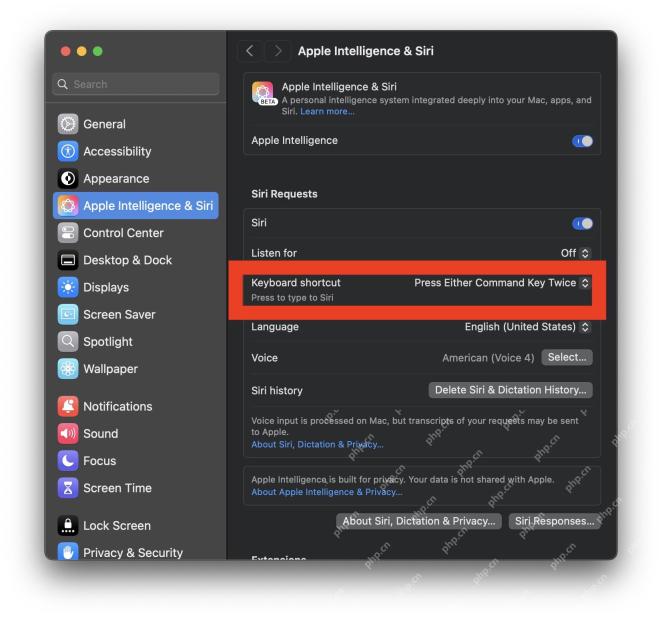 How to Change Keyboard Shortcut for Type to Siri on MacMay 08, 2025 am 11:30 AM
Guide to modify the shortcut keys for the "Type to use Siri" feature on Mac system The "Type to Use Siri" feature on Mac is very useful, especially after Siri has Apple Intelligence features. For Mac users, using "Type to use Siri" may be more convenient than using voice-activated Siri commands, but some Mac users may accidentally trigger this feature by accidentally pressing the launch command sequence. If you want to change the keyboard shortcuts for "Type to Use Siri" on your Mac, you can quickly implement it with simple settings changes, as follows: How to change the keyboard shortcuts for "Type to use Siri" on your Mac Open the Apple menu
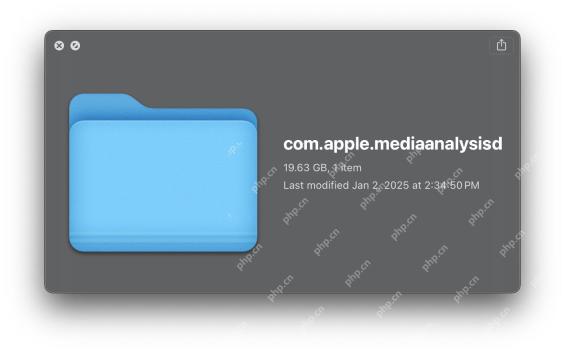 com.apple.mediaanalysisd Cache on Mac Using Tons of Storage? Here’s the FixMay 08, 2025 am 11:17 AM
MacOS Sequoia's com.apple.mediaanalysisd directory cache files occupy a lot of disk space Some MacOS Sequoia users have found that the com.apple.mediaanalysisd directory in MacOS systems consumes a lot of disk space due to cache files. If you find that your Mac disk space is reduced after installing or updating to MacOS Sequoia, an oversized com.apple.mediaanalysisd cache file problem may be the culprit. Many Mac users report that the directory is full of 15GB or more data, some use
 How to Disable Mail Sender Icons on iPhone in iOS 18.2May 08, 2025 am 10:46 AM
The revision of Apple's latest iPhone mail app has caused strong controversy among users, and its new email category features and eye-catching sender avatars are particularly criticized. These large-sized avatars occupy the space of the email interface, not only making it difficult to identify the sender, but also blocks the email subject and preview content, reducing the efficiency of email reading and browsing. Even though the avatar shows contact photos, most emails do not associate photos, and instead are blurred thumbnails, which further affects the beauty of the interface and user experience. Fortunately, just like the annoying email category feature can be disabled, we can also turn off these annoying giant sender avatars and contact photos to restore the classic appearance of the email app and enhance the user experience. How to use the iPhone mail app
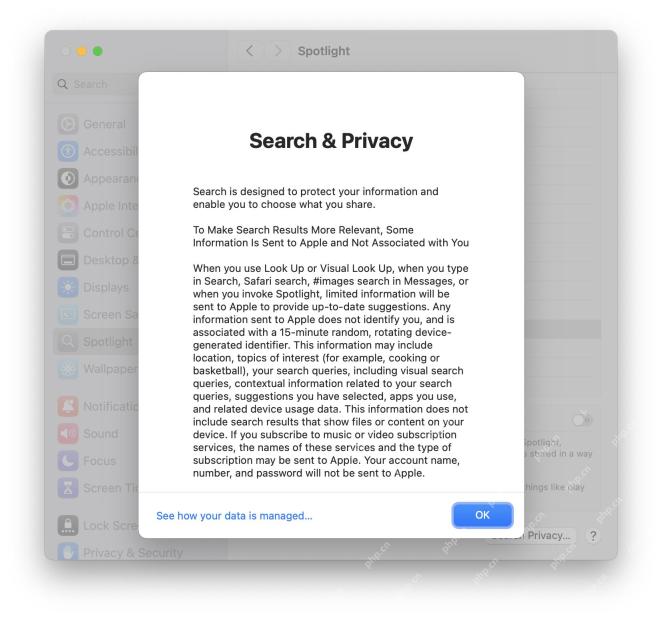 How to Stop Spotlight Search Data on Mac from Being Shared with AppleMay 08, 2025 am 10:38 AM
Protect Mac search privacy: Easily turn off Apple search data sharing By default, search queries you enter in Spotlight, Safari, Siri, Lookup, and #images for Mac will be sent to Apple. While this information is anonymous and will not reveal your identity, Apple also says it is used to improve search results, but many Mac users may not want to share this search information with Apple at all. In addition, privacy-conscious users may find this method of data collection undesirable. Fortunately, you can easily turn off the Help Apple Improve Search settings on your Mac, blocking Safari, Siri, Spotlight,
 MacOS Sonoma 14.7.3 & MacOS Ventura 13.7.3 with Security Updates AvailableMay 08, 2025 am 10:13 AM
Apple released macOS Sonoma 14.7.3 and macOS Ventura 13.7.3 updates for Mac users who are still using these systems. These updates focus on security, are released simultaneously with the newly released macOS Sequoia 15.3 update (for Sequoia users) and are not expected to contain any new features or significant changes. Safari 18.3 is also available as a software update to macOS Ventura and macOS Sonoma users. If your Mac is running a Sequoia system, you will see that the 15.3 update is available, and Son
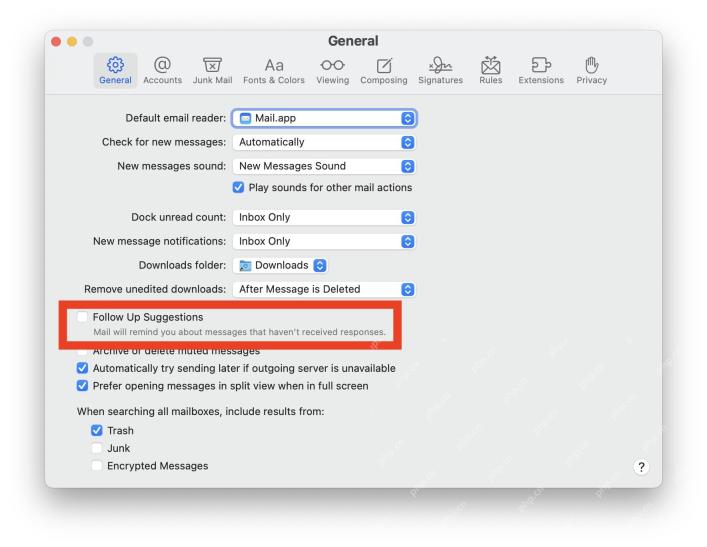 How to Disable “Follow Up” Mail Suggestions on MacMay 08, 2025 am 10:06 AM
The "Please Follow Up" feature guide for turning off Mac mail apps The Mac mail app's "to follow-up" feature is controversial, and it will display email suggestions Apple mail thinks need to follow up on the top of the inbox. The principle is simple: If you don't receive a reply from a specific person or email, the last message you sent will appear at the top of your email inbox with a "To be followed" tag. This feature has confused some users because it puts old messages on top of your inbox, making people mistakenly think that messages are new or have received replies when they aren't. While some users may like this reminder, others may find the “to follow-up” feature redundant or annoying and want to turn it off in the Mac mail app. Next, we will demonstrate how to do it. like
![Why Won't My Mac Update to Ventura? [ How to Fix This Problem?]](https://img.php.cn/upload/article/001/242/473/174666973291965.png?x-oss-process=image/resize,p_40) Why Won't My Mac Update to Ventura? [ How to Fix This Problem?]May 08, 2025 am 10:02 AM
Why Won't My Mac Update to Ventura? [ How to Fix This Problem?]May 08, 2025 am 10:02 AMCommon reasons and solutions for macOS Ventura update failure Have problems upgrading to macOS Ventura? This article will introduce some common reasons and solutions to help you complete the upgrade smoothly. 1. Hardware incompatible If your Mac is older, it may not support macOS Ventura because Apple limits updates to its newer models. This can be frustrating, as hardware incompatibility can only be solved by replacing a new device. 2. Insufficient storage space All macOS updates, including Ventura, require a lot of disk space. If your storage space is almost full, the update process may fail or get stuck. 3. Software
 What to Dо if Yоur MacBook Won't Turn On?May 08, 2025 am 09:58 AM
Your Mac usually boots quickly and smoothly. However, occasional startup issues can occur. This guide helps troubleshoot MacBook Pro, MacBook Air, and iMac startup problems. If your Mac won't power on, follow these steps: Verify Power: Ensure your


Hot AI Tools

Undresser.AI Undress
AI-powered app for creating realistic nude photos

AI Clothes Remover
Online AI tool for removing clothes from photos.

Undress AI Tool
Undress images for free

Clothoff.io
AI clothes remover

Video Face Swap
Swap faces in any video effortlessly with our completely free AI face swap tool!

Hot Article
Hot Tools

MantisBT
Mantis is an easy-to-deploy web-based defect tracking tool designed to aid in product defect tracking. It requires PHP, MySQL and a web server. Check out our demo and hosting services.

MinGW - Minimalist GNU for Windows
This project is in the process of being migrated to osdn.net/projects/mingw, you can continue to follow us there. MinGW: A native Windows port of the GNU Compiler Collection (GCC), freely distributable import libraries and header files for building native Windows applications; includes extensions to the MSVC runtime to support C99 functionality. All MinGW software can run on 64-bit Windows platforms.

SublimeText3 Chinese version
Chinese version, very easy to use

Dreamweaver Mac version
Visual web development tools

Zend Studio 13.0.1
Powerful PHP integrated development environment

