


Say goodbye to the old Mac and welcome a brand new upgrade! My 13-inch 2017 MacBook Air is retired and upgraded to a new phone! As an environmental expert, I started to prepare to reset my old device, only to find that the "Erasheshes" did not support my old Mac. Don't worry, I've found a solution! This article will guide you through the problem of "This Mac does not support erase assistants".
What is erasing assistant?
Erase Assistant is a built-in tool for macOS that completely removes all files, settings, and applications on your hard drive. For older Macs equipped with Apple chips or T2 security chips, it is very practical and can safely erase data without complicated reinstallation of the system.
Start the Eraser Assistant:
- macOS Ventura and later: Apple Menu > System Settings > General > Transfer or Reset > Erase all content and settings.
- macOS Monterey: Apple Menu > System Preferences > Erase all content and settings.
![How to fix “Erase Assistant is not supported on this Mac” [2025]](https://img.php.cn/upload/article/000/000/000/174304825483637.jpg?x-oss-process=image/resize,p_40)
Why doesn't my Mac support erase assistant?
You may follow the steps to look for the "Erase All Content and Settings" button but you can't find it or encounter an error after clicking it. Don't worry, I'm the same!
After research, I found that the Erase Assistant is only available for macOS Monterey or later and is only compatible with specific Mac models:
- Apple chip Mac
- Intel Mac with T2 security chip
Whether my 2017 Intel version of MacBook Air supports Erase Assistant is not sure, so I documented the steps to verify compatibility. Next, I'll show you how to check if your device is compatible.
![How to fix “Erase Assistant is not supported on this Mac” [2025]](https://img.php.cn/upload/article/000/000/000/174304826540488.jpg?x-oss-process=image/resize,p_40)
How to check if Mac supports erase assistant?
First, determine if your Mac is based on Intel or Apple chips (skip this step if you already know).
Click the Apple menu in the upper left corner of the screen and select "About this machine". If the window contains a "chip" project, your Mac is an Apple chip and you can use the Erase Assistant.
![How to fix “Erase Assistant is not supported on this Mac” [2025]](https://img.php.cn/upload/article/000/000/000/174304827492476.jpg?x-oss-process=image/resize,p_40)
If there is no "chip" project, your Mac is Intel version and you need to further check if you have a T2 security chip.
Go to Launch Platform > System Information > Controller or iBridge (depending on your macOS version).
If you see the listed T2 security chip, your Mac has it, you can use the Erase Assistant.
![How to fix “Erase Assistant is not supported on this Mac” [2025]](https://img.php.cn/upload/article/000/000/000/174304827656742.jpg?x-oss-process=image/resize,p_40)
How to fix the problem of "This Mac does not support erase assistant"?
If your Mac doesn't meet the requirements of erasing the assistant, don't worry! You can still use Disk Utility in Recovery Mode to erase your Mac. This may be a little more complicated, but it works just as well.
There are only two requirements to erase the assistant:
- Intel version of Mac with Apple chip or T2 security chip
- macOS Monterey or later
If your Mac doesn't meet these requirements, you can still erase it manually. Next I will explain how to do it.
Step 1. Enter recovery mode
How to operate:
| Intel Mac | Apple chip Mac |
| 1. Click the Apple menu in the upper left corner of the screen > select Restart. 2. Press and hold Command R And press the power button. 3. Release the button when you see the Apple logo or rotate the globe. 4. If you see the lock screen, enter your Mac's password to continue. | 1. Turn off your Mac. 2. Press and hold the power button until “Load Startup Options” appears on the screen. 3. Click "Options" > "Continue". 4. Enter the password for your Mac administrator account. |
For more detailed instructions, read our article on Recovery Mode.
Step 2. Open Disk Tool
After entering recovery mode, use Disk Utility to erase the Mac disk:
- Go to the starter or press Command Space Open the Spotlight search bar.
- Select Disk Utility > Continue.
- In Disk Utility, select your boot disk from the list.
- Click the "Erase" button in the toolbar. In the dialog box, enter the disk name, select APFS as the format, and select "Erase File" if available.
- Click "Erase".
![How to fix “Erase Assistant is not supported on this Mac” [2025]](https://img.php.cn/upload/article/000/000/000/174304827924200.jpg?x-oss-process=image/resize,p_40)
Step 3. Reinstall macOS
Your Mac is now clean. Now it's time to get a new copy of macOS. This step takes at least 30 minutes (although it may take up to 3 hours depending on your Mac model).
How to reinstall macOS:
- After erasing the disk, exit the Disk Utility and return to the macOS Utility window.
- Select "Reinstall macOS".
- Follow the on-screen instructions.
Depending on your Mac model, you will reinstall the latest compatible macOS. Currently, macOS Sonoma is the latest version and is compatible with only the following models (you can find the full list on the Apple Support page):
- iMacs in 2019 and beyond
- Mac Pro in 2019 and beyond
- 2017 iMac Pro
- Mac Studio in 2022 and beyond
- MacBook Air in 2018 and beyond
- Mac Mini in 2018 and beyond
- MacBook Pro in 2018 and beyond
If you read this article after fall 2024 and your Mac is compatible, you will need to reinstall macOS Sequoia.

Other ways to erase your Mac
If you have problems using the standard flow in recovery mode described earlier (for example, your hard drive is corrupted), I should also mention several other ways to wipe your Mac.
Wipe Mac using Internet Recovery Mode
The first alternative is to use Internet recovery mode. It starts directly from the Apple server. You can use it when your hard drive is damaged and needs to be replaced. It installs the original operating system that comes with your Mac.
To enter Internet recovery mode, restart your Mac and hold Command Option R .
Erase the Mac using target disk mode
Another way is to use the target disk mode. Connect your Mac to another Mac using a Thunderbolt or FireWire cable. You can then use the Disk Utility on your second Mac to erase the disk.
If you have an Intel version device and want to enter target disk mode, connect two Macs with a cable > Restart the target Mac and hold it immediately T key.
Summary and extra tips to bring your Mac a new look
After seeing the message "Mac Erased Assistant Not Supported", I went through the process of erasing my Mac, which gave me some key insights and I'm happy to share them with you.
First, don't panic if your Mac doesn't support erase assistant. You can still solve all the problems. Simply start recovery mode, use Disk Utility to erase your Mac, and follow the steps in this guide.
Second, I should mention that it is much easier to prepare to erase your Mac with the help of some excellent third-party tools like Get Backup Pro (for backups) and DiskDrill (for restoring any lost files).
Finally, there is no need to buy all of these apps separately. They are available under a single subscription to Setapp, an application platform (and more than 250 applications for Mac, iOS, and the web). You can prepare your Mac for its new life with Setapp over a 7-day trial.
FAQ:
Why "Erase All Content and Settings" is not showing up on my Mac?
Erase Assistant is not suitable for every Mac. You need an Intel Mac with a special T2 security chip or Apple's newer chip to use it. Additionally, it is only available on macOS Monterey and later (this is another reason to always update the software!)
How to erase a Mac without erasing the assistant?
If you see the message "This Mac does not support erase assistant", don't worry. Use Disk Utility in Recovery Mode.
- Restart your Mac and hold it Command R , until you see the Apple logo.
- In the Recovery window, select Disk Utility.
- Select your main drive, click "Erase", select the format (APFS is usually the best choice), and then click "Erase Files".
Important: Be sure to back up important data before erasing your Mac.
Why doesn't my Mac allow me to erase everything?
To erase everything on your Mac, you need to erase the Assistant, which is a built-in tool. It has two requirements: an Apple chip Mac or an Intel version of Mac with T2 security chip, and a macOS Monterey or higher.
If your Mac does not meet these requirements, erasing the assistant will not be available. However, you can still manually erase your Mac using Disk Utility in Recovery Mode, or completely delete old large files with CleanMyMac.
The above is the detailed content of How to fix 'Erase Assistant is not supported on this Mac” [2025]. For more information, please follow other related articles on the PHP Chinese website!

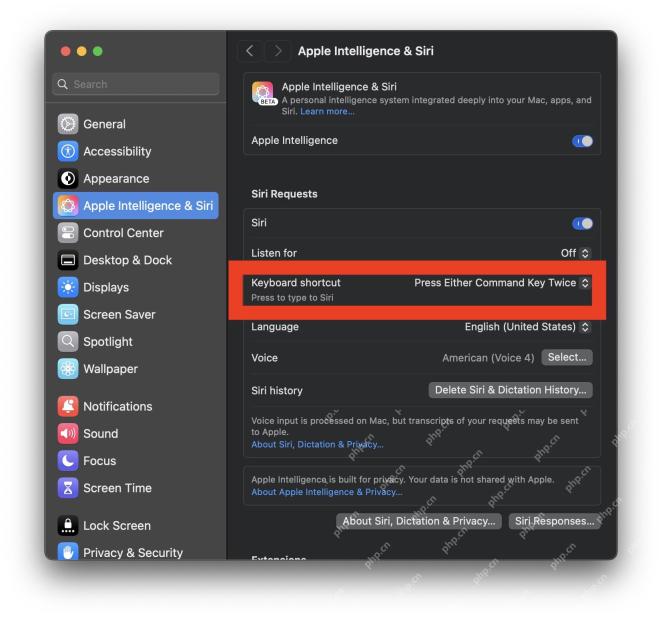 How to Change Keyboard Shortcut for Type to Siri on MacMay 08, 2025 am 11:30 AM
Guide to modify the shortcut keys for the "Type to use Siri" feature on Mac system The "Type to Use Siri" feature on Mac is very useful, especially after Siri has Apple Intelligence features. For Mac users, using "Type to use Siri" may be more convenient than using voice-activated Siri commands, but some Mac users may accidentally trigger this feature by accidentally pressing the launch command sequence. If you want to change the keyboard shortcuts for "Type to Use Siri" on your Mac, you can quickly implement it with simple settings changes, as follows: How to change the keyboard shortcuts for "Type to use Siri" on your Mac Open the Apple menu
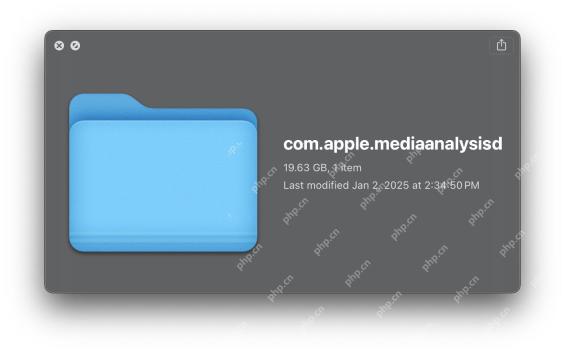 com.apple.mediaanalysisd Cache on Mac Using Tons of Storage? Here’s the FixMay 08, 2025 am 11:17 AM
MacOS Sequoia's com.apple.mediaanalysisd directory cache files occupy a lot of disk space Some MacOS Sequoia users have found that the com.apple.mediaanalysisd directory in MacOS systems consumes a lot of disk space due to cache files. If you find that your Mac disk space is reduced after installing or updating to MacOS Sequoia, an oversized com.apple.mediaanalysisd cache file problem may be the culprit. Many Mac users report that the directory is full of 15GB or more data, some use
 How to Disable Mail Sender Icons on iPhone in iOS 18.2May 08, 2025 am 10:46 AM
The revision of Apple's latest iPhone mail app has caused strong controversy among users, and its new email category features and eye-catching sender avatars are particularly criticized. These large-sized avatars occupy the space of the email interface, not only making it difficult to identify the sender, but also blocks the email subject and preview content, reducing the efficiency of email reading and browsing. Even though the avatar shows contact photos, most emails do not associate photos, and instead are blurred thumbnails, which further affects the beauty of the interface and user experience. Fortunately, just like the annoying email category feature can be disabled, we can also turn off these annoying giant sender avatars and contact photos to restore the classic appearance of the email app and enhance the user experience. How to use the iPhone mail app
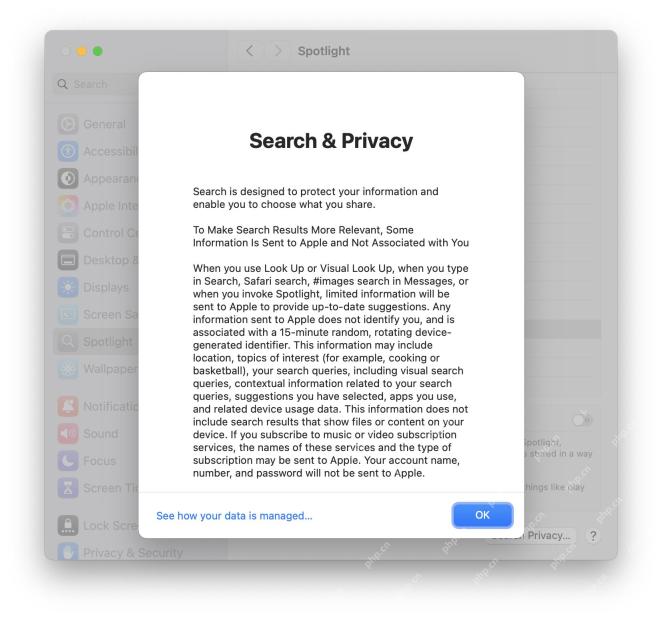 How to Stop Spotlight Search Data on Mac from Being Shared with AppleMay 08, 2025 am 10:38 AM
Protect Mac search privacy: Easily turn off Apple search data sharing By default, search queries you enter in Spotlight, Safari, Siri, Lookup, and #images for Mac will be sent to Apple. While this information is anonymous and will not reveal your identity, Apple also says it is used to improve search results, but many Mac users may not want to share this search information with Apple at all. In addition, privacy-conscious users may find this method of data collection undesirable. Fortunately, you can easily turn off the Help Apple Improve Search settings on your Mac, blocking Safari, Siri, Spotlight,
 MacOS Sonoma 14.7.3 & MacOS Ventura 13.7.3 with Security Updates AvailableMay 08, 2025 am 10:13 AM
Apple released macOS Sonoma 14.7.3 and macOS Ventura 13.7.3 updates for Mac users who are still using these systems. These updates focus on security, are released simultaneously with the newly released macOS Sequoia 15.3 update (for Sequoia users) and are not expected to contain any new features or significant changes. Safari 18.3 is also available as a software update to macOS Ventura and macOS Sonoma users. If your Mac is running a Sequoia system, you will see that the 15.3 update is available, and Son
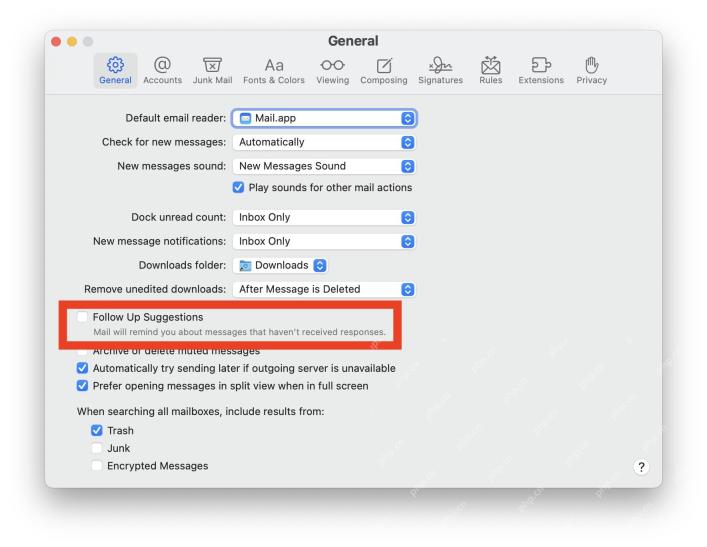 How to Disable “Follow Up” Mail Suggestions on MacMay 08, 2025 am 10:06 AM
The "Please Follow Up" feature guide for turning off Mac mail apps The Mac mail app's "to follow-up" feature is controversial, and it will display email suggestions Apple mail thinks need to follow up on the top of the inbox. The principle is simple: If you don't receive a reply from a specific person or email, the last message you sent will appear at the top of your email inbox with a "To be followed" tag. This feature has confused some users because it puts old messages on top of your inbox, making people mistakenly think that messages are new or have received replies when they aren't. While some users may like this reminder, others may find the “to follow-up” feature redundant or annoying and want to turn it off in the Mac mail app. Next, we will demonstrate how to do it. like
![Why Won't My Mac Update to Ventura? [ How to Fix This Problem?]](https://img.php.cn/upload/article/001/242/473/174666973291965.png?x-oss-process=image/resize,p_40) Why Won't My Mac Update to Ventura? [ How to Fix This Problem?]May 08, 2025 am 10:02 AM
Why Won't My Mac Update to Ventura? [ How to Fix This Problem?]May 08, 2025 am 10:02 AMCommon reasons and solutions for macOS Ventura update failure Have problems upgrading to macOS Ventura? This article will introduce some common reasons and solutions to help you complete the upgrade smoothly. 1. Hardware incompatible If your Mac is older, it may not support macOS Ventura because Apple limits updates to its newer models. This can be frustrating, as hardware incompatibility can only be solved by replacing a new device. 2. Insufficient storage space All macOS updates, including Ventura, require a lot of disk space. If your storage space is almost full, the update process may fail or get stuck. 3. Software
 What to Dо if Yоur MacBook Won't Turn On?May 08, 2025 am 09:58 AM
Your Mac usually boots quickly and smoothly. However, occasional startup issues can occur. This guide helps troubleshoot MacBook Pro, MacBook Air, and iMac startup problems. If your Mac won't power on, follow these steps: Verify Power: Ensure your


Hot AI Tools

Undresser.AI Undress
AI-powered app for creating realistic nude photos

AI Clothes Remover
Online AI tool for removing clothes from photos.

Undress AI Tool
Undress images for free

Clothoff.io
AI clothes remover

Video Face Swap
Swap faces in any video effortlessly with our completely free AI face swap tool!

Hot Article
Hot Tools

SublimeText3 Mac version
God-level code editing software (SublimeText3)

SublimeText3 Linux new version
SublimeText3 Linux latest version

ZendStudio 13.5.1 Mac
Powerful PHP integrated development environment

SublimeText3 English version
Recommended: Win version, supports code prompts!

Safe Exam Browser
Safe Exam Browser is a secure browser environment for taking online exams securely. This software turns any computer into a secure workstation. It controls access to any utility and prevents students from using unauthorized resources.

