

 Software TutorialOffice SoftwareIf You Don't Use Excel's Hidden Camera Tool, You're Missing a Trick
Quick Links
- Why Use the Camera Tool?
- How to Use Excel's Camera Tool
- Read This Before You Start
Excel's Camera tool lets you take a snapshot of some data in Excel and paste it as an image. Unlike normal images, those you create using the Camera tool are dynamic, meaning they update to reflect any changes in the original data.
Why Use the Camera Tool?
There are many situations where using the Camera tool is a better option than simply copying and pasting the data.
First, let's say you have several tabs of data in your workbook, and you want to create a dashboard that pulls together the key bits of information. Duplicating this key data using the Camera tool means that you can resize and reformat the graphics so that they look impressive on your dashboard. What's more, since data duplicated with the Camera tool is linked to the original data, your dashboard will always be up-to-date with the latest statistics.

Your Excel Spreadsheet Needs a Dashboard: Here's How to Create One
Have your KPIs in one place.
2Second, if you're working with a large dataset and want to keep certain information in sight, creating an image version of that key data means you can easily drag and drop it to the area where you're working.
Finally, duplicating data using the copy-paste method can alter the layout of your worksheets. Instead, when you duplicate the data using the Camera tool, it sits on top of Excel's cells, meaning your spreadsheet's layout isn't affected.
How to Use Excel's Camera Tool
The first step you need to take is to add the Camera button to your Quick Access Toolbar (QAT), since the tool is not visible by default.

6 Quick Access Toolbar Must-Haves in Microsoft Excel
Perform your most valuable Excel commands with a single click.
Click the down arrow on the right-hand side of any tab on the ribbon to see if your QAT is enabled. If you see the Hide Quick Access Toolbar option, the QAT is already activated. On the other hand, if you see the Show Quick Access Toolbar option, click it to activate your QAT.

Next, click the QAT down arrow and select "More Commands."

Now, select "All Commands" in the Choose Command From menu, and scroll to and select "Camera." Next, click "Add" to add it to your QAT. Then, click "OK."

You will now see the Camera icon in your QAT.

You're now ready to use the Camera tool to capture some data.
Let's say you want to duplicate data entered into a range of cells. To do this, select the relevant cells, and click the "Camera" icon you just added to your QAT. Excel will then surround your data with a dotted line to indicate that it has been added to the Camera tool's clipboard.
Consider removing the gridlines and filter buttons from your data before capturing it with the Camera tool. Hiding the gridlines will make the image appear tidier, and since the filter buttons won't be active in the pasted picture, there's no need for them to be present.

Then, go to the location where you want the data to be duplicated, such as a new tab in your workbook, and single-click to paste the copied data. Since Excel treats this as an image, you can use the handles to resize the graphic and the Picture Format tab on the ribbon to present the snapshot exactly as you want.

To capture something that is not attached to cells, like an Excel chart, select the cells behind and around the object before clicking the Camera icon. This will copy the selected cells and everything in front of them. Remember to remove the gridlines to improve the presentation of the data you're capturing.

Regardless of what you capture using Excel's camera tool, any changes you make to the original data will be reflected in the duplicated picture version.

5 Excel Quick Tips You Didn’t Know You Needed
They could transform how you organize and visualize your data.
2Read This Before You Start
Before you go ahead and make use of Excel's Camera tool, here are some additional points you should note:
- As well as using the Camera tool to duplicate data within the same workbook, you can also copy the data into a different workbook. Providing you've signed in to your Microsoft account and activated AutoSave, the duplicated image will remain linked to the original data, meaning any changes you make to the original version will be reflected in the copied version.
- After selecting your data and clicking the Camera icon, you can reproduce it in another program, like Word or Outlook, by pressing Ctrl V. Note, however, that the duplicated data will no longer be linked to the original data. Also, rather than being processed as an image, it will be pasted as editable data.
- If you envisage expanding the size of the pasted picture version of your data, before you select the data and click the Camera icon, zoom into your Excel sheet using the slider in the bottom-right corner of the Excel window, so that the data you're about to capture fills your screen. Taking this step will help you ensure your pasted image is high quality and not pixelated.
As you've seen in this guide, using Excel's Camera tool means you can see the same data in two places at the same time. Another way to work on two parts of an Excel file simultaneously is to use the New Window tool, which creates a duplicate of the same workbook.
The above is the detailed content of If You Don't Use Excel's Hidden Camera Tool, You're Missing a Trick. For more information, please follow other related articles on the PHP Chinese website!

 How to convert number to text in Excel - 4 quick waysMay 15, 2025 am 10:10 AM
This tutorial shows how to convert numbers to text in Excel 2016, 2013, and 2010. Learn how to do this using Excel's TEXT function and use numbers to strings to specify the format. Learn how to change the format of numbers to text using the Format Cell… and Text to Column options. If you use an Excel spreadsheet to store long or short numbers, you may want to convert them to text one day. There may be different reasons to change the number stored as a number to text. Here is why you might need to have Excel treat the entered number as text instead of numbers: Search by part rather than the whole number. For example, you might want to find all numbers containing 50, such as 501
 How to make a dependent (cascading) drop-down list in ExcelMay 15, 2025 am 09:48 AM
We recently delved into the basics of Excel Data Validation, exploring how to set up a straightforward drop-down list using a comma-separated list, cell range, or named range.In today's session, we'll delve deeper into this functionality, focusing on
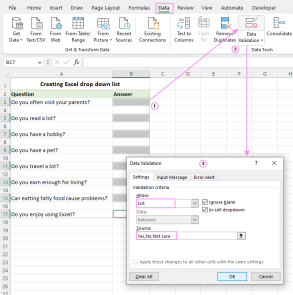 How to create drop down list in Excel: dynamic, editable, searchableMay 15, 2025 am 09:47 AM
This tutorial shows simple steps to create a drop-down list in Excel: Create from cell ranges, named ranges, Excel tables, other worksheets. You will also learn how to make Excel drop-down menus dynamic, editable, and searchable. Microsoft Excel is good at organizing and analyzing complex data. One of its most useful features is the ability to create drop-down menus that allow users to select items from predefined lists. The drop-down menu allows for faster, more accurate and more consistent data entry. This article will show you several different ways to create drop-down menus in Excel. - Excel drop-down list - How to create dropdown list in Excel - From the scope - From the naming range
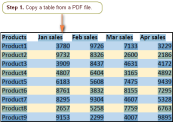 Convert PDF to Excel manually or using online convertersMay 15, 2025 am 09:40 AM
The PDF format, known for its ability to display documents independently of the user's software, hardware, or operating system, has become the standard for electronic file sharing.When requesting information, it's common to receive a well-formatted P
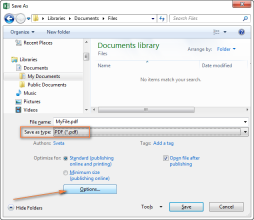 How to convert Excel files to PDFMay 15, 2025 am 09:37 AM
This short tutorial describes 4 possible ways to convert Excel files to PDF - using Excel's Save As feature, Adobe software, online Excel to PDF converter, and desktop tools. Converting an Excel worksheet to a PDF is usually necessary if you want other users to be able to view your data but can't edit it. You may also want to convert Excel spreadsheets to PDF format for use in media toolkits, presentations, and reports, or create a file that all users can open and read even if they don't have Microsoft Excel installed, such as on a tablet or phone. Today, PDF is undoubtedly one of the most popular file formats. According to Google
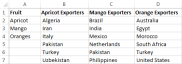
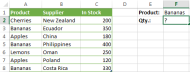 How to use SUMIF function in Excel with formula examplesMay 13, 2025 am 10:53 AM
This tutorial explains the Excel SUMIF function in plain English. The main focus is on real-life formula examples with all kinds of criteria including text, numbers, dates, wildcards, blanks and non-blanks. Microsoft Excel has a handful o
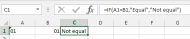
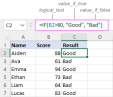 IF function in Excel: formula examples for text, numbers, dates, blanksMay 13, 2025 am 10:50 AM
In this article, you will learn how to build an Excel IF statement for different types of values as well as how to create multiple IF statements. IF is one of the most popular and useful functions in Excel. Generally, you use an IF statem
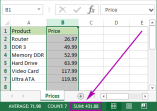 How to sum a column in Excel - 5 easy waysMay 13, 2025 am 09:53 AM
This tutorial shows how to sum a column in Excel 2010 - 2016. Try out 5 different ways to total columns: find the sum of the selected cells on the Status bar, use AutoSum in Excel to sum all or only filtered cells, employ the SUM function


Hot AI Tools

Undresser.AI Undress
AI-powered app for creating realistic nude photos

AI Clothes Remover
Online AI tool for removing clothes from photos.

Undress AI Tool
Undress images for free

Clothoff.io
AI clothes remover

Video Face Swap
Swap faces in any video effortlessly with our completely free AI face swap tool!

Hot Article
Hot Tools

Safe Exam Browser
Safe Exam Browser is a secure browser environment for taking online exams securely. This software turns any computer into a secure workstation. It controls access to any utility and prevents students from using unauthorized resources.

WebStorm Mac version
Useful JavaScript development tools

Dreamweaver CS6
Visual web development tools

Notepad++7.3.1
Easy-to-use and free code editor

MantisBT
Mantis is an easy-to-deploy web-based defect tracking tool designed to aid in product defect tracking. It requires PHP, MySQL and a web server. Check out our demo and hosting services.

