


One good screenshot is worth a thousand words. Whether you want to quickly capture a sample of your work, send a reference visual, highlight a mistake or inconsistency, taking a screenshot is essential for efficient work.
You can opt to capture your screen or a portion of it with macOS built-in tools or you can explore screenshotting options that offer additional tools like creating a GIF, making a scrolling capture, or editing out sections of your screenshot for privacy.
If you want a screenshotting tool that offers that and more, CleanShot X is our choice. The app allows you to capture your screen in a variety of ways fit for most purposes — scrolling screenshot to capture those long presentations or web pages, easy GIF creation if you need to make an illustration for your landing page, product demo, or a blog post, and our favorite blurring feature to edit out personal information from screenshots.

Best screen recording tool
With CleanShot X, you can capture the entire chat history, a report, or any scrollable content from websites or apps.
Try freeAnd if your desktop icons keep getting in the way of the perfect screenshots, don’t worry, CleanShot X can easily hide them. Just click the respective option in the app’s menu and you are good to go!
Now, let’s dive into how you can use these and more CleanShot X tools.
Capture your Mac’s screen like a pro
The most important part of taking a good screenshot is being versed enough in it that you can do it quickly and not missing a beat. Sometimes you just need to capture something without wasting a moment before it vanishes, so here’s how to best leverage CleanShot X for quick and/or perfect screenshots.
Setting up CleanShot X
First things first, how do you take a screenshot with CleanShot X? You can simply click the app icon in your Mac’s menu bar and pick the screenshot you want to take from there.

But that’s not always the best option if you want to take your screenshot instantly, before whatever it is that you are capturing is gone. Use keyboard shortcuts for quicker screenshot taking.
To set them up, click Settings in the CleanShot X menu bar drop-down menu and go to Shortcuts.

Here, you can record your preferred shortcuts for various screenshot types or you can choose to use system default shortcuts for your CleanShot X screenshots — just click the Use System Default Shortcuts button at the bottom of the menu.
The app will prompt you to set it as the system default screenshot tool.

Take the screenshot you need
With CleanShot X, you can take all the popular screenshot types — capturing a single window, your whole screen, an area on your screen, a scrolling capture, or a video capture.
To pick the type of screenshot you need, click the menu bar icon of the app and select the screenshot type.

Record video and GIFs
You can record a video of your screen with CleanShot X just as easily. Simply pick the Record Screen option in the menu and select the area you want to capture.
Video recording options will appear on your screen.

Decide if you want to create a video file with your screen recording or a GIF, and select the respective option.
Additionally, CleanShot X allows you to record your mic or computer audio, your webcam, show keystrokes and highlight clicks. These are wonderful tools for times when you are creating product demos, walkthroughs, or presentations. You can also choose to show recording time as you record to help you keep track of the length of your video.
And lastly, but not in the least less importantly, you can choose to set Do Not Disturb on in CleanShot video recording settings. Now unwanted notifications won’t ruin your whole recording!
Worried about video files or GIFs of your screen recording getting too large? Just set the quality restrictions in the settings.

Self-timer
If you need some time to set up your screenshot before you capture, use the self-timer option in CleanShot X.
Click on the app’s menu bar icon, select Self-Timer, and select the area you want to capture. The 5-second timer will start automatically.
Remove background distractions
We’ve all been there — your desktop is as cluttered as it can be, filled to the brim with private files or sensitive information, or just looking like a mess, and that’s exactly when you need a nice clean screenshot of something you’ve been working on.
Before you waste your time trying to clean up your desktop in a time crunch, take a beat. CleanShot X can hide your desktop icons in a click. Go to the app’s menu in your Mac’s menu bar and click Hide Desktop Icons. And voila, your desktop is pristine!
Easily access quick actions
Once you’ve captured your screenshot, you can perform quick actions with the file. Copy it to clipboard, save in your desired location, drag and drop onto your desktop to save, save to cloud storage, or make further edits — CleanShot X makes it easier than ever.
Draw on screenshots
Highlighting something in your screenshot is the action that’s probably most used when it comes to editing screenshots.
CleanShot X makes it easy to add arrows, lines, text, emoji, and even other screenshots to your screenshot.

Pick what you need from the editing panel at the top and make your screenshots more functional than ever! You can even add a counter for easy illustration.
Annotate your screenshots and hide sensitive content
With CleanShot X advanced editing tools designed specifically for screenshots, you can annotate your images, combine multiple screenshots in one explainer, and blur out sensitive information.

Add custom wallpaper
Clean up your screenshots with CleanShot X background tool. Set the scene with beautiful backgrounds and make your captures look stunning.
Pick a background while editing your screenshot — an image or a plain color — and instantly add it to your capture.

Capture text from images
There’s nothing more tedious than retyping all the text in your screenshot or PDF. Whether it’s some old image files or a screenshot you saved for later, CleanShot X can capture text from it with its handy Capture Text (OCR) tool.
Simply pick this option in the app’s drop-down menu bar menu and select the text you need captured. CleanShot X will take a second to process and then you’ll be able to simply paste your copied text where you need it!

Grab and save to the cloud
Use CleanShot Cloud to store your screenshots if you want to save some precious hard disk space. The app helps you declutter your desktop and free up valuable hard drive memory for things more important than random screenshots.
Here’s how to store your screenshots in CleanShot Cloud.
- Make your capture.
- On the overlay menu of your screen capture, click the Cloud button. You’ll be prompted to log into CleanShot Cloud, use sign in with Setapp if you are a Setapp user.
- Once your one-time cloud setup is complete, just click the cloud icon in the top right corner of your screenshot miniature overlay to save your item to cloud.
- You can adjust expiry time for your screenshot or get the sharing link on cleanshot.cloud > Your media.

Download and share screenshots from the cloud
Access CleanShot Cloud via CleanShot X menu bar menu by clicking on View All Uploads. Find all your screen captures neatly stored on the cloud. You can also copy the link to your most recent capture from the app’s menu.
From the cloud, you can download your screenshots and recordings, tag them, or get a link for sharing.

Note that the default expiry date is just 7 days. You can adjust it to 1 day, 30, 90, 365 days, or even never.
Pick destinations instantly
If you vary the location of where your screenshots are saved, this feature in CleanShot X is a must for you. Open the app’s Settings from the menu bar drop-down menu and go to Quick Access.
Find Save button behavior at the bottom of the window and set it to Ask for destination. This way, CleanShot X will give you a chance to pick your screenshot saving destination when you click the Save button on the screenshot miniature.

Screenshot with CleanShot X
Screenshots with CleanShot X can be as easy or as advanced as you want them to get. From basic capturing tools to quickly save a portion of your screen or record a screencast, to more advanced screenshot edits like blurring out sensitive information, adding a background, or creating an explainer, CleanShot X can do it all.
We hope this guide will help you make amazing screenshots and save time with this tool. Get CleanShot X on Setapp along with 240+ more apps for your daily tasks on Mac and iOS.
Not on Setapp yet? Get started with an easy 7-day free trial and try the apps, including CleanShot X now!
The above is the detailed content of CleanShot X tutorial: No-clutter screen capturing on Mac. For more information, please follow other related articles on the PHP Chinese website!

 How to Change Keyboard Shortcut for Type to Siri on MacMay 08, 2025 am 11:30 AM
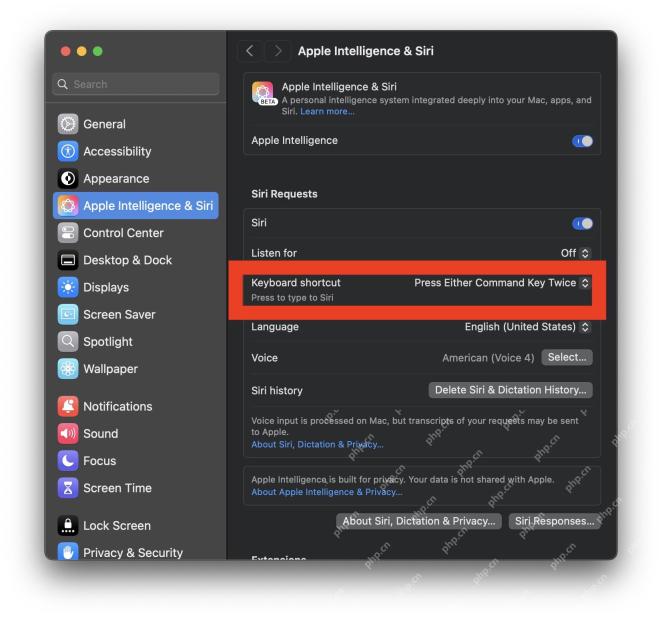
Guide to modify the shortcut keys for the "Type to use Siri" feature on Mac system The "Type to Use Siri" feature on Mac is very useful, especially after Siri has Apple Intelligence features. For Mac users, using "Type to use Siri" may be more convenient than using voice-activated Siri commands, but some Mac users may accidentally trigger this feature by accidentally pressing the launch command sequence. If you want to change the keyboard shortcuts for "Type to Use Siri" on your Mac, you can quickly implement it with simple settings changes, as follows: How to change the keyboard shortcuts for "Type to use Siri" on your Mac Open the Apple menu
 com.apple.mediaanalysisd Cache on Mac Using Tons of Storage? Here’s the FixMay 08, 2025 am 11:17 AM
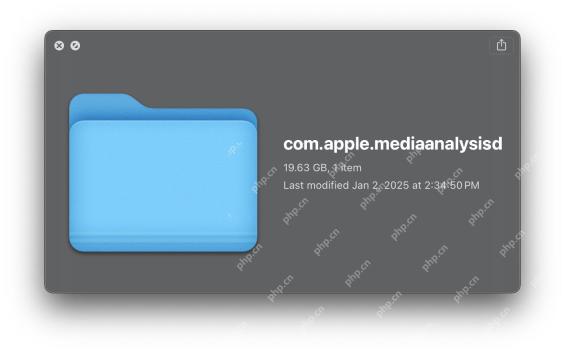
MacOS Sequoia's com.apple.mediaanalysisd directory cache files occupy a lot of disk space Some MacOS Sequoia users have found that the com.apple.mediaanalysisd directory in MacOS systems consumes a lot of disk space due to cache files. If you find that your Mac disk space is reduced after installing or updating to MacOS Sequoia, an oversized com.apple.mediaanalysisd cache file problem may be the culprit. Many Mac users report that the directory is full of 15GB or more data, some use
 How to Disable Mail Sender Icons on iPhone in iOS 18.2May 08, 2025 am 10:46 AM
The revision of Apple's latest iPhone mail app has caused strong controversy among users, and its new email category features and eye-catching sender avatars are particularly criticized. These large-sized avatars occupy the space of the email interface, not only making it difficult to identify the sender, but also blocks the email subject and preview content, reducing the efficiency of email reading and browsing. Even though the avatar shows contact photos, most emails do not associate photos, and instead are blurred thumbnails, which further affects the beauty of the interface and user experience. Fortunately, just like the annoying email category feature can be disabled, we can also turn off these annoying giant sender avatars and contact photos to restore the classic appearance of the email app and enhance the user experience. How to use the iPhone mail app
 How to Stop Spotlight Search Data on Mac from Being Shared with AppleMay 08, 2025 am 10:38 AM
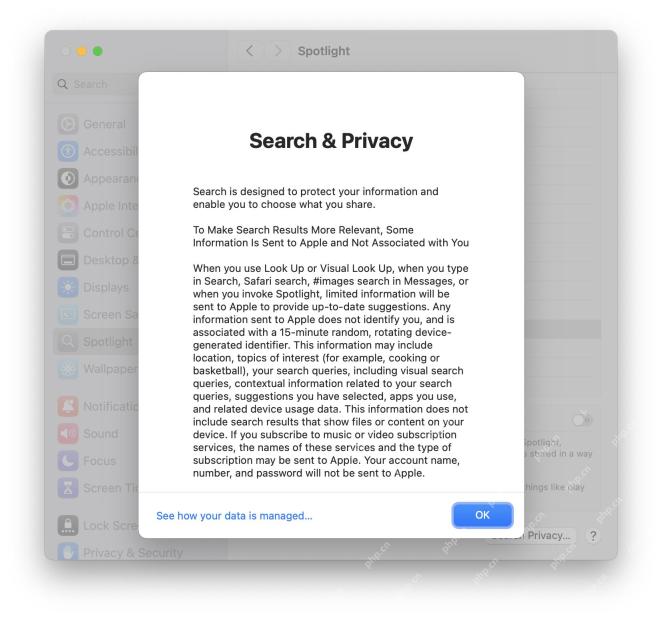
Protect Mac search privacy: Easily turn off Apple search data sharing By default, search queries you enter in Spotlight, Safari, Siri, Lookup, and #images for Mac will be sent to Apple. While this information is anonymous and will not reveal your identity, Apple also says it is used to improve search results, but many Mac users may not want to share this search information with Apple at all. In addition, privacy-conscious users may find this method of data collection undesirable. Fortunately, you can easily turn off the Help Apple Improve Search settings on your Mac, blocking Safari, Siri, Spotlight,
 MacOS Sonoma 14.7.3 & MacOS Ventura 13.7.3 with Security Updates AvailableMay 08, 2025 am 10:13 AM
Apple released macOS Sonoma 14.7.3 and macOS Ventura 13.7.3 updates for Mac users who are still using these systems. These updates focus on security, are released simultaneously with the newly released macOS Sequoia 15.3 update (for Sequoia users) and are not expected to contain any new features or significant changes. Safari 18.3 is also available as a software update to macOS Ventura and macOS Sonoma users. If your Mac is running a Sequoia system, you will see that the 15.3 update is available, and Son
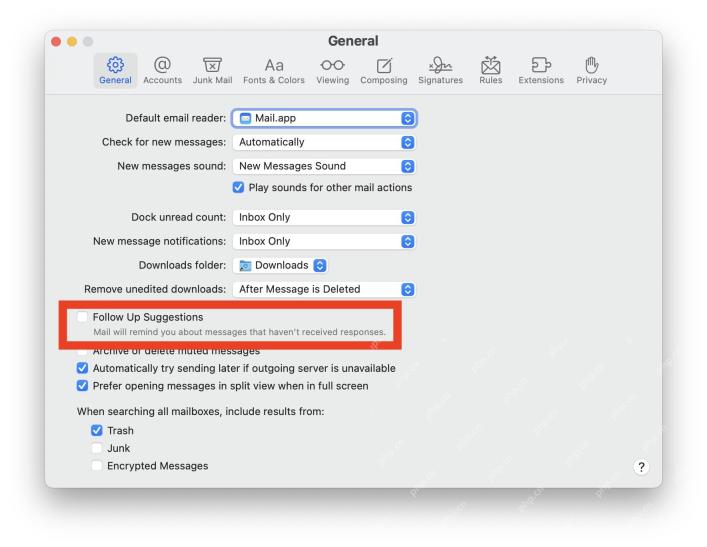 How to Disable “Follow Up” Mail Suggestions on MacMay 08, 2025 am 10:06 AM
The "Please Follow Up" feature guide for turning off Mac mail apps The Mac mail app's "to follow-up" feature is controversial, and it will display email suggestions Apple mail thinks need to follow up on the top of the inbox. The principle is simple: If you don't receive a reply from a specific person or email, the last message you sent will appear at the top of your email inbox with a "To be followed" tag. This feature has confused some users because it puts old messages on top of your inbox, making people mistakenly think that messages are new or have received replies when they aren't. While some users may like this reminder, others may find the “to follow-up” feature redundant or annoying and want to turn it off in the Mac mail app. Next, we will demonstrate how to do it. like
![Why Won't My Mac Update to Ventura? [ How to Fix This Problem?]](https://img.php.cn/upload/article/001/242/473/174666973291965.png?x-oss-process=image/resize,p_40) Why Won't My Mac Update to Ventura? [ How to Fix This Problem?]May 08, 2025 am 10:02 AM
Why Won't My Mac Update to Ventura? [ How to Fix This Problem?]May 08, 2025 am 10:02 AMCommon reasons and solutions for macOS Ventura update failure Have problems upgrading to macOS Ventura? This article will introduce some common reasons and solutions to help you complete the upgrade smoothly. 1. Hardware incompatible If your Mac is older, it may not support macOS Ventura because Apple limits updates to its newer models. This can be frustrating, as hardware incompatibility can only be solved by replacing a new device. 2. Insufficient storage space All macOS updates, including Ventura, require a lot of disk space. If your storage space is almost full, the update process may fail or get stuck. 3. Software
 What to Dо if Yоur MacBook Won't Turn On?May 08, 2025 am 09:58 AM
Your Mac usually boots quickly and smoothly. However, occasional startup issues can occur. This guide helps troubleshoot MacBook Pro, MacBook Air, and iMac startup problems. If your Mac won't power on, follow these steps: Verify Power: Ensure your


Hot AI Tools

Undresser.AI Undress
AI-powered app for creating realistic nude photos

AI Clothes Remover
Online AI tool for removing clothes from photos.

Undress AI Tool
Undress images for free

Clothoff.io
AI clothes remover

Video Face Swap
Swap faces in any video effortlessly with our completely free AI face swap tool!

Hot Article
Hot Tools

Safe Exam Browser
Safe Exam Browser is a secure browser environment for taking online exams securely. This software turns any computer into a secure workstation. It controls access to any utility and prevents students from using unauthorized resources.

ZendStudio 13.5.1 Mac
Powerful PHP integrated development environment

SecLists
SecLists is the ultimate security tester's companion. It is a collection of various types of lists that are frequently used during security assessments, all in one place. SecLists helps make security testing more efficient and productive by conveniently providing all the lists a security tester might need. List types include usernames, passwords, URLs, fuzzing payloads, sensitive data patterns, web shells, and more. The tester can simply pull this repository onto a new test machine and he will have access to every type of list he needs.

PhpStorm Mac version
The latest (2018.2.1) professional PHP integrated development tool

MinGW - Minimalist GNU for Windows
This project is in the process of being migrated to osdn.net/projects/mingw, you can continue to follow us there. MinGW: A native Windows port of the GNU Compiler Collection (GCC), freely distributable import libraries and header files for building native Windows applications; includes extensions to the MSVC runtime to support C99 functionality. All MinGW software can run on 64-bit Windows platforms.

