


In this detailed tutorial, we will discuss how to optimize and improve your Laptop battery life using auto-cpufreq in Linux. With the help of auto-cpufreq tool, you can happily say goodbye to Charger Anxiety and boost the Battery Life without sacrificing performance.
Table of Contents
Introduction
Laptops are fantastic for their portability, but battery life can often be a concern. We all know the struggle of scrambling to find an outlet when our trusty machine decides to call it quits.
This is where CPU frequency scaling comes in, also known as dynamic voltage and frequency scaling (DVFS).
DVFS a technology that adjusts your Central Processing Unit's (CPU) clock speed and voltage based on workload. The faster the CPU runs, the more power it consumes.
Linux offers built-in governors for CPU frequency scaling, but they might not always strike the perfect balance between performance and battery efficiency.
This is where auto-cpufreq, an intelligent tool for automatic CPU frequency management, comes into play. It acts as an optimizer, constantly monitoring factors like battery health, CPU usage, temperature, and overall system load.
By analyzing this data, auto-cpufreq can dynamically adjust your CPU's governor and settings, prioritizing either performance or power saving depending on your needs.
In essence, auto-cpufreq helps you achieve the best of both worlds: extended battery life for those long work sessions on the go, without sacrificing performance when you need that extra processing power.
What is auto-cpufreq?
auto-cpufreq is an automatic CPU speed and power optimizer for Linux. It is designed to optimize CPU frequency scaling based on the current system load and power status. It dynamically adjusts the CPU frequency and governor settings to balance performance and power consumption efficiently.
As the name says, auto-cpufreq will do the optimizations automatically. You don't need to do any manual changes or constant tweaking.
It will actively monitor your battery's state, CPU usage (frequency and temperatures) and system load and recommend you the best tweaks to apply in order to improve your Laptop's battery life. You can then apply the recommended CPU and power optimizations temporarily or permanently.
The auto-cpufreq tool is especially useful for laptops and portable devices where battery life and thermal management are crucial.
While auto-cpufreq was developed to improve performance and battery life on laptops, it can also be used on desktops and servers to lower power consumption.
Why do We Need auto-cpufreq?
Here are some key reasons why auto-cpufreq is beneficial:
1. Power Savings
Battery Life:
By reducing the CPU frequency during low load conditions, auto-cpufreq helps extend battery life on laptops and other battery-powered devices.
Energy Efficiency:
Lowering the CPU frequency when full performance is not needed reduces overall energy consumption, which is beneficial for both the environment and your electricity bill.
2. Performance Optimization
Dynamic Scaling:
auto-cpufreq adjusts CPU performance dynamically based on the system's workload, ensuring that you have enough performance when needed and saving power when the system is idle or under low load.
Thermal Management:
By managing CPU frequency and power states, auto-cpufreq can help reduce heat generation, which is important for maintaining system stability and prolonging the lifespan of hardware components.
3. Ease of Use
Automation:
Once installed and configured, auto-cpufreq works automatically without the need for manual intervention, making it easy for users to benefit from power savings and performance optimizations without having to constantly adjust settings.
Minimal Configuration:
The tool requires minimal setup and works well out of the box, making it accessible even for users who are not familiar with CPU frequency scaling.
How It Works
CPU Governors:
Linux provides several CPU frequency scaling governors like performance, powersave, ondemand, and conservative. auto-cpufreq switches between these governors based on the current system state.
Monitoring:
It continuously monitors system metrics such as CPU load, battery status, and thermal readings to make real-time adjustments to the CPU frequency.
Install auto-cpufreq
[Important NOTE]auto-cpufreq is designed to replace TLP. Before installing auto-cpufreq, it is recommended to remove TLP to avoid conflicts, such as overheating, which can occur if both tools try to manage CPU frequencies simultaneously. Only use both tools together if you are sure of what you are doing.
Installing and configuring auto-cpufreq on Linux involves a few steps.
Here’s how you can install and configure it on Debian and its derivatives such as Ubuntu:
Step 1: Update Your System
First, make sure your system is up to date by running:
sudo apt update
sudo apt upgrade
Step 2: Install Dependencies
auto-cpufreq requires some dependencies that need to be installed first. You can do this with:
sudo apt install git curl python3 python3-pip
Step 3: Clone the auto-cpufreq Repository
Next, clone the auto-cpufreq repository from GitHub:
git clone https://github.com/AdnanHodzic/auto-cpufreq.git
Step 4: Install auto-cpufreq
Navigate to the cloned repository and install auto-cpufreq:
cd auto-cpufreq
sudo ./auto-cpufreq-installer
Step 5: Install auto-cpufreq daemon
Once auto-cpufreq is installed, we need to install the daemon.
To install auto-cpufreq daemon, run:
sudo auto-cpufreq --install
This will deploy and start the daemon as a systemd service. After the daemon is installed, auto-cpufreq is available as a binary and runs in the background.
You must install this daemon if you prefer to apply permanent automatic CPU optimizations.
Step 6: Start and Enable auto-cpufreq
Once installed, you can start and enable auto-cpufreq to run automatically at boot:
sudo systemctl enable auto-cpufreq
sudo systemctl start auto-cpufreq
Step 6: Verify Installation
You can check the status of auto-cpufreq to ensure it’s running correctly:
sudo systemctl status auto-cpufreq
Install thermald (Optional but Recommended)
The Linux Thermal Daemon (thermald) monitors and controls the temperature on laptops and tablets with Intel Sandy Bridge and newer CPUs. When the system temperature reaches a certain threshold, thermald activates various cooling methods to lower it.
Thermald doesn't conflict with auto-cpufreq in any way. Even the developer of auto-coufreq recommends to run thermald alongside it.
Thermald operates in two modes:
- Zero Configuration Mode: This mode is suitable for most users. It utilizes the DTS temperature sensor and employs cooling methods such as the Intel P-state driver, power clamp driver, Running Average Power Limit control, and cpufreq.
- User-Defined Configuration Mode: This mode allows for customization using an ACPI-style configuration in a thermal XML file. It can fix buggy ACPI configurations or fine-tune settings by adding more sensors and cooling devices.
To install thermald on a Debian-based system, run the following command:
sudo apt install thermald
This command will install the thermald tool on your system, enabling you to monitor and control the temperature along with auto-cpufreq.
Configuration
By default, auto-cpufreq does not require additional configuration to work effectively. However, if you need to adjust its behavior, you can do so by modifying its configuration file. For more details, check the official instructions on configuring auto-cpufreq.
View Stats
We can view the current CPU stats and CPU frequency scaling optmizations made by the auto-cpufreq daemon using command:
auto-cpufreq --stats
Sample Output:
Note: You can quit stats mode by pressing "ctrl c" Optimal total CPU usage: 4.0 %, high average core temp: 65.0 °C setting turbo boost: off Warning: Changing CPU turbo is not supported. Skipping. ------------------------------------------------------------------------------- "auto-cpufreq" is about to refresh ... Executed on: June 15 (Saturday) - 16:44:42 ------------------------------------------------------------------------------- Linux distro: Debian GNU/Linux 12 bookworm Linux kernel: 6.1.0-21-amd64 Processor: Intel(R) Core(TM) i3-2350M CPU @ 2.30GHz Cores: 4 Architecture: x86_64 Driver: intel_cpufreq ------------------------------ Current CPU stats ------------------------------ CPU max frequency: 2300 MHz CPU min frequency: 800 MHz Core Usage Temperature Frequency CPU0 3.9% 65 °C 2300 MHz CPU1 1.0% 62 °C 2300 MHz CPU2 1.0% 65 °C 2026 MHz CPU3 1.0% 62 °C 2042 MHz CPU fan speed: 4003 RPM ---------------------------- CPU frequency scaling ---------------------------- Battery is: charging Setting to use: "performance" governor Not setting EPP (not supported by system) Total CPU usage: 1.7 % Total system load: 0.43 Average temp. of all cores: 63.50 °C Load optimal (load average: 0.43, 0.52, 0.53) Optimal total CPU usage: 1.7 %, high average core temp: 63.5 °C setting turbo boost: off Warning: Changing CPU turbo is not supported. Skipping. ------------------------------------------------------------------------------- "auto-cpufreq" is about to refresh ... Executed on: June 15 (Saturday) - 16:44:47 -------------------------------------------------------------------------------
The stats will keep updating until you manually stop them by pressing Ctrl c.
auto-cpufreq GUI
Starting with version 2.0, auto-cpufreq comes with a GUI. If you want to use this GUI, you must install auto-cpufreq daemon.

By default, auto-cpufreq will use "performance" governor, which is the default. You can switch to "powesave" governor if you want to.
Modes
auto-cpufreq supports three modes:
- Monitor (No changes)
- Live (Temporary changes)
- Daemon (Permanent changes)
Monitor Mode:
In this mode, no changes will be made. If you just want to monitor and see the suggestions for optimizations, you can run auto-cpufreq in monitor mode.
To run auto-cpufreq in monitor mode, use:
sudo auto-cpufreq --monitor
Live Mode:
This mode is for evaluation purpose. All necessary changes are temporarily applied to your system.
In this mode, temporary changes will be made based on the system load. If you want to monitor and make temporary CPU optimizations, you can run auto-cpufreq in live mode.
To run auto-cpufreq in live mode without installing it as a service, use:
sudo auto-cpufreq --live
In the live mode, you will see how your system would behave after permanently enabling auto-cpufreq. Please note that these changes will be lost on system reboot.
Daemon Mode
This mode will create a auto-cpufreq systemd service. The service will run automatically on every system reboot. So, all necessary changes that are made will persist across system reboots.
Install and enable auto-cpufreq daemon as shown in the installation section above if you want to apply permanent automatic CPU optimizations on your system.
Remove auto-cpufreq Service
If you don't wish to permanently enable CPU optimizations across reboots, remove the auto-cpufreq daemon using command:
sudo auto-cpufreq --remove
Uninstall auto-cpufreq
If you need to uninstall auto-cpufreq, run:
sudo auto-cpufreq-installer --uninstall
Summary
In this tutorial, we discussed how to install and configure auot-cpufreq in Linux to improve performance and battery life on Laptops, lower power consumption in Desktops and Servers.
auto-cpufreq tool helps you to optimize your CPU frequency scaling based on the current system load.
It is a valuable tool for managing CPU frequency dynamically to achieve a balance between performance and power efficiency.
It is particularly useful for users who want to maximize their device's battery life and manage heat without sacrificing the ability to perform demanding tasks when needed.
By automating the process of CPU frequency scaling, auto-cpufreq provides an easy-to-use solution for optimizing system performance and power consumption.
I strongly recommend you to install it after installing a Linux distribution on your Laptop, Desktop or Server.
Resources:
- https://github.com/AdnanHodzic/auto-cpufreq
- https://docs.kernel.org/admin-guide/pm/cpufreq.html
- https://wiki.archlinux.org/title/CPU_frequency_scaling
- https://www.techtarget.com/whatis/definition/dynamic-voltage-and-frequency-scaling-DVFS
Related read:
- How To Optimize Laptop Battery Life With TLP In Linux
- CPU Power Manager – Control And Manage CPU Frequency In Linux
- How To Improve Laptop Battery Performance In Linux
- How To Check Laptop Battery Status And Level In Terminal In Linux
The above is the detailed content of How To Optimize Performance And Battery Life With Auto-cpufreq In Linux. For more information, please follow other related articles on the PHP Chinese website!

 How to Use 'next' Command with Awk in Linux - Part 6May 15, 2025 am 10:43 AM
In this sixth installment of our Awk series, we will explore the next command, which is instrumental in enhancing the efficiency of your script executions by skipping redundant processing steps.What is the next Command?The next command in awk instruc
 How to Efficiently Transfer Files in LinuxMay 15, 2025 am 10:42 AM
Transferring files in Linux systems is a common task that every system administrator should master, especially when it comes to network transmission between local or remote systems. Linux provides two commonly used tools to accomplish this task: SCP (Secure Replication) and Rsync. Both provide a safe and convenient way to transfer files between local or remote machines. This article will explain in detail how to use SCP and Rsync commands to transfer files, including local and remote file transfers. Understand the scp (Secure Copy Protocol) in Linux scp command is a command line program used to securely copy files and directories between two hosts via SSH (Secure Shell), which means that when files are transferred over the Internet, the number of
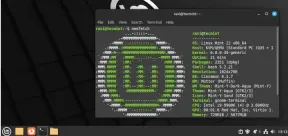
 10 Most Popular Linux Desktop Environments of All TimeMay 15, 2025 am 10:35 AM
One fascinating feature of Linux, in contrast to Windows and Mac OS X, is its support for a variety of desktop environments. This allows desktop users to select the most suitable and fitting desktop environment based on their computing requirements.A
 How to Install LibreOffice 24.8 in Linux DesktopMay 15, 2025 am 10:15 AM
LibreOffice stands out as a robust and open-source office suite, tailored for Linux, Windows, and Mac platforms. It boasts an array of advanced features for handling word documents, spreadsheets, presentations, drawings, calculations, and mathematica
 How to Work with PDF Files Using ONLYOFFICE Docs in LinuxMay 15, 2025 am 09:58 AM
Linux users who manage PDF files have a wide array of programs at their disposal. Specifically, there are numerous specialized PDF tools designed for various functions.For instance, you might opt to install a PDF viewer for reading files or a PDF edi
 How to Filter Command Output Using Awk and STDINMay 15, 2025 am 09:53 AM
In the earlier segments of the Awk command series, our focus was primarily on reading input from files. However, what if you need to read input from STDIN?In Part 7 of the Awk series, we will explore several examples where you can use the output of o
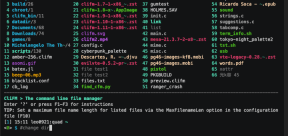 Clifm - Lightning-Fast Terminal File Manager for LinuxMay 15, 2025 am 09:45 AM
Clifm stands out as a distinctive and incredibly swift command-line file manager, designed on the foundation of a shell-like interface. This means that users can engage with their file system using commands they are already familiar with.The choice o
 How to Upgrade from Linux Mint 21.3 to Linux Mint 22May 15, 2025 am 09:44 AM
If you prefer not to perform a new installation of Linux Mint 22 Wilma, you have the option to upgrade from a previous version.In this guide, we will detail the process to upgrade from Linux Mint 21.3 (the most recent minor release of the 21.x series


Hot AI Tools

Undresser.AI Undress
AI-powered app for creating realistic nude photos

AI Clothes Remover
Online AI tool for removing clothes from photos.

Undress AI Tool
Undress images for free

Clothoff.io
AI clothes remover

Video Face Swap
Swap faces in any video effortlessly with our completely free AI face swap tool!

Hot Article
Hot Tools

Safe Exam Browser
Safe Exam Browser is a secure browser environment for taking online exams securely. This software turns any computer into a secure workstation. It controls access to any utility and prevents students from using unauthorized resources.

VSCode Windows 64-bit Download
A free and powerful IDE editor launched by Microsoft

MantisBT
Mantis is an easy-to-deploy web-based defect tracking tool designed to aid in product defect tracking. It requires PHP, MySQL and a web server. Check out our demo and hosting services.

SAP NetWeaver Server Adapter for Eclipse
Integrate Eclipse with SAP NetWeaver application server.

SecLists
SecLists is the ultimate security tester's companion. It is a collection of various types of lists that are frequently used during security assessments, all in one place. SecLists helps make security testing more efficient and productive by conveniently providing all the lists a security tester might need. List types include usernames, passwords, URLs, fuzzing payloads, sensitive data patterns, web shells, and more. The tester can simply pull this repository onto a new test machine and he will have access to every type of list he needs.

