

 System TutorialWindows SeriesA Complete Walkthrough for Installing the 24H2 Windows 11 Update on Your Device
A Complete Walkthrough for Installing the 24H2 Windows 11 Update on Your Device

A Complete Walkthrough for Installing the 24H2 Windows 11 Update on Your Device
This walkthrough assumes you're installing the Windows 11 24H2 update via Windows Update. Before beginning, it's crucial to back up your important data. This safeguards against potential data loss, a rare but possible occurrence during any major OS update.
1. Check for Updates: Open the Settings app (Windows key I), then navigate to "Windows Update." Click "Check for updates." If the 24H2 update is available, it will be listed. Ensure your device is connected to a stable internet connection with sufficient bandwidth.
2. Download the Update: Once the update is detected, click "Download." The download size is substantial, so it might take a considerable amount of time depending on your internet speed. Avoid interrupting the download process.
3. Schedule the Installation: Windows Update typically allows you to schedule the installation for a time that's convenient for you. This is highly recommended to avoid disrupting your workflow. Choose a time when you can leave your computer undisturbed for the duration of the installation.
4. Restart Your Computer: Once the download is complete, you'll be prompted to restart your computer to begin the installation. Ensure all unsaved work is saved before proceeding.
5. Installation Process: During the installation, your computer will restart several times. Do not interrupt the process. A progress bar will indicate the installation's progress. The duration varies depending on your hardware specifications.
6. Post-Installation: Once the installation is complete, your computer will restart again. Log in and verify that everything is functioning correctly. Check your applications and data to ensure everything has transferred successfully.
What are the potential risks and issues I might encounter during the 24H2 Windows 11 update installation?
While generally smooth, the Windows 11 24H2 update installation can present several potential risks and issues:
- Data Loss: Although rare, data loss is a possibility. This is why backing up your data beforehand is crucial. Corruption during the update process, though infrequent, can lead to data loss.
- Driver Incompatibility: Some older drivers might be incompatible with the new update, leading to malfunctioning hardware or devices. After the update, ensure all your devices are functioning correctly. You might need to update drivers manually from the manufacturer's website.
- Application Compatibility Issues: While Microsoft strives for compatibility, some older applications might not function correctly with the updated OS. Check for updates to your applications or consider alternatives if needed.
- Installation Failures: The installation process might fail due to various reasons, including insufficient disk space, corrupted system files, or hardware problems. If this occurs, refer to Microsoft's support documentation for troubleshooting steps.
- Boot Problems: In rare cases, the update might lead to boot problems. This might require using advanced troubleshooting options like system restore or a repair installation.
- Performance Issues: Initially, you might experience performance issues, such as slower boot times or application lag. This is often temporary and resolves itself as the system optimizes.
Will my existing applications and data be compatible with the updated Windows 11 24H2 version?
Microsoft aims for backward compatibility, meaning most applications and data should work seamlessly with the 24H2 update. However, some older applications, particularly those not regularly updated, might encounter compatibility issues. It's advisable to check the compatibility of your key applications with the new version before proceeding with the update. Websites of application developers may provide information on compatibility. If an application is known to be incompatible, consider updating it or finding an alternative before updating your Windows version. Regarding data, the risk of incompatibility is generally low, but backing up your data is still a critical preventative measure.
How long will the entire 24H2 Windows 11 update installation process take, and what are the minimum system requirements?
The total time for the 24H2 Windows 11 update installation varies considerably depending on several factors:
- Internet Speed: Downloading the update is the most time-consuming part. A faster internet connection significantly reduces the download time.
- Hardware Specifications: The speed of your CPU, RAM, and storage device directly impacts the installation speed. A more powerful system will complete the installation faster.
- System Load: If other applications are running during the installation, it might slow down the process. It's recommended to close all unnecessary applications before starting the update.
Expect the entire process, including download and installation, to take anywhere from 30 minutes to several hours.
Regarding minimum system requirements, they generally align with the minimum requirements for Windows 11 itself. Check Microsoft's official website for the most up-to-date and precise minimum system requirements for Windows 11 24H2, as these specifications can change. Generally, you'll need a relatively modern processor, sufficient RAM (at least 4GB, but 8GB is recommended), and a compatible storage device.
The above is the detailed content of A Complete Walkthrough for Installing the 24H2 Windows 11 Update on Your Device. For more information, please follow other related articles on the PHP Chinese website!

 Logitech G515 Keyboard Hits All Time Low at $109May 14, 2025 am 02:32 AM
Logitech G515 Lightspeed TKL Gaming Keyboard
 I Miss the Times Computers Were Plug and PlayMay 13, 2025 am 06:03 AM
Building a new PC was once a moment of triumph. Now, it’s just the beginning, as you have to install apps, download large games, and tweak dozens of settings before it's fully set up. Let's take a look at how we got here and how things used to be.
 Why Is This Logitech Mouse on Every Tech Person's Desk?May 13, 2025 am 06:02 AM
Logitech's MX Master series of mice has become a common sight in YouTube videos or photographs of tech-savvy people's desk setups, but what makes this now-iconic mouse so special? I'm on my third MX Master mouse at this point, and, honestly, I can
 I Refuse to Buy a Keyboard Without a ScreenMay 13, 2025 am 03:05 AM
Mechanical keyboards offer a plethora of features, from switch type and keycap material to sound dampening. But one often overlooked, yet invaluable feature, is the built-in screen. Why Integrate Screens into Keyboards? The QWERTY keyboard, a staple
 The Galaxy S25 Gets Edgy, and RIP Skype: Weekly RoundupMay 13, 2025 am 03:04 AM
Tech News Roundup: Major Updates and New Releases Across the Tech Landscape This week brings a flurry of exciting tech news, from AI advancements to new gaming peripherals and significant software updates. Let's dive into the highlights: AI and Secu
 How to Rollback Windows 11 UpdateMay 12, 2025 pm 08:01 PM
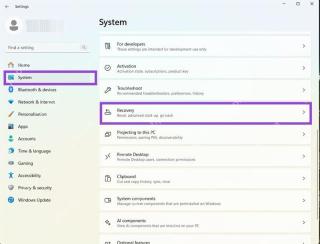
Is Windows 11 update causing system problems? Don’t panic! This article provides three methods of rollback updates to help you restore system stability. Method 1: Rollback updates through Windows settings This method is suitable for users whose update time is less than 10 days. Step 1: Click the "Start" menu to enter "Settings". You can also press the Windows key I on the keyboard. Step 2: In Settings, select System, and then click Recover. Step 3: Under Recovery Options, find "Previous Windows Versions". If the Back button is clickable, the system can be rolled back to the previous version. Step 4: The system will ask you why the rollback is
 13 Windows Keyboard Shortcuts I Couldn't Live WithoutMay 12, 2025 am 03:02 AM
Mastering Windows keyboard shortcuts isn't just about efficiency; it streamlines your entire computing experience. Windows' interface can be less than intuitive, hiding crucial settings within layers of menus. Fortunately, countless shortcuts exist
 How to Speed Up Your PC (Windows 11)May 11, 2025 pm 06:01 PM
Is your Windows 11 PC running slower than usual? Opening apps and loading websites taking an eternity? You're not alone! This guide offers three simple, no-download solutions to boost your computer's performance without complex settings adjustments


Hot AI Tools

Undresser.AI Undress
AI-powered app for creating realistic nude photos

AI Clothes Remover
Online AI tool for removing clothes from photos.

Undress AI Tool
Undress images for free

Clothoff.io
AI clothes remover

Video Face Swap
Swap faces in any video effortlessly with our completely free AI face swap tool!

Hot Article
Hot Tools

SublimeText3 English version
Recommended: Win version, supports code prompts!

DVWA
Damn Vulnerable Web App (DVWA) is a PHP/MySQL web application that is very vulnerable. Its main goals are to be an aid for security professionals to test their skills and tools in a legal environment, to help web developers better understand the process of securing web applications, and to help teachers/students teach/learn in a classroom environment Web application security. The goal of DVWA is to practice some of the most common web vulnerabilities through a simple and straightforward interface, with varying degrees of difficulty. Please note that this software

Dreamweaver Mac version
Visual web development tools

Zend Studio 13.0.1
Powerful PHP integrated development environment

Dreamweaver CS6
Visual web development tools

