


Master Hanging Indents in Microsoft Word for Mac: A Comprehensive Guide
Proper formatting is crucial for academic and legal documents. Hanging indents, where the first line of a paragraph remains flush left while subsequent lines are indented, are frequently used, particularly in citations. This guide details how to create and troubleshoot hanging indents in Microsoft Word for Mac, using both the Paragraph settings and the Ruler.

The Ideal Text Editor for Professional Documents
MonsterWriter, available on Setapp, offers intuitive features to simplify document formatting.
Creating a Hanging Indent Using Paragraph Settings
Let's assume you're formatting citations in a marine biology paper. Here's how to apply a hanging indent:
- Select the paragraph(s) requiring a hanging indent.

- Go to
Format > Paragraph. - In the
Indentationsection, chooseHangingfrom theSpecialdropdown menu.
- Adjust the indent size (default is 1.27 cm) in the
Byfield, if necessary. - Click
OK.


For a quicker method, use the keyboard shortcut: ⌘ T
Personal Note: While Word's Focus mode exists, I prefer the distraction-free writing environment of Ulysses, which includes grammar/style checks, versatile export options, markdown editing, and direct publishing capabilities.

Related Articles:
- Get Microsoft Word for Free on Mac
- How to Type Exponents on Mac
- Type Accents on Mac
- Convert Word to JPEG
Creating a Hanging Indent Using the Ruler
The Ruler tool provides another method:
- Open your Word document.
- Go to
View > Rulerto display the ruler (if hidden).
- Select the text.
- Drag the bottom triangle (hanging indent marker) on the ruler to set the indentation.


Tip: MonsterWriter streamlines academic document formatting, handling headlines, footnotes, and citations efficiently.

Troubleshooting Hanging Indent Issues
- Incorrect Indentation: Avoid using both left and first-line indents simultaneously. Ensure left and right indent values are 0 in Paragraph settings, and only drag the bottom triangle on the ruler.
- Indentation Not Applying to Lists: Adjust list indent settings separately, as lists often have distinct formatting.
Conclusion
Creating hanging indents is straightforward using the Ruler, Paragraph settings, or the ⌘ T shortcut. Explore Ulysses and MonsterWriter (available via Setapp's 7-day free trial) for enhanced writing and formatting experiences.
Frequently Asked Questions
-
How do I create a hanging indent in Word for Mac? Use the
Format > Paragraphmethod or the Ruler. - Is there a keyboard shortcut? Yes, ⌘ T.
-
How do I adjust the indent size? Use the
Byfield inFormat > Paragraphor drag the bottom triangle on the Ruler.
(Remember to replace the bracketed links with actual links.)
The above is the detailed content of How to do a hanging indent on Word on Mac: Easy steps found. For more information, please follow other related articles on the PHP Chinese website!

 How to Install MacOS Sequoia Public BetaMay 15, 2025 am 10:39 AM
The MacOS Sequoia public beta program is now available, providing Mac users with an early chance to explore the new major MacOS system software update. However, it's important to note that, like all beta versions, MacOS Sequoia public beta may be mor
 How to Run Ubuntu Linux on Apple Silicon MacMay 15, 2025 am 10:37 AM
Interested in running Ubuntu Linux on your Apple Silicon Mac? It's now simpler than ever to run Ubuntu alongside MacOS without the hassle of partitioning, dual booting, or risking your Mac's operating system. Thanks to virtual machine technology, you
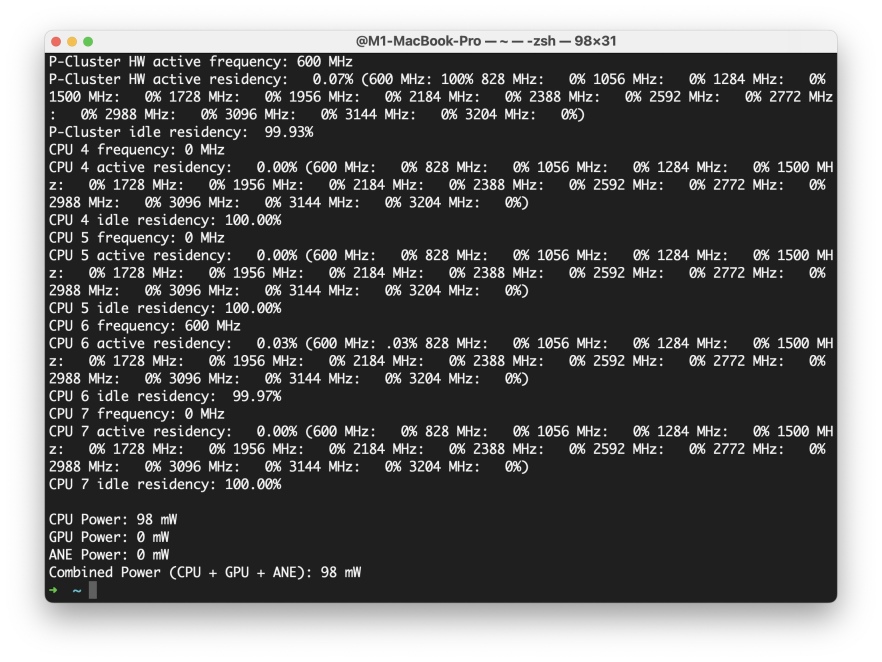 How to See Individual Core CPU Usage on Mac with powermetricsMay 15, 2025 am 10:31 AM
There are multiple methods to track CPU usage on a Mac, with the most popular being Activity Monitor for the graphical interface and htop or top for command line users. While Activity Monitor can display an optional core graph and htop shows CPU core
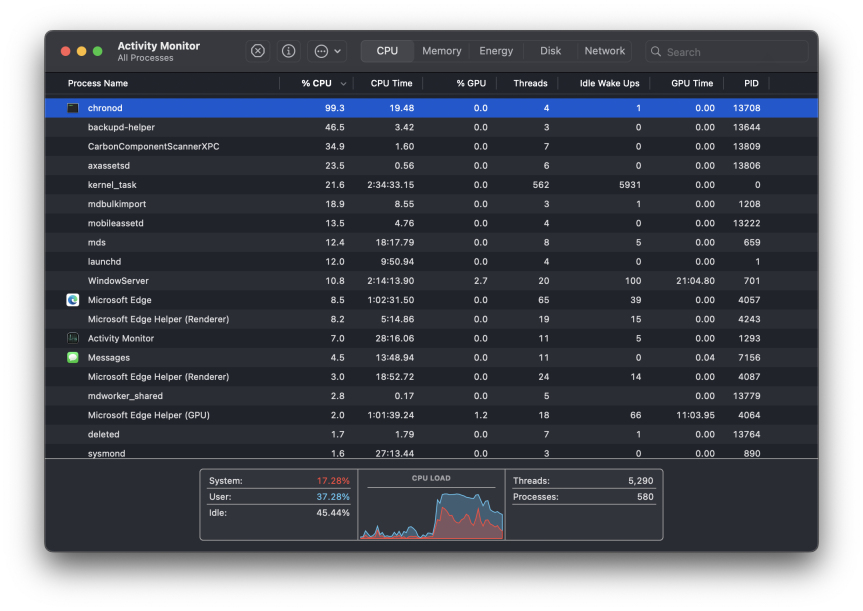 chronod on Mac – High CPU Use & Network Access Requests ExplainedMay 15, 2025 am 10:18 AM
Some Mac users occasionally find that the "chronod" process in MacOS either consumes a lot of system resources or requests access to a network connection. Sometimes, chronods are also marked by overly alert antivirus applications. While many people will ignore this situation, there are also curious Mac users who actively explore what specific processes that consume a lot of resources are, or what the intentions are of a process that requires or requires Internet access. So, what is chronod on Mac? Why does it use high CPU and system resources? Why does it require network access? Let's dive into the chronod process to better understand its functionality. What is chronod? The chronod process is
 Security Agent on Mac: What Is It & What Does It Do on MacBook Air/Pro?May 15, 2025 am 10:11 AM
What is Security Agent on MacSecurity Agent on Mac functions as a background process responsible for managing user authentication, system security notifications, and requests for application permissions. It collaborates with macOS's Security Server t
 2 of the Best Hex Editors for Mac: ImHex & Hex FiendMay 15, 2025 am 10:05 AM
Hex editors are specialized software tools designed for viewing and editing hexadecimal data as well as raw binary data within files. These tools are indispensable for programmers, developers, and reverse engineers who need to inspect, debug, and ana
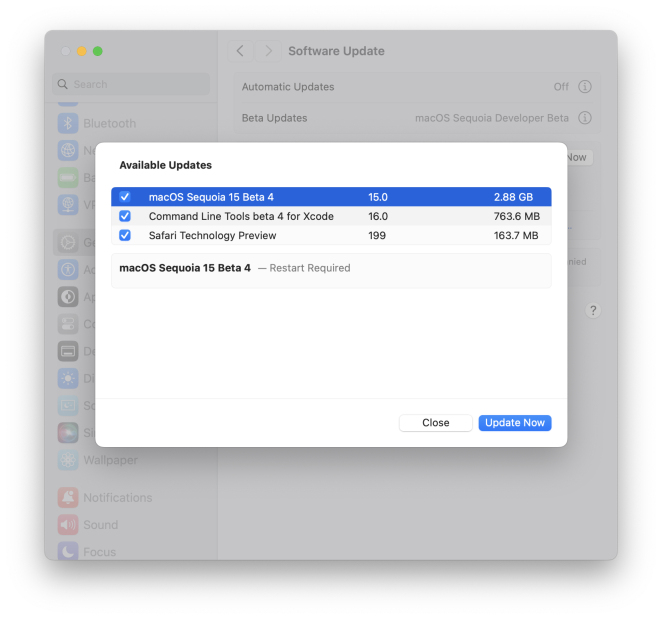 MacOS Sequoia 15 Beta 4 Available to DownloadMay 15, 2025 am 09:54 AM
Apple has unveiled the fourth beta release of MacOS Sequoia 15 for those engaged in the macOS Sequoia developer beta testing program. Typically, the corresponding build for public beta testers, labeled as macOS Sequoia public beta 2, is released shor
 FaceTime Not Working on Mac? Here's How to Fix ItMay 15, 2025 am 09:49 AM
Apple's FaceTime application is designed to connect Apple users seamlessly, offering features such as dual-camera support on smartphones for enhanced video chat experiences.Occasionally, though, FaceTime might not function as intended. This article d


Hot AI Tools

Undresser.AI Undress
AI-powered app for creating realistic nude photos

AI Clothes Remover
Online AI tool for removing clothes from photos.

Undress AI Tool
Undress images for free

Clothoff.io
AI clothes remover

Video Face Swap
Swap faces in any video effortlessly with our completely free AI face swap tool!

Hot Article
Hot Tools

VSCode Windows 64-bit Download
A free and powerful IDE editor launched by Microsoft

Notepad++7.3.1
Easy-to-use and free code editor

SAP NetWeaver Server Adapter for Eclipse
Integrate Eclipse with SAP NetWeaver application server.

SublimeText3 Mac version
God-level code editing software (SublimeText3)

ZendStudio 13.5.1 Mac
Powerful PHP integrated development environment

