


In the first part of my series, an introduction to the WordPress Plugin Boilerplate, we looked at how the code is organised within the Boilerplate. To continue with this series, we’ll apply what we’ve learnt previously to build a real working plugin. We are going to take a look at how quickly we can get our plugin up and running using the Boilerplate code, with as little work as possible.
This article will focus on creating and activating the plugin, as well as developing the admin facing functionality of the plugin. In order to follow this tutorial, you’ll need a basic understanding of PHP and WordPress, as well as having a working knowledge of the WordPress Plugin API.
Key Takeaways
- Utilize the WordPress Plugin Boilerplate to expedite the development process with a structured, organized approach, ensuring best practices are followed.
- Customize the plugin by adding an options page using the Settings API to allow users to modify settings such as the display position of notices and the number of days after which a post is considered outdated.
- Implement the plugin’s functionality by registering settings, adding settings fields, and handling the saving and retrieving of these settings values using the provided classes and methods in the Boilerplate.
- Optimize the admin-facing functionality of the plugin by creating a clean, user-friendly interface for the options page, and ensure settings are correctly saved and displayed.
- Plan for further enhancements such as code cleanup, internationalization, and more selective application logic to refine the plugin’s efficiency and user experience.
About the Plugin
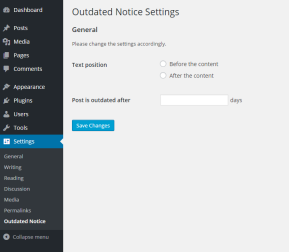
We’re going to develop a simple plugin that will display the number of days since a specific post was last updated. We’re also going to offer a couple of simple customizations to the plugin, allowing the user to choose a specific number of days after which a post will be considered outdated, as well as the position of the notice in the post content.
Preparing the Boilerplate
As mentioned in the first article, we can either download a fresh copy of the Boilerplate and do the search and replace ourselves, or we can use the unofficial WordPress Plugin Boilerplate Generator to speed up the process. Let’s use the generator for our plugin.
Head over to the WordPress Plugin Boilerplate Generator website and fill in the form with the appropriate values. Let’s just call our plugin “Outdated Notice”. Here’s a sample form with the fields filled in.
I’m using an imaginary URL for the plugin URL that links to an official repository. Don’t worry too much about this stuff as we can always modify it later on in the plugin header.
Click the “Build” button and you should get a nice, customized copy of the WordPress Plugin Boilerplate.
Installing and Activating the Plugin
The generated zip archive will contain the two expected directories, assets and trunk. We are not going to use the symlink route in installing our plugin, so extract the trunk folder in the archive and copy it into the wp-content/plugins directory.
We still need to rename it appropriately to avoid a naming conflict with other plugins, so we will rename the trunk directory to outdated-notice.
If you now go to the “Installed Plugins” section in wp-admin, sure enough, you’ll see your plugin is on the list of plugins installed but not yet activated. The Plugin Boilerplate generator does not change anything with regards to plugin description so if we want to change it, we can simply edit the description in the main plugin file, in our case, outdated-notice.php.

Click on “Activate” to activate your shiny new plugin. Nothing will change on your WordPress site, so don’t worry that there’s nothing to see yet after activating the plugin.
Adding an Options Page
Plugin developers usually provide a means for the user to customize the settings of the plugin. This can be achieved by utilizing the Settings API provided by WordPress. Let’s see how can we integrate our own settings into the plugin.
In short, we are going to allow the user to choose where the notice will appear, either before the post content or after the post content. As far as the number of days threshold goes, the user can set the number of days before a post is to be considered outdated. Using that piece of information, we are going to dynamically change the class of the notice so that we can style it differently from a post that is still considered fresh.
Let’s get started by adding an options page for our plugin.
Open up class-oudated-notice-admin.php inside your admin folder. We need to modify this class to allow us to register a settings page for our plugin. Add this public method towards the end of the class.
<span>/**
</span><span>	 * Add an options page under the Settings submenu
</span><span>	 *
</span><span>	 * <span>@since  1.0.0
</span></span><span>	 */
</span>	<span>public function add_options_page() {
</span>
		<span>$this->plugin_screen_hook_suffix = add_options_page(
</span>			<span>__( 'Outdated Notice Settings', 'outdated-notice' ),
</span>			<span>__( 'Outdated Notice', 'outdated-notice' ),
</span>			<span>'manage_options',
</span>			<span>$this->plugin_name,
</span>			<span>array( $this, 'display_options_page' )
</span>		<span>);
</span>
	<span>}</span>
One thing to note is since we are using classes to define our hooks, we need to pass an array in the form of array( We are not quite done yet! As we can see, the add_options_page requires a valid callback function, which we have not yet defined in our Outdated_Notice_Admin class. Let’s add it in. This should be simple enough since we are going to use the provided outdated-notice-admin-display.php included in our admin/partials folder. So, all we have to do for our callback function is to include that file. That should do it. The last thing we need to do now is to load it correctly using the provided loader class in the Boilerplate. Open up your class-outdated-notice.php in the includes folder and add the additional hook we defined earlier inside the define_admin_hooks method. The proper action hook to include on our options page is admin_menu so let’s add it in. You should now see an additional “Outdated Notice” submenu under Settings. You can access the empty options page by going to the URL http:// It’s a blank page for now, so let’s start populating the partial file with proper markup. The Settings API page on the WordPress Codex provides a good explanation on how to register our own settings, including displaying them on the options page. Here’s a breakdown of what we are going to do in this section: Let’s go through all the steps one by one. To register a settings section, we will need to use the register_setting function. The proper hook to initialize that function is admin_init. So, first we are going to add another hook into the Boilerplate loader to register our settings inside the define_admin_hooks method of our main Boilerplate class, Outdated_Notice class. To make things simpler and provide a basic sort of namespacing to our options names, we are going to add another private variable on top of this class. Put this snippet on top of the Outdated_Notice_Admin class. From now on, we are going to prepend this value to anything that is related to our options. Next thing is to actually register the settings section, settings field and the individual settings. Open up the Outdated_Notice_Admin class again and add the public method register_setting into that. Inside the public register_setting method, we are going to register a settings section. I won’t delve too much into the various functions and APIs to do this since the Codex has already provided enough information to get started. As our plugin settings are relatively simple, we are going to register only one section. This snippet will allow us to register a “General” section for our options page using the add_settings_section function. Notice that we are pre-pending our section name with the variable $option_name to prevent conflicts with other plugins. The callback can be used to provide additional information about our section, which is exactly what we want. We are going to add another public method, outdated_notice_general_cb that will echo basic information about this section. The next part of the Settings API that we need to use is to register the actual field to be rendered on the options page. This can be achieved using the add_settings_field function. We will use radio buttons for the text position configuration. This is done by adding this code to the register_setting function that we have. We need to make sure that the fifth argument of add_settings_field will point to the correct settings section that we registered before or we might not see the field on our options page. This is not done just yet. We need to provide the callback function that will render the actual markup for our radio buttons. In our outdated_notice_position_cb function, we need to include this block of code: The second option for day threshold can be configured using a normal text input. So we are going to register another settings field: Again, we also need to provide a callback function that will render our text field. Lastly, we need to register the options name that we are going to use so that it can be recognized within WordPress. Since we are using two different option names, outdated_notice_position and outdated_notice_day, we are going to register them both using the register_setting function. Notice that third parameter for the register_setting function is a sanitization callback. Although it is optional, it’s always useful to make sure that input values are sanitized before being saved to the database. For day sanitization, we will use the built-in PHP function, intval as it is enough in our case. As for the text notice position, we are going to define our own sanitization callback function, which will allow only certain values to be saved into the database. This is particularly useful when dealing with options that are limited to specific values, such as in this case where we only accept two values, which are before and after, so our sanitization callback will need to make sure that if the value is not one of these, it won’t get saved into the database. Here’s a simple sanitization callback function to achieve that: After we are done with registering all the related settings, now we need to make sure our options page renders correctly. Since we are using the WordPress way to register our fields and settings, this task is particularly straightforward. Open up the outdated-notice-admin-display.php inside the admin/partials folder. Here’s how we can render the options page based on the settings that we have registered before. With a simple combination of do_settings_sections and settings_fields functions, your options page is done in no time at all. Let’s take a break and refresh the options page. Try filling in some values and save the form. You should get the notice “Settings saved.” but nothings happened. Let try doing a var_dump to both our options. Place this somewhere in the related function. We should get some values back from the database, as per the example below: That means our form is working just fine, so the only thing left that needs to be done is to display the current value in the text field, and make sure the correct radio button is checked. Let’s tackle the radio buttons first. As a shortcut, we are just going to use the checked function provided by WordPress to mark the value selected previously. Our outdated_notice_position_cb will need some modification. Here’s an updated snippet for the callback. Now, whenever we change the value of either fields, it will be reflected correctly in the options page. This is by no means complete. We can always improve the admin facing functionality of this plugin. Some of the things that I can think of are: The complete code can be viewed from this GitHub repository, in the part-2 branch. We have created a plugin with basic admin facing functionality by registering related settings, and creating an options page for the user to customize our plugin. In a relatively short time using the WordPress Plugin Boilerplate, we achieved this without compromising the code quality and yet still adhering to the best practices as recommended by WordPress. Stay tuned for the next part of the series where we will do the public facing side of the plugin to display the appropriate notice inside the post content. The WordPress Plugin Boilerplate is a standardized, organized, and object-oriented framework for building high-quality WordPress plugins. It provides a clear and consistent structure that is easy to understand and work with. Using this boilerplate can save you a lot of time and effort in setting up the basic structure of a plugin. It also ensures that your plugin follows WordPress coding standards and best practices, which can help to prevent bugs and compatibility issues. To get started with the WordPress Plugin Boilerplate, you first need to download it from its GitHub repository. After downloading, you can rename the boilerplate’s directory and files to match your plugin’s name. Then, you can start developing your plugin by adding your own custom functionality to the boilerplate’s existing structure. The WordPress Plugin Boilerplate consists of several main components. These include the plugin file, which contains the plugin header and loader class; the includes directory, which contains the core plugin class and other functionality-related files; the admin directory, which contains files related to the admin-specific functionality of the plugin; and the public directory, which contains files related to the public-facing functionality of the plugin. To add your own functionality to the WordPress Plugin Boilerplate, you can create new classes in the includes directory. These classes should extend the base class provided by the boilerplate. You can then add your own methods to these classes to implement your desired functionality. You can also modify the existing classes and methods as needed. The WordPress Plugin Boilerplate provides a class for handling plugin settings. This class includes methods for registering settings, displaying settings fields, and sanitizing settings values. You can use this class as a starting point for implementing your own settings functionality. To add admin-specific functionality to your plugin, you can use the classes and methods provided in the admin directory of the WordPress Plugin Boilerplate. This directory includes classes for creating admin pages, adding settings fields, and handling form submissions. To add public-facing functionality to your plugin, you can use the classes and methods provided in the public directory of the WordPress Plugin Boilerplate. This directory includes classes for enqueuing scripts and styles, and for displaying public-facing content. The WordPress Plugin Boilerplate includes a class for internationalization. This class includes methods for loading the plugin’s text domain, which allows your plugin to be translated into different languages. The WordPress Plugin Boilerplate includes classes for handling AJAX requests. These classes include methods for registering AJAX actions, handling AJAX requests, and sending AJAX responses. Debugging your plugin when using the WordPress Plugin Boilerplate can be done in several ways. One common method is to use the WP_DEBUG constant in your wp-config.php file. This will display PHP errors, notices, and warnings. You can also use various debugging plugins available for WordPress, or use PHP’s built-in error logging functionality.<span>/**
</span><span> * Add an options page under the Settings submenu
</span><span> *
</span><span> * <span>@since 1.0.0
</span></span><span> */
</span> <span>public function add_options_page() {
</span>
<span>$this->plugin_screen_hook_suffix = add_options_page(
</span> <span>__( 'Outdated Notice Settings', 'outdated-notice' ),
</span> <span>__( 'Outdated Notice', 'outdated-notice' ),
</span> <span>'manage_options',
</span> <span>$this->plugin_name,
</span> <span>array( $this, 'display_options_page' )
</span> <span>);
</span>
<span>}</span>
<span>/**
</span><span> * Render the options page for plugin
</span><span> *
</span><span> * <span>@since 1.0.0
</span></span><span> */
</span> <span>public function display_options_page() {
</span> <span>include_once 'partials/outdated-notice-admin-display.php';
</span> <span>}</span>
Registering, Saving and Retrieving the Settings Value
Register the Hook to the Boilerplate Loader
<span>$this->loader->add_action( 'admin_menu', $plugin_admin, 'add_options_page' );</span>
<span>$this->loader->add_action( 'admin_init', $plugin_admin, 'register_setting' );</span>
Register a Settings Section
<span>/**
</span><span>	 * Add an options page under the Settings submenu
</span><span>	 *
</span><span>	 * <span>@since  1.0.0
</span></span><span>	 */
</span>	<span>public function add_options_page() {
</span>
		<span>$this->plugin_screen_hook_suffix = add_options_page(
</span>			<span>__( 'Outdated Notice Settings', 'outdated-notice' ),
</span>			<span>__( 'Outdated Notice', 'outdated-notice' ),
</span>			<span>'manage_options',
</span>			<span>$this->plugin_name,
</span>			<span>array( $this, 'display_options_page' )
</span>		<span>);
</span>
	<span>}</span>
<span>/**
</span><span>	 * Render the options page for plugin
</span><span>	 *
</span><span>	 * <span>@since  1.0.0
</span></span><span>	 */
</span>	<span>public function display_options_page() {
</span>		<span>include_once 'partials/outdated-notice-admin-display.php';
</span>	<span>}</span>
Register Two Settings Fields (Threshold Days and Text Position)
<span>$this->loader->add_action( 'admin_menu', $plugin_admin, 'add_options_page' );</span>
<span>$this->loader->add_action( 'admin_init', $plugin_admin, 'register_setting' );</span>
<span>/**
</span><span> * The options name to be used in this plugin
</span><span> *
</span><span> * <span>@since 1.0.0
</span></span><span> * <span>@access private
</span></span><span> * <span>@var <span>string</span> $option_name Option name of this plugin
</span></span><span> */
</span> <span>private $option_name = 'outdated_notice';</span>
<span>// Add a General section
</span> <span>add_settings_section(
</span> <span>$this->option_name . '_general',
</span> <span>__( 'General', 'outdated-notice' ),
</span> <span>array( $this, $this->option_name . '_general_cb' ),
</span> <span>$this->plugin_name
</span> <span>);</span>
Register the Settings
<span>/**
</span><span> * Render the text for the general section
</span><span> *
</span><span> * <span>@since 1.0.0
</span></span><span> */
</span> <span>public function outdated_notice_general_cb() {
</span> <span>echo '<p>' . __( 'Please change the settings accordingly.', 'outdated-notice' ) . '</p>';
</span> <span>}</span>
<span>/**
</span><span>	 * Add an options page under the Settings submenu
</span><span>	 *
</span><span>	 * <span>@since  1.0.0
</span></span><span>	 */
</span>	<span>public function add_options_page() {
</span>
		<span>$this->plugin_screen_hook_suffix = add_options_page(
</span>			<span>__( 'Outdated Notice Settings', 'outdated-notice' ),
</span>			<span>__( 'Outdated Notice', 'outdated-notice' ),
</span>			<span>'manage_options',
</span>			<span>$this->plugin_name,
</span>			<span>array( $this, 'display_options_page' )
</span>		<span>);
</span>
	<span>}</span>
Populate the Options Page
<span>/**
</span><span>	 * Render the options page for plugin
</span><span>	 *
</span><span>	 * <span>@since  1.0.0
</span></span><span>	 */
</span>	<span>public function display_options_page() {
</span>		<span>include_once 'partials/outdated-notice-admin-display.php';
</span>	<span>}</span>
Saving and Repopulate the Fields
<span>$this->loader->add_action( 'admin_menu', $plugin_admin, 'add_options_page' );</span>
<span>$this->loader->add_action( 'admin_init', $plugin_admin, 'register_setting' );</span>
<span>/**
</span><span>	 * The options name to be used in this plugin
</span><span>	 *
</span><span>	 * <span>@since  	1.0.0
</span></span><span>	 * <span>@access 	private
</span></span><span>	 * <span>@var  	<span>string</span> 		$option_name 	Option name of this plugin
</span></span><span>	 */
</span>	<span>private $option_name = 'outdated_notice';</span>
Further Improvements
Conclusion
Frequently Asked Questions about Developing a WordPress Plugin with Boilerplate
What is the WordPress Plugin Boilerplate and why should I use it?
How do I get started with the WordPress Plugin Boilerplate?
What are the main components of the WordPress Plugin Boilerplate?
How do I add my own functionality to the WordPress Plugin Boilerplate?
How do I handle plugin settings in the WordPress Plugin Boilerplate?
How do I add admin-specific functionality to my plugin?
How do I add public-facing functionality to my plugin?
How do I internationalize my plugin with the WordPress Plugin Boilerplate?
How do I handle AJAX requests in my plugin?
How do I debug my plugin when using the WordPress Plugin Boilerplate?
The above is the detailed content of WordPress Plugin Boilerplate Part 2: Developing a Plugin. For more information, please follow other related articles on the PHP Chinese website!

 Is WordPress suitable for e-commerce?May 13, 2025 am 12:05 AM
Yes, WordPress is very suitable for e-commerce. 1) With the WooCommerce plugin, WordPress can quickly become a fully functional online store. 2) Pay attention to performance optimization and security, and regular updates and use of caches and security plug-ins are the key. 3) WordPress provides a wealth of customization options to improve user experience and significantly optimize SEO.
 How to add your WordPress site in Yandex Webmaster ToolsMay 12, 2025 pm 09:06 PM
Do you want to connect your website to Yandex Webmaster Tools? Webmaster tools such as Google Search Console, Bing and Yandex can help you optimize your website, monitor traffic, manage robots.txt, check for website errors, and more. In this article, we will share how to add your WordPress website to the Yandex Webmaster Tool to monitor your search engine traffic. What is Yandex? Yandex is a popular search engine based in Russia, similar to Google and Bing. You can excel in Yandex
 How to fix HTTP image upload errors in WordPress (simple)May 12, 2025 pm 09:03 PM
Do you need to fix HTTP image upload errors in WordPress? This error can be particularly frustrating when you create content in WordPress. This usually happens when you upload images or other files to your CMS using the built-in WordPress media library. In this article, we will show you how to easily fix HTTP image upload errors in WordPress. What is the reason for HTTP errors during WordPress media uploading? When you try to upload files to Wo using WordPress media uploader
 How to fix the issue where adding media buttons don't work in WordPressMay 12, 2025 pm 09:00 PM
Recently, one of our readers reported that the Add Media button on their WordPress site suddenly stopped working. This classic editor problem does not show any errors or warnings, which makes the user unaware why their "Add Media" button does not work. In this article, we will show you how to easily fix the Add Media button in WordPress that doesn't work. What causes WordPress "Add Media" button to stop working? If you are still using the old classic WordPress editor, the Add Media button allows you to insert images, videos, and more into your blog post.
 How to set, get and delete WordPress cookies (like a professional)May 12, 2025 pm 08:57 PM
Do you want to know how to use cookies on your WordPress website? Cookies are useful tools for storing temporary information in users’ browsers. You can use this information to enhance the user experience through personalization and behavioral targeting. In this ultimate guide, we will show you how to set, get, and delete WordPresscookies like a professional. Note: This is an advanced tutorial. It requires you to be proficient in HTML, CSS, WordPress websites and PHP. What are cookies? Cookies are created and stored when users visit websites.
 How to Fix WordPress 429 Too Many Request ErrorsMay 12, 2025 pm 08:54 PM
Do you see the "429 too many requests" error on your WordPress website? This error message means that the user is sending too many HTTP requests to the server of your website. This error can be very frustrating because it is difficult to find out what causes the error. In this article, we will show you how to easily fix the "WordPress429TooManyRequests" error. What causes too many requests for WordPress429? The most common cause of the "429TooManyRequests" error is that the user, bot, or script attempts to go to the website
 How scalable is WordPress as a CMS for large websites?May 12, 2025 am 12:08 AM
WordPresscanhandlelargewebsiteswithcarefulplanningandoptimization.1)Usecachingtoreduceserverload.2)Optimizeyourdatabaseregularly.3)ImplementaCDNtodistributecontent.4)Vetpluginsandthemestoavoidconflicts.5)ConsidermanagedWordPresshostingforenhancedperf
 How customizable is WordPress, really?May 11, 2025 am 12:11 AM
WordPress is very customized, providing a wide range of flexibility and customizability. 1) Through the theme and plug-in ecosystem, 2) use RESTAPI for front-end development, 3) In-depth code level modifications, users can achieve a highly personalized experience. However, customization requires mastering technologies such as PHP, JavaScript, CSS, etc., and pay attention to performance optimization and plug-in selection to avoid potential problems.


Hot AI Tools

Undresser.AI Undress
AI-powered app for creating realistic nude photos

AI Clothes Remover
Online AI tool for removing clothes from photos.

Undress AI Tool
Undress images for free

Clothoff.io
AI clothes remover

Video Face Swap
Swap faces in any video effortlessly with our completely free AI face swap tool!

Hot Article
Hot Tools

SublimeText3 Linux new version
SublimeText3 Linux latest version

Safe Exam Browser
Safe Exam Browser is a secure browser environment for taking online exams securely. This software turns any computer into a secure workstation. It controls access to any utility and prevents students from using unauthorized resources.

VSCode Windows 64-bit Download
A free and powerful IDE editor launched by Microsoft

PhpStorm Mac version
The latest (2018.2.1) professional PHP integrated development tool

MantisBT
Mantis is an easy-to-deploy web-based defect tracking tool designed to aid in product defect tracking. It requires PHP, MySQL and a web server. Check out our demo and hosting services.

