


If you’ve just bought a new Mac and you’re upgrading from an older Mac or a Windows PC, you want all of your files and data to be accessible on the new computer. But when you set up a new Mac, should you migrate your old files or do a clean installation?
When you get a new Mac, it might be a good idea to do a clean installation; starting from scratch with a brand-new operating system, and copy the files that you need from your old Mac manually. Here’s how to migrate your files to your new Mac, or do a clean installation, and the pros and cons of both methods.
How to migrate files to a new Mac
Apple includes a useful tool as part of macOS: Migration Assistant. This feature is similar to Setup Assistant, which only runs during the setup of a new Mac; therefore, if you have set up your Mac as new, you will have to use Migration Assistant to copy files from either a backup or a different Mac.
When you set up a new Mac, the Migration Assistant offers to copy your files. To use this tool on a Mac, do one of the following:
- Make sure both Macs are nearby. If both your old and new Macs are running macOS Sierra or later, Migration Assistant creates a peer-to-peer Wi-Fi network to transfer files. If either Mac is running Mac OS X El Capitan or earlier, you’ll need to make sure both Macs are connected to the same Wi-Fi network.
- If you use an external hard drive for Time Machine backups on your old Mac, make sure that the Time Machine backup has run recently. Then safely eject and disconnect it from the old Mac, and then plug it into the new Mac.
- Physically connect the Macs using a cable and target disk mode; see this Apple support document for more on target disk mode. (Note that only Macs with Intel processors can boot up in target disk mode. An Intel-based Mac booted into target disk mode can connect to a new Apple silicon-based Mac, i.e. a Mac with an M1/M2/M3 processor.)
- If you’re migrating from a PC running Microsoft Windows, Apple recommends first installing all available Windows updates. Then, on your PC, run the appropriate version of Windows Migration Assistant based on the version of macOS to which you’ll migrate your data. (If you’ve bought a new Mac in 2024, you’ll want to choose the current version of Windows Migration Assistant, which can transfer data to macOS Sonoma.)
You may see a security code on the old Mac; if so, make sure it matches the one displayed on your new Mac.

Select the Mac or hard drive from which you want to copy data, and then select what type of data you want to transfer—user accounts, applications, other files and folders, and settings—and wait while the files get copied.

As you can see, Migration Assistant is easy to use. It copies all your files, and you can choose which user accounts get copied over to the new Mac.
However, the disadvantage of using the Migration Assistant is that all your files get copied. This can be problematic because if you have been upgrading your Macs over the years by installing new versions of macOS over old ones, or migrating data from old Macs to new ones, you’ll have hundreds, even thousands of old files that you no longer need taking up space. For this reason, you might want to consider doing a clean installation.
Clean Installation
When you do a clean installation, you let macOS run its Setup Assistant and create a new, empty user account. During the process, you enter some information, such as your Apple ID, so your iCloud account is activated, but, for the most part, your Mac will be a tabula rasa—a blank slate. It will contain the default apps that are part of macOS, but nothing more.
If you go this route, you then must manually copy files from your old Mac or PC, or from a backup. This part of the process can be time-consuming, but it can allow you to sift through your files to find what you really need, and slim down your Mac. When you do this, you may be surprised to find how much you can ignore from your old Mac.
Here’s what you need to copy after a clean installation:
Applications: macOS installs a number of applications, many of which you probably use every day. These include Safari, Mail, Calendar, Music, Photos, and the iWork apps (Pages, Numbers, and Keynote). But you likely use plenty of other apps on your Mac. If you have purchased apps from the Mac App Store, you’ll need to re-download them; these apps won’t work if you copy them from one Mac to another. But for apps you’ve purchased directly from developers, it can easier to copy them manually. (Though you might also just want to download the latest versions, to ensure that yours aren’t up to date.) And this is a good time to decide which of the many apps in your Applications folder you want to keep. You may find dozens of apps that you rarely use. If so, don’t copy them. (Of course, if you’re moving from Windows, you’ll skip this step; macOS can’t run Windows apps natively—but you can run Windows 11 for free on an Apple silicon Mac.)
Your Home Folder: You want to copy most of the files from your home folder (that’s the folder with the house icon and your username). You don’t want to copy the folders at the top level of your home folder—Desktop, Documents, Downloads, Movies, Music, and Pictures—but rather the contents of these folders into the identically-named folders on the new Mac. Again, take this opportunity to check whether you need to keep all of the files in these folders.
Your Library Folder: There is a special folder in your home folder called Library. By default, this folder is hidden, but it contains many files that you should copy. For example, all of your email from Apple Mail is in this folder, as is the information in the macOS Contacts app. First, you need to tell your Mac to display this folder. Go go to your home folder; you should see folders like Documents, Pictures, Movies, etc. Choose View > Show View Options, or press Command-J, then, at the bottom of the window, check Show Library Folder. It will now be permanently visible.
In another Finder window, navigate to the old Library folder. If it’s not visible, press Command-Shift-G, then enter, for example, /Volumes/backup-disk-name/Users/your-user-name/Library, and click Go. (Type the appropriate names for the backup disk and your user name.) You’ll have two windows open.

Here are some of the folders that you want to copy from the old Library folder to the new one; though if you sync a lot of data with iCloud, then many of the folders below will already be populated with your up-to-date data:
- Application Support; though look inside this folder, and only copy folders for apps you’re still using. Note that if you’re syncing data via iCloud, a lot of this data will already be available, so check the folders on the new Mac and don’t overwrite ones that contain data that is up to date.
- Containers; this contains data for many apps, both from Apple and third-party developers.
- Group Containers; as above, this has data from many apps,
- Calendars
- Fonts
- HomeKit; this has HomeKit settings, if you use those features.
- Music; this may contain AppleScripts, if you have used any with the Music app.
- Keychains; this contains all your stored passwords.
- Mail; this contains all your email, and your email settings.
- Preference Panes; if there are any that you’ve installed that you still use.
- Safari; this has your Safari bookmarks.
There’s a lot of important data in the Application Support folder. In addition to the above folders, it’s a good idea to copy any folder whose modification date is in the past year or so. To do this, choose View > As List, then right-click the window header — where you see columns like Name and Size — and enable Date Modified. Click that header, to sort in date order. Start looking at the newest dates and work your way back. Also, if you see folders with names for apps that you know you no longer use, then don’t copy them. Do the same for the library folder in general. But, check inside the folders to see if they contain contents with newer modification dates than those shown for the folders; this is probably a bug, but a lot of the folders in my Library folder have older modification dates than their contents. One folder you don’t need to copy is /Library/Caches; this may be quite large, and your apps will create new caches as you use them.
I don’t recommend that you copy the Preferences folder; this probably contains lots of files for apps you no longer use. I do, however, suggest that you go through that folder and copy over any files or folders for apps that you do use, especially if, when you launch them, their setup is different. However, you may just want to manually reset the preferences for your apps; this is a good way to rediscover your apps and their interfaces.
You’ll notice, as you start working with the new Mac, that you will need to enter serial numbers for all of the apps that you did not purchase from the Mac App Store. This is because many apps store invisible files on your Mac for registration purposes, and you haven’t copied these. So make sure you know where your serial numbers are.
As you work on your new Mac, you may find that certain files are missing. For this reason you should absolutely not delete your old backup, and especially the ~/Library folder. You may need to go back into that folder and copy some other files to the new Mac.
While I don’t recommend doing a clean installation for each new Mac you get, or for each macOS update, it’s a good idea to do it every few years. Just make sure to keep a backup in case there are any files you need to find that you didn’t copy over the first time around.
The above is the detailed content of How to Set Up a New Mac: Should You Migrate or Do a Clean Installation?. For more information, please follow other related articles on the PHP Chinese website!

 How to Summarize Webpages in Safari for MacMay 09, 2025 am 10:47 AM
Safari browser's powerful web simplification feature: use Apple Intelligence to read efficiently! One of the built-in Apple Intelligence features of Safari browser is the web snippet feature. Whether the content of a web page is a long-lasting or a normal website, Apple Intelligence can quickly generate summary, helping you quickly understand web page content and save time. This feature is very convenient to use in Safari for Mac. How to use the web ssummary feature in Safari for Mac? If you are using an Apple Silicon Mac with MacOS Sequoia 15 or later
 How to Fix Spotlight Search Issues on MacOS SequoiaMay 09, 2025 am 10:36 AM
A fair number of Mac users have discovered that Spotlight Search is not working well in MacOS Sequoia, either missing files, apps, and sometimes not working at all to find any local file. For some users the issues with Spotlight happens right after t
 How to Customize Safari on Mac? How to Personalize It on MacBook Air/Pro?May 09, 2025 am 10:35 AM
Personalize Your Safari Experience on MacBook: A Comprehensive Guide You can easily customize Safari on your MacBook to enhance your browsing experience. This guide provides a step-by-step approach to personalize various aspects of Safari, from the t
![How to Silence Notifications on iPhone? [Mute Messages & Apps on iOS]](https://img.php.cn/upload/article/001/242/473/174675709271104.jpg?x-oss-process=image/resize,p_40) How to Silence Notifications on iPhone? [Mute Messages & Apps on iOS]May 09, 2025 am 10:18 AM
How to Silence Notifications on iPhone? [Mute Messages & Apps on iOS]May 09, 2025 am 10:18 AMSilence iPhone Notifications: 6 Ways to Find Your Peace Need a break from the constant buzz of iPhone notifications? This guide offers six methods to silence your iPhone, from quick toggles to scheduled quiet time. Let's dive in! 1. Focus Mode: The
 How to Record Calls on iPhoneMay 09, 2025 am 10:15 AM
The new iPhone call recording function added in iOS 18.1 and above makes recording easier than ever! Just tap the recording button on the screen to start recording. This button is on the same screen as the speaker, mute and hang up buttons, making it convenient and fast. After the recording starts, the system will automatically play the prompt tone to inform both parties that the recording is being recorded, but it is best to confirm it verbally to show respect. Say goodbye to the past tedious recording methods, such as using a three-party call to transfer to a voice mail or recording with a Mac computer. Call content recorded on iPhone will be automatically saved in the memo app and saved with the title "Call with (Contact Name or Phone Number)" so that you can listen back, view voice to text records at any time, and add
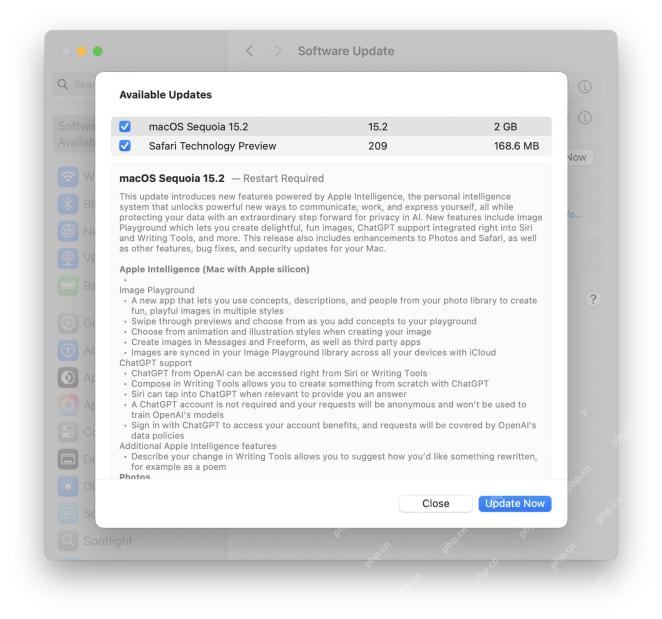 RC of MacOS Sequoia 15.2, iOS 18.2, iPadOS 18.2, Released for TestingMay 09, 2025 am 09:55 AM
Apple released the iOS 18.2, MacOS Sequoia 15.2, and iPadOS 18.2 version candidates (RC) for all users participating in the Apple Systems Software Beta Test Program. The RC version is usually the final version of the Beta version before its public release, which indicates that the official version of iOS 18.2, iPadOS 18.2 and MacOS Sequoia 15.2 will be released soon. In addition to regular bug fixes and security enhancements, these upcoming software updates focus on bringing new Apple Intelligence features to compatible devices, including Imag
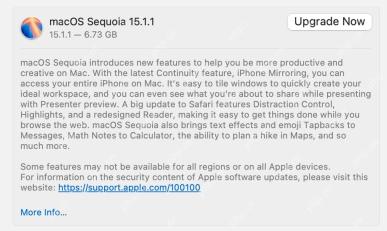 MacOS Sequoia 15.1.1 with Security Fixes Available NowMay 09, 2025 am 09:40 AM
Apple released the macOS Sequoia 15.1.1 update, a small software update that mainly contains important Mac security fixes. This update does not contain any new features, but fixes multiple security vulnerabilities that are being actively exploited, so it is highly recommended that you install this important update on your Apple device. In addition, Apple has released iOS 18.1.1 for iPhone, iPadOS 18.1.1, visionOS 2.1.1, and iOS 17.7.2 and iPadOS 17.7.2, all of which include the same security patches. How to download and install mac
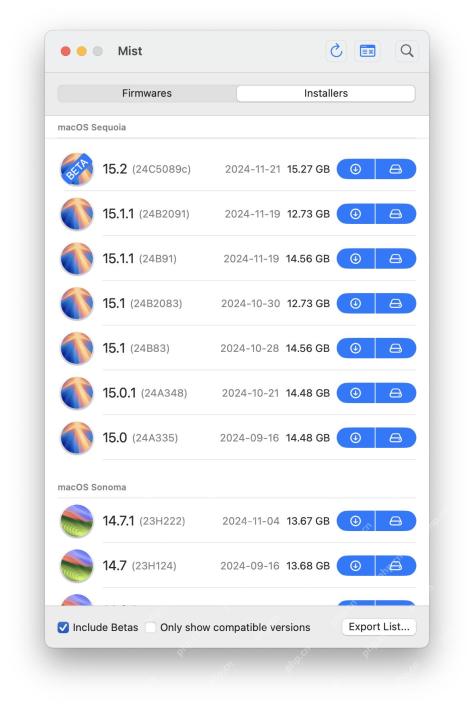 Mist Makes Downloading MacOS Installers & Firmwares EasyMay 09, 2025 am 09:37 AM
Mist: A powerful tool for easy downloading of macOS installers and firmware Many Mac users, IT staff and system administrators like to keep abreast of macOS installation programs, including current and previous versions of macOS system software. Additionally, many advanced Mac users and IT professionals need to access macOS IPSW firmware files at any time to restore Apple Silicon Macs, use them for virtual machines, and even for deployment, troubleshooting, or simple reconfiguration and setup of your Mac. This is where the free Mist tool comes into play, it makes it very easy to download any available macOS IPSW firmware file or any version of macOS installer. Although we maintain it


Hot AI Tools

Undresser.AI Undress
AI-powered app for creating realistic nude photos

AI Clothes Remover
Online AI tool for removing clothes from photos.

Undress AI Tool
Undress images for free

Clothoff.io
AI clothes remover

Video Face Swap
Swap faces in any video effortlessly with our completely free AI face swap tool!

Hot Article
Hot Tools

SublimeText3 Chinese version
Chinese version, very easy to use

WebStorm Mac version
Useful JavaScript development tools

EditPlus Chinese cracked version
Small size, syntax highlighting, does not support code prompt function

DVWA
Damn Vulnerable Web App (DVWA) is a PHP/MySQL web application that is very vulnerable. Its main goals are to be an aid for security professionals to test their skills and tools in a legal environment, to help web developers better understand the process of securing web applications, and to help teachers/students teach/learn in a classroom environment Web application security. The goal of DVWA is to practice some of the most common web vulnerabilities through a simple and straightforward interface, with varying degrees of difficulty. Please note that this software

Zend Studio 13.0.1
Powerful PHP integrated development environment

