
 Web Front-endJS TutorialBuild a clone of Perplexity with LangGraph, CopilotKit, Tavily & Next.js
AI-powered applications are evolving beyond just autonomous agents performing tasks. A new approach involving Human-in-the-Loop allows users to provide feedback, review results, and decide the next steps for the AI. These run-time agents are known as CoAgents.
TL;DR
In this tutorial, you'll learn how to build a Perplexity clone using LangGraph, CopilotKit, and Tavily.
Time to start building!
What is an Agentic Copilot?
Agentic copilots are how CopilotKit brings LangGraph agents into your application.
CoAgents are CopilotKit's approach to building agentic experiences!
In short, it will handle user requests by performing multiple search queries and stream the search back with status and results in real-time to the client.
Checkout CopilotKit ⭐️
Prerequisites
To fully understand this tutorial, you need to have a basic understanding of React or Next.js.
We'll also make use of the following:
- Python - a popular programming language for building AI agents with LangGraph; make sure it is installed on your computer.
- LangGraph - a framework for creating and deploying AI agents. It also helps to define the control flows and actions to be performed by the agent.
- OpenAI API Key - to enable us to perform various tasks using the GPT models; for this tutorial, ensure you have access to the GPT-4 model.
- Tavily AI - a search engine that enables AI agents to conduct research and access real-time knowledge within the application.
- CopilotKit - an open-source copilot framework for building custom AI chatbots, in-app AI agents, and text areas.
- Shad Cn UI - provides a collection of reusable UI components within the application.
How to Create AI Agents with LangGraph and CopilotKit
In this section, you'll learn how to create an AI agent using LangGraph and CopilotKit.
First, clone the CopilotKit CoAgents starter repository. The ui directory contains the frontend for the Next.js application, and the agent directory holds the CoAgent for the application.
Inside the agent directory, install the project dependencies using Poetry.
cd agent
poetry install
Create a .env file within the agent folder and copy your OpenAI and Tavily AI API keys into the file:
OPENAI_API_KEY=
TAVILY_API_KEY=

Copy the code snippet below into the agent.py file:
"""
This is the main entry point for the AI.
It defines the workflow graph and the entry point for the agent.
"""
# pylint: disable=line-too-long, unused-import
from langgraph.graph import StateGraph, END
from langgraph.checkpoint.memory import MemorySaver

from ai_researcher.state import AgentState
from ai_researcher.steps import steps_node
from ai_researcher.search import search_node
from ai_researcher.summarize import summarize_node
from ai_researcher.extract import extract_node

def route(state):
    """Route to research nodes."""
    if not state.get("steps", None):
        return END

    current_step = next((step for step in state["steps"] if step["status"] == "pending"), None)

    if not current_step:
        return "summarize_node"

    if current_step["type"] == "search":
        return "search_node"

    raise ValueError(f"Unknown step type: {current_step['type']}")

# Define a new graph
workflow = StateGraph(AgentState)
workflow.add_node("steps_node", steps_node)
workflow.add_node("search_node", search_node)
workflow.add_node("summarize_node", summarize_node)
workflow.add_node("extract_node", extract_node)
# Chatbot
workflow.set_entry_point("steps_node")

workflow.add_conditional_edges(
    "steps_node",
    route,
    ["summarize_node", "search_node", END]
)

workflow.add_edge("search_node", "extract_node")

workflow.add_conditional_edges(
    "extract_node",
    route,
    ["summarize_node", "search_node"]
)

workflow.add_edge("summarize_node", END)

memory = MemorySaver()
graph = workflow.compile(checkpointer=memory)
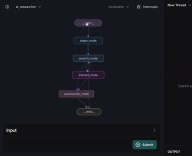
The code snippet above defines the LangGraph agent workflow. It starts from the steps_node, searches for the results, summarizes them, and extracts the key points.
Next create a demo.py file with the code snippet below:
cd agent
poetry install
The code above creates a FastAPI endpoint that hosts the LangGraph agent and connects it to the CopilotKit SDK.
You can copy the remaining code for creating the CoAgent from the GitHub repository. In the following sections, you'll learn how to build the user interface for the Perplexity clone and handle search requests using CopilotKit.
Building the application interface with Next.js
In this section, I'll walk you through the process of building the user interface for the application.
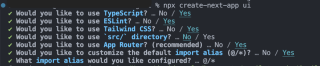
First, create a Next.js Typescript project by running the code snippet below:
OPENAI_API_KEY=
TAVILY_API_KEY=
Install the ShadCn UI library to the newly created project by running the code snippet below:
"""
This is the main entry point for the AI.
It defines the workflow graph and the entry point for the agent.
"""
# pylint: disable=line-too-long, unused-import
from langgraph.graph import StateGraph, END
from langgraph.checkpoint.memory import MemorySaver

from ai_researcher.state import AgentState
from ai_researcher.steps import steps_node
from ai_researcher.search import search_node
from ai_researcher.summarize import summarize_node
from ai_researcher.extract import extract_node

def route(state):
    """Route to research nodes."""
    if not state.get("steps", None):
        return END

    current_step = next((step for step in state["steps"] if step["status"] == "pending"), None)

    if not current_step:
        return "summarize_node"

    if current_step["type"] == "search":
        return "search_node"

    raise ValueError(f"Unknown step type: {current_step['type']}")

# Define a new graph
workflow = StateGraph(AgentState)
workflow.add_node("steps_node", steps_node)
workflow.add_node("search_node", search_node)
workflow.add_node("summarize_node", summarize_node)
workflow.add_node("extract_node", extract_node)
# Chatbot
workflow.set_entry_point("steps_node")

workflow.add_conditional_edges(
    "steps_node",
    route,
    ["summarize_node", "search_node", END]
)

workflow.add_edge("search_node", "extract_node")

workflow.add_conditional_edges(
    "extract_node",
    route,
    ["summarize_node", "search_node"]
)

workflow.add_edge("summarize_node", END)

memory = MemorySaver()
graph = workflow.compile(checkpointer=memory)
Next, create a components folder at the root of the Next.js project, then copy the ui folder from this GitHub repository into that folder. Shadcn allows you to easily add various components to your application by installing them via the command line.
In addition to the Shadcn components, you'll need to create a few components representing different parts of the application interface. Run the following code snippet inside the components folder to add these components to the Next.js project:
"""Demo"""

import os
from dotenv import load_dotenv
load_dotenv()

from fastapi import FastAPI
import uvicorn
from copilotkit.integrations.fastapi import add_fastapi_endpoint
from copilotkit import CopilotKitSDK, LangGraphAgent
from ai_researcher.agent import graph

app = FastAPI()
sdk = CopilotKitSDK(
    agents=[
        LangGraphAgent(
            name="ai_researcher",
            description="Search agent.",
            graph=graph,
        )
    ],
)

add_fastapi_endpoint(app, sdk, "/copilotkit")

# add new route for health check
@app.get("/health")
def health():
    """Health check."""
    return {"status": "ok"}

def main():
    """Run the uvicorn server."""
    port = int(os.getenv("PORT", "8000"))
    uvicorn.run("ai_researcher.demo:app", host="0.0.0.0", port=port, reload=True)
Copy the code snippet below into the app/page.tsx file:
# ?? Navigate into the ui folder
npx create-next-app ./
In the code snippet above, ResearchProvider is a custom React context provider that shares the user's search query and results, making them accessible to all components within the application. The ResearchWrapper component contains the core application elements and manages the UI.
Create a lib folder containing a research-provider.tsx file at the root of the Next.js project and copy the code below into the file:
npx shadcn@latest init
The states are declared and saved to the ResearchContext to ensure they are properly managed across multiple components within the application.
Create a ResearchWrapper component as shown below:
cd agent
poetry install
The ResearchWrapper component renders the HomeView component as the default view and displays the ResultView when a search query is provided. The useResearchContext hook enables us to access the researchQuery state and update the view accordingly.
Finally, create the HomeView component to render the application home page interface.
OPENAI_API_KEY=
TAVILY_API_KEY=

How to Connect your CoAgent to a Next.js Application
In this section, you'll learn how to connect the CopilotKit CoAgent to your Next.js application to enable users to perform search operations within the application.
Install the following CopilotKit packages and the OpenAI Node.js SDK. The CopilotKit packages allow the co-agent to interact with the React state values and make decisions within the application.
"""
This is the main entry point for the AI.
It defines the workflow graph and the entry point for the agent.
"""
# pylint: disable=line-too-long, unused-import
from langgraph.graph import StateGraph, END
from langgraph.checkpoint.memory import MemorySaver

from ai_researcher.state import AgentState
from ai_researcher.steps import steps_node
from ai_researcher.search import search_node
from ai_researcher.summarize import summarize_node
from ai_researcher.extract import extract_node

def route(state):
    """Route to research nodes."""
    if not state.get("steps", None):
        return END

    current_step = next((step for step in state["steps"] if step["status"] == "pending"), None)

    if not current_step:
        return "summarize_node"

    if current_step["type"] == "search":
        return "search_node"

    raise ValueError(f"Unknown step type: {current_step['type']}")

# Define a new graph
workflow = StateGraph(AgentState)
workflow.add_node("steps_node", steps_node)
workflow.add_node("search_node", search_node)
workflow.add_node("summarize_node", summarize_node)
workflow.add_node("extract_node", extract_node)
# Chatbot
workflow.set_entry_point("steps_node")

workflow.add_conditional_edges(
    "steps_node",
    route,
    ["summarize_node", "search_node", END]
)

workflow.add_edge("search_node", "extract_node")

workflow.add_conditional_edges(
    "extract_node",
    route,
    ["summarize_node", "search_node"]
)

workflow.add_edge("summarize_node", END)

memory = MemorySaver()
graph = workflow.compile(checkpointer=memory)
Create an api folder within the Next.js app folder. Inside the api folder, create a copilotkit directory containing a route.ts file. This will create an API endpoint (/api/copilotkit) that connects the frontend application to the CopilotKit CoAgent.
"""Demo"""

import os
from dotenv import load_dotenv
load_dotenv()

from fastapi import FastAPI
import uvicorn
from copilotkit.integrations.fastapi import add_fastapi_endpoint
from copilotkit import CopilotKitSDK, LangGraphAgent
from ai_researcher.agent import graph

app = FastAPI()
sdk = CopilotKitSDK(
    agents=[
        LangGraphAgent(
            name="ai_researcher",
            description="Search agent.",
            graph=graph,
        )
    ],
)

add_fastapi_endpoint(app, sdk, "/copilotkit")

# add new route for health check
@app.get("/health")
def health():
    """Health check."""
    return {"status": "ok"}

def main():
    """Run the uvicorn server."""
    port = int(os.getenv("PORT", "8000"))
    uvicorn.run("ai_researcher.demo:app", host="0.0.0.0", port=port, reload=True)
Copy the code snippet below into the api/copilotkit/route.ts file:
# ?? Navigate into the ui folder
npx create-next-app ./
The code snippet above sets up the CopilotKit runtime at the /api/copilotkit API endpoint, allowing CopilotKit to process user requests through the AI co-agent.
Finally, update the app/page.tsx by wrapping the entire application with the CopilotKit component which provides the copilot context to all application components.
npx shadcn@latest init
The CopilotKit component wraps the entire application and accepts two props - runtimeUrl and agent. The runtimeUrl is the backend API route that hosts the AI agent and agent is the name of the agent performing the action.
Accepting Requests and Streaming Responses to the Frontend
To enable CopilotKit to access and process user inputs, it provides the useCoAgent hook, which allows access to the agent's state from anywhere within the application.
For example, the code snippet below demonstrates how to use the useCoAgent hook. The state variable allows access to the agent's current state, setState is used to modify the state, and the run function executes instructions using the agent. The start and stop functions initiate and halt the agent's execution.
cd agent
poetry install
Update the HomeView component to execute the agent when a search query is provided.
OPENAI_API_KEY=
TAVILY_API_KEY=
Next, you can stream the search results to the the ResultsView by accessing the state variable within the useCoAgent hook. Copy the code snippet below into the ResultsView component.
"""
This is the main entry point for the AI.
It defines the workflow graph and the entry point for the agent.
"""
# pylint: disable=line-too-long, unused-import
from langgraph.graph import StateGraph, END
from langgraph.checkpoint.memory import MemorySaver

from ai_researcher.state import AgentState
from ai_researcher.steps import steps_node
from ai_researcher.search import search_node
from ai_researcher.summarize import summarize_node
from ai_researcher.extract import extract_node

def route(state):
    """Route to research nodes."""
    if not state.get("steps", None):
        return END

    current_step = next((step for step in state["steps"] if step["status"] == "pending"), None)

    if not current_step:
        return "summarize_node"

    if current_step["type"] == "search":
        return "search_node"

    raise ValueError(f"Unknown step type: {current_step['type']}")

# Define a new graph
workflow = StateGraph(AgentState)
workflow.add_node("steps_node", steps_node)
workflow.add_node("search_node", search_node)
workflow.add_node("summarize_node", summarize_node)
workflow.add_node("extract_node", extract_node)
# Chatbot
workflow.set_entry_point("steps_node")

workflow.add_conditional_edges(
    "steps_node",
    route,
    ["summarize_node", "search_node", END]
)

workflow.add_edge("search_node", "extract_node")

workflow.add_conditional_edges(
    "extract_node",
    route,
    ["summarize_node", "search_node"]
)

workflow.add_edge("summarize_node", END)

memory = MemorySaver()
graph = workflow.compile(checkpointer=memory)
The code snippet above retrieves the search results from the agent's state and streams them to the frontend using the useCoAgent hook. The search results are returned in markdown format and passed into the AnswerMarkdown component, which renders the content on the page.
Finally, copy the code snippet below into the AnswerMarkdown component. This will render the markdown content as formatted text using the React Markdown library.
"""Demo"""

import os
from dotenv import load_dotenv
load_dotenv()

from fastapi import FastAPI
import uvicorn
from copilotkit.integrations.fastapi import add_fastapi_endpoint
from copilotkit import CopilotKitSDK, LangGraphAgent
from ai_researcher.agent import graph

app = FastAPI()
sdk = CopilotKitSDK(
    agents=[
        LangGraphAgent(
            name="ai_researcher",
            description="Search agent.",
            graph=graph,
        )
    ],
)

add_fastapi_endpoint(app, sdk, "/copilotkit")

# add new route for health check
@app.get("/health")
def health():
    """Health check."""
    return {"status": "ok"}

def main():
    """Run the uvicorn server."""
    port = int(os.getenv("PORT", "8000"))
    uvicorn.run("ai_researcher.demo:app", host="0.0.0.0", port=port, reload=True)

Congratulations! You've completed the project for this tutorial. You can also watch the video recording here:
Complete Webinar Recording
Wrapping it up
LLM intelligence is the most effective when it works alongside human intelligence, and CopilotKit CoAgents allows you to integrate AI agents, copilots, and various types of assistants into your software applications in just a few minutes.
If you need to build an AI product or integrate AI agents into your app, you should consider CopilotKit.
The source code for this tutorial is available on GitHub:
https://github.com/CopilotKit/CopilotKit/tree/main/examples/coagents-ai-researcher
Thank you for reading!
The above is the detailed content of Build a clone of Perplexity with LangGraph, CopilotKit, Tavily & Next.js. For more information, please follow other related articles on the PHP Chinese website!

 Javascript Data Types : Is there any difference between Browser and NodeJs?May 14, 2025 am 12:15 AM
JavaScript core data types are consistent in browsers and Node.js, but are handled differently from the extra types. 1) The global object is window in the browser and global in Node.js. 2) Node.js' unique Buffer object, used to process binary data. 3) There are also differences in performance and time processing, and the code needs to be adjusted according to the environment.
 JavaScript Comments: A Guide to Using // and /* */May 13, 2025 pm 03:49 PM
JavaScriptusestwotypesofcomments:single-line(//)andmulti-line(//).1)Use//forquicknotesorsingle-lineexplanations.2)Use//forlongerexplanationsorcommentingoutblocksofcode.Commentsshouldexplainthe'why',notthe'what',andbeplacedabovetherelevantcodeforclari
 Python vs. JavaScript: A Comparative Analysis for DevelopersMay 09, 2025 am 12:22 AM
The main difference between Python and JavaScript is the type system and application scenarios. 1. Python uses dynamic types, suitable for scientific computing and data analysis. 2. JavaScript adopts weak types and is widely used in front-end and full-stack development. The two have their own advantages in asynchronous programming and performance optimization, and should be decided according to project requirements when choosing.
 Python vs. JavaScript: Choosing the Right Tool for the JobMay 08, 2025 am 12:10 AM
Whether to choose Python or JavaScript depends on the project type: 1) Choose Python for data science and automation tasks; 2) Choose JavaScript for front-end and full-stack development. Python is favored for its powerful library in data processing and automation, while JavaScript is indispensable for its advantages in web interaction and full-stack development.
 Python and JavaScript: Understanding the Strengths of EachMay 06, 2025 am 12:15 AM
Python and JavaScript each have their own advantages, and the choice depends on project needs and personal preferences. 1. Python is easy to learn, with concise syntax, suitable for data science and back-end development, but has a slow execution speed. 2. JavaScript is everywhere in front-end development and has strong asynchronous programming capabilities. Node.js makes it suitable for full-stack development, but the syntax may be complex and error-prone.
 JavaScript's Core: Is It Built on C or C ?May 05, 2025 am 12:07 AM
JavaScriptisnotbuiltonCorC ;it'saninterpretedlanguagethatrunsonenginesoftenwritteninC .1)JavaScriptwasdesignedasalightweight,interpretedlanguageforwebbrowsers.2)EnginesevolvedfromsimpleinterpreterstoJITcompilers,typicallyinC ,improvingperformance.
 JavaScript Applications: From Front-End to Back-EndMay 04, 2025 am 12:12 AM
JavaScript can be used for front-end and back-end development. The front-end enhances the user experience through DOM operations, and the back-end handles server tasks through Node.js. 1. Front-end example: Change the content of the web page text. 2. Backend example: Create a Node.js server.
 Python vs. JavaScript: Which Language Should You Learn?May 03, 2025 am 12:10 AM
Choosing Python or JavaScript should be based on career development, learning curve and ecosystem: 1) Career development: Python is suitable for data science and back-end development, while JavaScript is suitable for front-end and full-stack development. 2) Learning curve: Python syntax is concise and suitable for beginners; JavaScript syntax is flexible. 3) Ecosystem: Python has rich scientific computing libraries, and JavaScript has a powerful front-end framework.


Hot AI Tools

Undresser.AI Undress
AI-powered app for creating realistic nude photos

AI Clothes Remover
Online AI tool for removing clothes from photos.

Undress AI Tool
Undress images for free

Clothoff.io
AI clothes remover

Video Face Swap
Swap faces in any video effortlessly with our completely free AI face swap tool!

Hot Article
Hot Tools

MinGW - Minimalist GNU for Windows
This project is in the process of being migrated to osdn.net/projects/mingw, you can continue to follow us there. MinGW: A native Windows port of the GNU Compiler Collection (GCC), freely distributable import libraries and header files for building native Windows applications; includes extensions to the MSVC runtime to support C99 functionality. All MinGW software can run on 64-bit Windows platforms.

SublimeText3 Chinese version
Chinese version, very easy to use

DVWA
Damn Vulnerable Web App (DVWA) is a PHP/MySQL web application that is very vulnerable. Its main goals are to be an aid for security professionals to test their skills and tools in a legal environment, to help web developers better understand the process of securing web applications, and to help teachers/students teach/learn in a classroom environment Web application security. The goal of DVWA is to practice some of the most common web vulnerabilities through a simple and straightforward interface, with varying degrees of difficulty. Please note that this software

Zend Studio 13.0.1
Powerful PHP integrated development environment

PhpStorm Mac version
The latest (2018.2.1) professional PHP integrated development tool

