Home >Web Front-end >JS Tutorial >Create a website with the next JS and deploy it with Vercel.
Create a website with the next JS and deploy it with Vercel.
- Mary-Kate OlsenOriginal
- 2024-11-15 08:02:02430browse
Building and deploying a website with Next.js is easier than you might think, and the best part? It's platform-agnostic, so the steps remain the same whether using macOS, Windows, or Linux. In this guide, I'll walk you through creating a Next.js app, setting it up locally, and deploying it to Vercel with just a few simple commands.
- 1. Set Up Your Next.js Project Start by creating a new Next.js app. Open your terminal, and run the following command:
npx create-next-app@latest my-website
-- Click yes for all dependencies
This will create a new Next.js project in a folder called my-website. When prompted, click "Yes" to install all necessary dependencies.
Next, navigate to your project folder:
cd my-website
- 2. Ensure Node is Installed If you encounter any issues while setting up your project, it's likely due to an outdated version of Node.js. To fix this, you can install the latest version of Node:
nvm install node --latest-npm
Ensure you have the correct Node.js version installed by checking the Next.js installation guide for the latest version requirements.
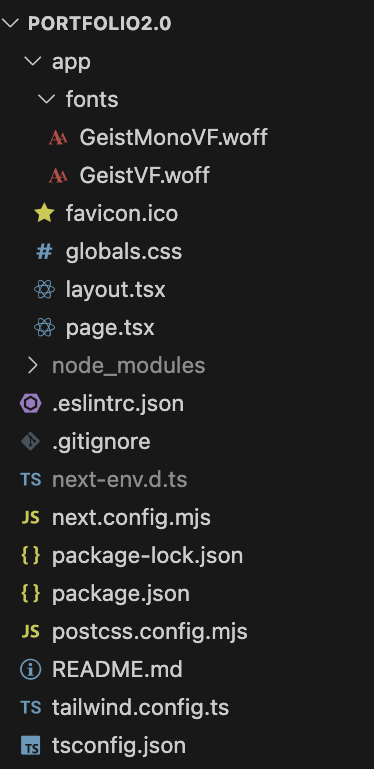
- 3. Open the Project Files Once the project is set up, open your project folder in your preferred code editor. You should see a file structure similar to the one below:

Note that the app name I've used here is portfolio2.0, but feel free to name your project whatever you like. If you want more details on these files, check out the Next.js Project Structure documentation.
- 4. Install Dependencies Next, install the necessary dependencies:
npm install
After installation, you can run your app locally to see it in action. Head to http://localhost:3000 in your browser, and you should see the Next.js default page!
 .
.
- 5.Push Code to GitHub
Now that your app is set up locally push the code to your GitHub repository. You'll need this to deploy it to Vercel.
6.Deploy to Vercel
Sign up for Vercel:
If you don't have a Vercel account, sign up at vercel.com. You can use your GitHub account for easy integration.Connect Vercel to GitHub:
Once signed in to Vercel, link your GitHub account to your Vercel dashboard.Import Your GitHub Repository:
Click "New Project" in your Vercel dashboard.
Select "Import Git Repository" and choose the repository containing your Next.js project.Configure the Project:
Vercel will automatically detect that your project is built with Next.js.
Set the build command to the next build.
Set the output directory to .next (this is usually auto-configured).
Add any environment variables you might need (optional).Deploy Your Project:
Click "Deploy," and Vercel will start the deployment process.
Vercel will clone your repository, install the dependencies, build your app, and deploy it.Wait for the Deployment to Complete:
Vercel will provide real-time deployment logs so you can follow along with the process.Access Your Live Site:
Once deployment is finished, you'll receive a link to your site, which will look like your-project-name.vercel.app. That's it! Your Next.js app is now live.

Quick Recap: Steps for Any Next.js Project
Prepare Your Next.js Project:
Ensure your project is in a GitHub repository with a package.json file containing the necessary scripts (next dev, next build, next start).
Sign Up for Vercel:
Head to Vercel's website and sign up using your GitHub account.
Connect Vercel to GitHub:
Link your GitHub account in the Vercel dashboard.
Import Your GitHub Repository:
In the Vercel dashboard, click "New Project" and choose your GitHub repository.
Configure Your Project:
Vercel automatically detects Next.js projects and configures most settings. You can fine-tune settings if needed.
Deploy:
Click "Deploy" and let Vercel handle the rest. It will build and deploy your app automatically.
Wait for the Deployment:
You can monitor the deployment logs in real-time.
Check Your Live Site:
Once deployment is complete, Vercel will give you a URL to access your site.
The above is the detailed content of Create a website with the next JS and deploy it with Vercel.. For more information, please follow other related articles on the PHP Chinese website!
Related articles
See more- An in-depth analysis of the Bootstrap list group component
- Detailed explanation of JavaScript function currying
- Complete example of JS password generation and strength detection (with demo source code download)
- Angularjs integrates WeChat UI (weui)
- How to quickly switch between Traditional Chinese and Simplified Chinese with JavaScript and the trick for websites to support switching between Simplified and Traditional Chinese_javascript skills

