Home > Article > Computer Tutorials > How to Manage Windows Defender With PowerShell Easily
How to Manage Windows Defender With PowerShell Easily
- Linda HamiltonOriginal
- 2024-09-23 15:01:28929browse
Windows Defender is an antivirus that is built into the Windows operating system. Here this tutorial on MiniTool will walk you through how to manage Windows Defender with PowerShell command line. You will learn how to check the antivirus status, run a quick/full scan, enable/disable the real-time protection, etc. with Windows Defender PowerShell commands.
Overview of Windows Defender and PowerShell
Windows Defender is the default antivirus software on Windows developed by Microsoft. It is used to scan your computer for viruses, malware, or other threats and then remove them to protect your device. PowerShell is a tool used to manage computer tasks. For example, you can use PowerShell to empty the Recycle Bin, use PowerShell to check if a file exists, and more.
In this article, we will show you how to manage Windows Defender with PowerShell. Keep reading to get specific command lines.
How to Manage Windows Defender With PowerShell
Check Whether Windows Defender Is Enabled
First, we will show you how to check the current status of Windows Defender by using PowerShell.
Step 1. In the Windows search box, type PowerShell and then select Run as administrator under Windows PowerShell in the right pane.
Step 2. If a UAC window appears, click the Yes option to continue.
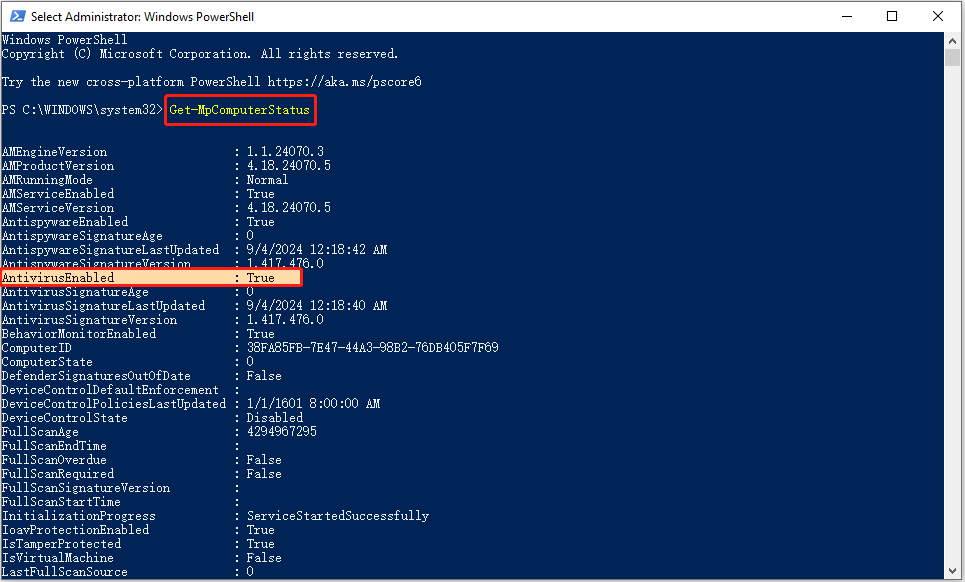
Step 3. In the command line window, type Get-MpComputerStatus and press Enter.
Step 4. In the new window, if the value of AntivirusEnabled is True, it means that the Windows Defender antivirus is running. If the AntivirusEnabled status shows as False, it indicates that Windows Defender is disabled.

Enable/Disable Windows Defender Real-time Protection PowerShell
After executing the above command line, in addition to the status of Windows Defender, a lot of other information about this antivirus software will be displayed, including the real-time protection status.
If the real-time protection is disabled and you want to enable it, you can run this command line:
Set-MpPreference -DisableRealtimeMonitoring $false
The command line to disable Windows Defender antivirus real-time protection is:
Set-MpPreference -DisableRealtimeMonitoring $true
Run a Quick Scan/Full Scan/Custom Scan/Offline Scan
Here you can see how to perform a quick/full/custom/offline scan by using Windows Defender PowerShell commands.
Quick scan:
Type this command: Start-MpScan -ScanType QuickScan in the command line window and press Enter. Then a quick scan will start.
Full scan:
To carry out a full virus scan, you need to execute this command line: Start-MpScan -ScanType FullScan.
Custom scan:
Windows Defender allows you to select specific drives or locations to check for viruses. Here you can see how to complete this task via PowerShell.
First, confirm the location/drive you want to scan.
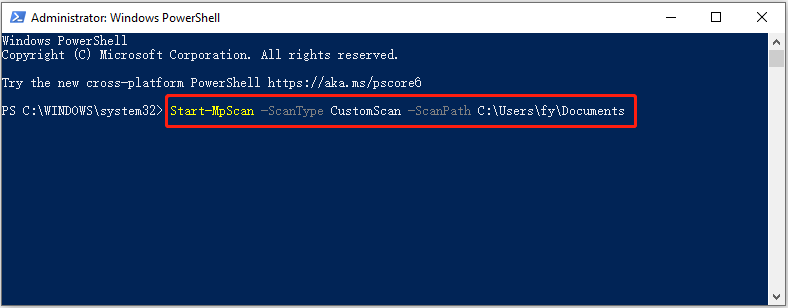
Second, type Start-MpScan -ScanType CustomScan -ScanPath file location path and press Enter. You need to replace the file location path with the actual directory. For example, you can type Start-MpScan -ScanType CustomScan -ScanPath C:UsersusernameDocuments and press Enter to scan the Documents folder. Remember to replace the username with the actual one.

Offline scan:
Windows Defender provides you with an offline scan option that helps you detect and remove persistent malware or viruses. This scan runs outside of the Windows kernel so it can inspect and clean your system more thoroughly.
Input Start-MpWDOScan and press Enter to start scanning for viruses offline.
This is all about how to manage Windows Defender with PowerShell.
Windows Data Recovery Software Recommended:
There are many cases of data loss due to virus infection. Some viruses can directly delete files on your computer while others may damage the hard drive file system, making the files inaccessible or unreadable. If you encounter such a situation and lose your files, you can use MiniTool Power Data Recovery to recover deleted files.
The free edition of this data recovery software supports recovering 1 GB of documents, pictures, videos, audio, emails, etc. for free. You can download it and have a try.
Bottom Line
How to manage Windows Defender with PowerShell? Now you should know the command lines to check Windows Defender status, enable/disable real-time protection, and run different types of virus scans.
The above is the detailed content of How to Manage Windows Defender With PowerShell Easily. For more information, please follow other related articles on the PHP Chinese website!

