


Very few modern apps on Windows are as difficult to remove as the Adobe Creative Cloud (Adobe CC) suite. However, with the right approach, you can get rid of Adobe CC and all of its traces in about 10 minutes. We'll show you how below.
Uninstall All Adobe Apps
To uninstall Adobe Creative Cloud, you first need to uninstall all the Adobe apps, like Photoshop, Lightroom, InDesign, Premiere Pro, etc., that you may have installed using Creative Cloud. If not, you'll likely see the "Couldn't uninstall Creative Cloud for desktop" error.
While you can uninstall Adobe apps from the Settings app, it's best to do it from the Adobe CC desktop app. This way, the desktop app can keep track of all the Adobe apps removed from your computer and prevent any escalation when you attempt to remove Creative Cloud.
To uninstall your Adobe apps:
- Launch Adobe Creative Cloud and sign in if necessary.
- Open the Apps tab. You can locate the installed apps in the right pane, under Installed apps.
- Hover your cursor over the app, then click the three-dots menu and choose Uninstall.

- Repeat the steps to remove all the apps.

If you can't access your Adobe CC account, try to uninstall the Adobe apps from the Settings app. To do this, press Win + I on your keyboard to open Settings, select Apps from the left sidebar, and click Installed Apps on the right.
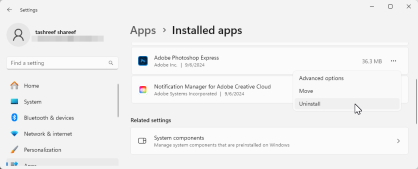
Locate the Adobe app you want to remove, click the three-dots menu, and choose Uninstall. Click Uninstall again to remove the app. If you still can't uninstall the apps, use the Adobe CC Cleaner Tool as described in the last section of this guide.
Remove Adobe Creative Cloud Using Its Uninstaller
You can easily uninstall any Windows app from the Settings app, except the Adobe Creative Cloud for desktop. Any attempt to remove it ends with the "Couldn't uninstall Creative Cloud for desktop" error. Instead, you can use the Adobe CC Uninstaller, a dedicated uninstaller from Adobe, to uninstall the desktop app.

- Go to the Adobe Creative Cloud Uninstaller page, then scroll down to the Uninstall on Windows section. Click the appropriate link for your Windows version.
- Extract the downloaded zip file to your PC. Then, double-click the Creative Cloud Uninstaller.exe file to launch the uninstaller. Click Yes if prompted by Windows User Account Control.
- Then, click Uninstall on the confirmation dialog and wait for the process to complete.

Clean Up Leftover Bloatware With Adobe CC Cleaner Tool
Thanks to Adobe's deep integration into the Windows OS, you still need to clean up some mess left by the Creative Cloud app. To remove leftover bloatware and files, we'll use the Adobe Creative Cloud Cleaner tool.
- Go to the download Adobe CC Cleaner page. Here, scroll down to the How to use the Creative Cloud Cleaner tool section, then click Download. Once downloaded, run the AdobeCreativeCloudCleanerTool.exe file and click Yes.
- In the Command Prompt-like screen, type e and hit Enter to choose your language as English. Then, type Yes or Y and hit Enter to agree to Adobe's end-user license agreement.
- The next screen will show all the Adobe bloatware left on your computer. Type 1 and press Enter to choose to clean up all the files, or press the corresponding number to remove a specific set of files.
- On the next screen, you'll see a list of products installed on your computer. Type 6 and press Enter to choose Clean All, then type Y and press Enter to confirm the action. Now, wait for the tool to finish removing the files.


If completed successfully, press Enter to quit. If you see any errors, run the tool again to remove any leftover files.
Manually Remove Adobe Genuine Service and Folders
The last bit of this puzzle involves removing the Adobe Genuine Service (also known as Adobe Client), which is designed to detect pirated Adobe tools on your computer.
To remove Adobe Genuine Service:
- Go to Settings > Apps > Installed apps.
- Locate Adobe Genuine Service, click the three-dots menu, and choose Uninstall.
- Click Uninstall again to confirm the action.
- Click Yes, then click Uninstall in the Adobe Genuine Service Uninstaller wizard.

After that, you can delete the Adobe folders in the following locations:
<code class="hljs bash">C:\Program Files\AdobeC:\Users\Username\AppData\Roaming\Adobe (replace Username with your computer's username)C:\Program Files (x86)\AdobeC:\Program Files (x86)\Common Files\AdobeC:\Program Files\Common Files\Adobe</code>
Open the Adobe folder, select all the files within, and choose Delete. Do this for all the folders above. Also, remember to empty your recycle bin to free up space on your drive.
Adobe makes it unnecessarily difficult to remove its Creative Cloud desktop app. While it does offer a few tools to clean up the installation, some manual cleaning is still necessary to remove all the files.
If you're moving away from the Adobe ecosystem, you may want to check our curated list of Adobe software alternatives that are available for free.
The above is the detailed content of Here\'s How I Properly Uninstalled Adobe Creative Cloud on Windows. For more information, please follow other related articles on the PHP Chinese website!

 How to Enable the Group Policy Editor in Windows 11 HomeApr 15, 2025 pm 06:01 PM
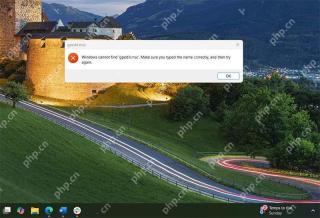
Enable the Group Policy Editor (gpedit.msc) on Windows 11 Home: A Step-by-Step Guide Many users, especially in shared office environments, rely on the Group Policy Editor (gpedit.msc) for managing multiple user accounts and preventing unauthorized ac
 Windows kb5054979 update information Update content listApr 15, 2025 pm 05:36 PM
KB5054979 is a cumulative security update released on March 27, 2025, for Windows 11 version 24H2. It targets .NET Framework versions 3.5 and 4.8.1, enhancing security and overall stability. Notably, the update addresses an issue with file and directory operations on UNC shares using System.IO APIs. Two installation methods are provided: one through Windows Settings by checking for updates under Windows Update, and the other via a manual download from the Microsoft Update Catalog.
 Creating an Encrypted Backup Drive That Works on Windows, Mac, and LinuxApr 15, 2025 am 06:13 AM
Protecting Your Digital Life: Creating Encrypted Backups with VeraCrypt Our digital lives are brimming with irreplaceable memories, crucial documents, and essential work files. The loss of these due to device failure, theft, or ransomware attacks co
 How (and Why) to Turn Off Mouse Acceleration on Windows 11Apr 15, 2025 am 06:06 AM
Improve mouse accuracy: Disable Windows 11 mouse acceleration function The mouse cursor moves too fast on the screen, even if you only move the mouse a few centimeters? This is what the mouse acceleration function is. This article will guide you on how to disable this feature to better control mouse movement. Is it wise to disable mouse acceleration? There is no direct "Mouse Acceleration" option in Windows systems. Instead, it is the "Enhanced Pointer Precision" setting, which Microsoft sees as a mouse acceleration feature. When this feature is enabled, the mouse's DPI (dots per inch) setting takes effect. It controls the relationship between the physical movement speed of the mouse and the distance the cursor moves on the screen. Move the mouse slowly, Windows will reduce the effective DPI and the cursor moves shorter
 GPD Duo Laptop Review: Dual-Screen Productivity For Experienced UsersApr 15, 2025 am 06:05 AM
The GPD Duo: A Powerful Dual-Screen Laptop Hampered by Software Issues Mobile productivity gets a boost with the GPD Duo's innovative dual-screen design. However, significant software shortcomings prevent it from reaching its full potential. Rating
 Razer's Remote Play May Be Better Than Steam LinkApr 15, 2025 am 06:04 AM
Razer's new remote play app offers a compelling alternative to established services like Steam Link. Integrating seamlessly with Razer Cortex, the app allows users to launch PC games with a single tap. Android users benefit from haptic feedback whe
 10 Ways to Customize the Windows 11 Start MenuApr 15, 2025 am 06:02 AM
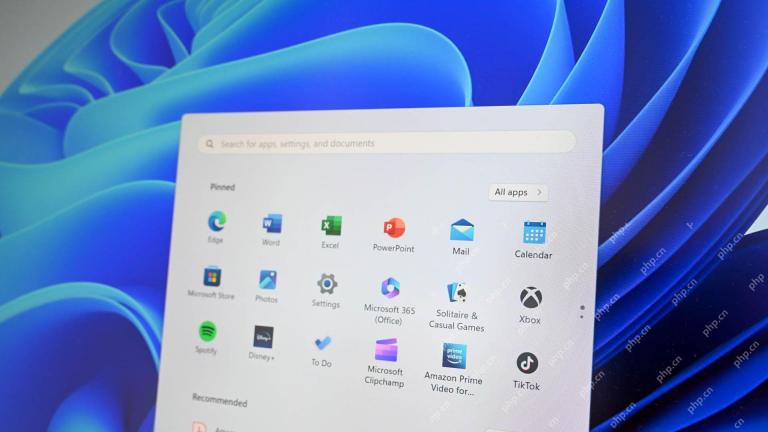
Customize Your Windows 11 Start Menu: A Comprehensive Guide The Windows 11 Start Menu is your gateway to apps and settings. If the default setup isn't to your liking, personalization options let you tailor it to your needs. This guide explores vari
 How to Use Windows 11 as a Bluetooth Audio ReceiverApr 15, 2025 am 03:01 AM
Turn your Windows 11 PC into a Bluetooth speaker and enjoy your favorite music from your phone! This guide shows you how to easily connect your iPhone or Android device to your computer for audio playback. Step 1: Pair Your Bluetooth Device First, pa


Hot AI Tools

Undresser.AI Undress
AI-powered app for creating realistic nude photos

AI Clothes Remover
Online AI tool for removing clothes from photos.

Undress AI Tool
Undress images for free

Clothoff.io
AI clothes remover

AI Hentai Generator
Generate AI Hentai for free.

Hot Article
Hot Tools

Notepad++7.3.1
Easy-to-use and free code editor

Zend Studio 13.0.1
Powerful PHP integrated development environment

SecLists
SecLists is the ultimate security tester's companion. It is a collection of various types of lists that are frequently used during security assessments, all in one place. SecLists helps make security testing more efficient and productive by conveniently providing all the lists a security tester might need. List types include usernames, passwords, URLs, fuzzing payloads, sensitive data patterns, web shells, and more. The tester can simply pull this repository onto a new test machine and he will have access to every type of list he needs.

DVWA
Damn Vulnerable Web App (DVWA) is a PHP/MySQL web application that is very vulnerable. Its main goals are to be an aid for security professionals to test their skills and tools in a legal environment, to help web developers better understand the process of securing web applications, and to help teachers/students teach/learn in a classroom environment Web application security. The goal of DVWA is to practice some of the most common web vulnerabilities through a simple and straightforward interface, with varying degrees of difficulty. Please note that this software

SAP NetWeaver Server Adapter for Eclipse
Integrate Eclipse with SAP NetWeaver application server.

