


The interoperability between iPhone and Mac is unparalleled; from using the iPhone as Mac’s webcam to syncing messages from iPhone to Mac. However, there’s stuff to know and settings to enable before you can send and receive messages from Mac. Read along to learn them all.

If you want to send an urgent message, but don’t have your iPhone next to you, or want to continue a conversation while using your Mac, here’s how you can connect iMessage to Mac.
How to Get Messages on Mac
The basic premise of this feature is iCloud. So, you’ll need to:
- Enable iCloud Message sync on iPhone and Mac (basically all the devices you want to use for Messages).
- Use the same Apple ID on all devices, namely the iPhone and Mac.
In addition to iMessage, you can also sync text messages from iPhone to Mac. Once set up, you’ll receive every new message on your iPhone and Mac.
Moreover, you can choose to reply or react from any device. And anything you delete will be deleted from all devices.
Chiefly there are three steps to sync iMessage history and attachments to Mac; so let’s get going.
1. Enable iCloud Sync for Messages on iPhone and iPad
Step 1: Launch Settings and tap your profile (your name and image) from the top.
Step 2: Tap iCloud


Step 3: Select Show All under Apps Using iCloud.
Step 4: Look for Messages and tap it.


Step 5: Turn on the toggle for Sync this iPhone.

Altogether the upload process might take some time depending on the size/number of messages.
Now, your message history will be synced to iCloud. Correspondingly any old messages stored in iCloud will be accessible on this device and all-new conversations will be stored on iCloud for backup.
Tip: Try to do the initial sync with a stable Wi-Fi connection as it can eat up a lot of your cellular data. Also, ensure there’s ample battery life to avoid battery drain before the sync is complete.
2. Allow Mac to Send and Receive Messages From iPhone
To turn on iMessage sync:
Step 1: Go to Setting → Messages.
Step 2: Select Send & Receive.


Step 3: Here, check the phone numbers and email addresses you want to send and receive messages from on each device.
Step 4: Check the preferred number or email address under ‘Start New Conversation From.’

To get an SMS on Mac,
Step 1: Go to Settings → Messages.
Step 2: Scroll down to Text Message Forwarding.
Step 3: Turn on the toggle for your Mac.


Note: If you haven’t activated two-factor authentication on your Apple ID, a six-digit activation code will appear on your Mac. Subsequently, enter this code on your iPhone and tap Allow.
3. Sync Messages From iPhone to Mac
Step 1: Launch the Messages app on Mac.
Step 2: Do one of the following, depending on your macOS:
- macOS Ventura: From the menu bar, select Messages → Settings → iMessage tab.
- macOS Monterey or earlier: From the menu bar, select Messages → Preferences → iMessage tab.

Step 3: Check the box next to ‘Enable Messages in iCloud’. Next, select the phone numbers and email addresses you want to send and receive messages from the Mac.
Step 4: Also, click the drop-down menu under ‘Start new conversations from’ and select the number/email ID. (It should match the setting on iPhone)

Thereupon, all messages stored in iCloud will be accessible from your Mac. Reversibly, any message sent and received on your Mac will be synced to your iCloud.
Tip: If the Messages app didn’t auto-sync all messages, you can click Sync Now to do so.

How to Send a Message From Mac
A great thing about enabling messages on Mac is that you are privy to almost all the features available on iPhone. So, alongside texting to an individual or a group, you can also:
- Send audio messages: Similar to sending a voice text on an iPhone, you have to click the Record Audio button (the wavy icon), speak, and click the Send Button.

- Attach and send photos and videos: Click the Apps button (app icon) → Photos → select the photo/video from the library. Additionally, you can copy and paste or drag and drop them in the message field directly.
- Tapback: Click and hold the message and choose the reaction you want to send. To unsend or send a different reaction, repeat the process and de-select or select any other Tapback.


- Scan an image or import a file from iPhone: Go to Files (from the menu bar) → Import from iPhone or iPad → choose between Take Photo, Scan Documents, and Add Sketch.

- Create and use Memoji: Click the Apps button (app icon) → Memoji Stickers → select an already existing Memoji or click plus ( ) icon/ three-dot icon → make the Memoji and share it.


- Add Message effects: Type the message or add the emoji, click the Apps button (app icon) → Message Effects → select the effect and send the message. If you want some tricks up your sleeve, check out these iMessage effects like Pew Pew.
- Edit or unsend messages: Remarkably, with iOS 16 and macOS Ventura you can now edit or unsend an iMessage. Right-click on the message and select Edit or Undo Send.
well, that’s how you can set up and send messages from your MacBook. However, if you no longer wish to sync iMessage on Mac, move on to the next section.
How to Stop Getting Messages on Mac From iPhone
To stop receiving messages on your Mac, you’ll need to turn off Messages in iCloud on Mac.
Step 1: Launch Messages.
Step 2: Select Messages from the top bar and select,
- Settings (macOS Ventura and later)
- Preferences (macOS Monterey and earlier)
(Alternatively, you can simply open messages and press Cmd , to open Settings/Preferences.)
Step 3: Here, uncheck ‘Enable Messages in iCloud.’

Step 4: Choose,
- Disable This Device: To turn off iCloud sync for Messages from Mac.
- Disable All: Turns off iCloud sync for Messages on all devices associated with the Apple ID.

The sync instantly stops when you turn off Messages in iCloud on any device. As for your message history on this device, it will be stored separately in the iCloud backup while the sync of other devices remains intact.

That’s it! You have successfully disconnected iMessage from Mac. Have more queries? Move on to the next section.
FAQs About Syncing Messages From iPhone to Mac
There can be a variety of reasons, from errors in connecting to iCloud to system bugs. Check out these fixes to get your iMessage working again on Mac.
Yes, you can register for iMessage on your Mac with your Apple ID. However, this will be limited to iMessage, you won’t be able to receive and send SMS.
No, you’ll need iCloud/Apple ID to set up messages on Mac and to sync text messages from iPhone to Mac.
There might be a glitch in iMessage sync or something. Albeit to fix it, go to Settings → Messages → Toggle off iMessage → restart device → Toggle on and sign back into iMessage.
Yes, Apple uses end-to-end encryption for all messages stored in iCloud. Whether you’re downloading or uploading messages, iCloud keeps it safe.
Turn on Messages on Mac for Ultimate Ease
Shared messages between your iPhone, iPad, and Mac are remarkably smooth. If used wisely, it can help you achieve work/life balance. Conversely, it can also cause distractions in your workflow.
And while some love the feature and depend on it, some prefer keeping the setting disabled. So, which side are you on, would you prefer keeping it on or off? Share in the comments below.
The above is the detailed content of How to Sync Messages From iPhone to Mac: A Step-By-Step Guide. For more information, please follow other related articles on the PHP Chinese website!

 MacOS Sequoia is Compatible with These MacsMay 12, 2025 am 10:50 AM
macOS Sequoia (macOS 15): A Comprehensive Guide to Compatibility macOS Sequoia, Apple's latest operating system, boasts exciting new features like iPhone mirroring, enhanced window tiling, AI-powered Safari and Mail, a dedicated Passwords app, and u
 How to Fix Cellular Data Not Working on iOS 18 with Apps or iPhoneMay 12, 2025 am 10:49 AM
Many iPhone users upgrading to iOS 18 have reported cellular data issues with various apps. Streaming music, podcasts, and social media content may fail when using cellular data, even if Wi-Fi is unavailable. This problem, widely discussed in Apple
 How to Run Llama LLM on Mac, LocallyMay 12, 2025 am 10:40 AM
Meta's Llama large language model (LLM) offers a powerful alternative to cloud-based options like ChatGPT. Unlike its counterparts, Llama allows for local execution on your computer, granting offline access and seamless integration into personal wor
 MacOS Sequoia is Available to Download NowMay 12, 2025 am 10:27 AM
Apple officially released macOS Sequoia, which is now available for download for all Mac users! Sequoia, version number macOS 15.0, is named after the famous Giant Sequoia and National Park, California, where Apple is headquartered. macOS Sequoia brings many exciting new features to the Mac, most notably iPhone mirroring, which allows you to control your iPhone with your cursor and conveniently drag and drop files and photos between devices. Other new features include: standalone password app, more convenient window tiling, new wallpapers and screen savers, "Focus Mode" in Safari
 How to Scroll-to-Top with Dynamic Island on iPhone 16, iPhone 15, & iPhone 14 ProMay 12, 2025 am 10:18 AM
The iPhone's "Back to Top" gesture is useful: Easily deal with dynamic islands iPhones have long provided a convenient “back to top” gesture: Just tap the top of the screen to quickly get back to the top of long text, email, or web pages. However, iPhone models equipped with Dynamic Island, such as the iPhone 14 Pro, iPhone 15 and iPhone 16 series, make this gesture slightly tricky. The Dynamic Island is located at the top of the screen and integrates a camera, microphone, and real-time information display for various applications (such as music playback, timer, or navigation). The problem is that when users habitually touch the top of the screen, it is easy to accidentally touch the dynamic island, thereby accidentally switching to the dynamic island.
 MacOS Sequoia 15 Release Candidate Available to Download NowMay 12, 2025 am 10:17 AM
macOS Sequoia 15 release candidate is now available! Apple has released the macOS Sequoia 15 release candidate (RC) to Mac users involved in developers and public beta programs. At the same time, users of qualified device can also download iOS 18 RC, iPadOS 18 RC, watchOS 11 RC, tvOS 18 RC and visionOS 2 RC. If you have been waiting for the RC version or want to get the first to experience the version that will be released next Monday, you can now install macOS Sequoia RC through the developer beta or public beta program. Apple
 How to Stop Apple Music from Opening on Mac RandomlyMay 12, 2025 am 10:01 AM
Many Mac users find that the Apple Music app will open randomly and even play music without any action. This behavior of Apple Music randomly opening and playing music is very annoying to many Mac users. This article will explain why Apple Music is open randomly and provides four different solutions. Why does Apple Music open randomly? There are two main reasons why Apple Music apps are opened randomly on Mac: Unexpected keyboard or touch bar input: Inadvertent pressing of keyboard media buttons (such as play/pause, back/forward buttons) may cause Apple M to be
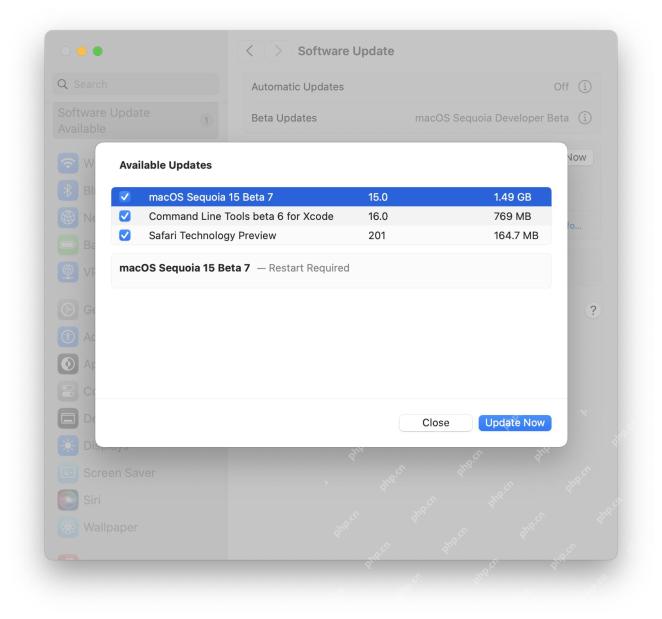 MacOS Sequoia 15 Beta 7 Available for TestingMay 12, 2025 am 09:43 AM
macOS Sequoia 15 Beta 7 and iOS 18 Beta 7 Now Available for Testing Apple has released the seventh beta versions of its upcoming operating systems, including macOS Sequoia 15, iOS 18, iPadOS 18, watchOS 11, tvOS 18, and visionOS 2. The macOS Sequoi


Hot AI Tools

Undresser.AI Undress
AI-powered app for creating realistic nude photos

AI Clothes Remover
Online AI tool for removing clothes from photos.

Undress AI Tool
Undress images for free

Clothoff.io
AI clothes remover

Video Face Swap
Swap faces in any video effortlessly with our completely free AI face swap tool!

Hot Article
Hot Tools

SublimeText3 English version
Recommended: Win version, supports code prompts!

EditPlus Chinese cracked version
Small size, syntax highlighting, does not support code prompt function

ZendStudio 13.5.1 Mac
Powerful PHP integrated development environment

Safe Exam Browser
Safe Exam Browser is a secure browser environment for taking online exams securely. This software turns any computer into a secure workstation. It controls access to any utility and prevents students from using unauthorized resources.

VSCode Windows 64-bit Download
A free and powerful IDE editor launched by Microsoft

