


Creating a Wi-Fi hotspot on Windows 7 system is a common need for many users. However, many people are confused and overwhelmed as to how to achieve this goal. To this end, PHP editor Yuzai brings you this detailed guide. This guide will explain the step-by-step process of creating a Wi-Fi hotspot on a Windows 7 computer, allowing users to easily turn their computer into a wireless hotspot to provide Internet connectivity to other devices.

1. How to set up a WiFi hotspot on a Win7 computer
How to set up a WiFi hotspot on a Win7 computer
In today's digital age, wireless networks have become an indispensable part of our daily lives. Using WiFi hotspots allows us to easily connect to the Internet anywhere, conveniently and quickly. However, sometimes we may need to create a WiFi hotspot on a temporary occasion so that other devices can connect to the shared network. At this time, we need our Win7 computer to realize this requirement.
Step 1: Open the command prompt
First, we need to open the command prompt with administrator rights. Type "cmd" in the search box in the Start menu, then right-click "Command Prompt" and select "Run as administrator" to open the command prompt window.
Step 2: Set the WiFi hotspot name and password
In the command prompt window that opens, enter the following command to set the WiFi hotspot name and password:
netsh wlan set hostednetwork mode=allow ssid=YourWiFiName key= YourPasswordnetsh wlan set hostednetwork mode=allow ssid=YourWiFiName key=YourPassword请将“YourWiFiName”替换为您想要设置的WiFi热点名称,将“YourPassword”替换为您想要设置的密码。执行完毕后,您将看到“已成功更改托管网络的状态”。
步骤三:启动托管网络
在命令提示符窗口中,输入以下命令启动托管网络:
netsh wlan start hostednetworkPlease replace "YourWiFiName" with the name of the WiFi hotspot you want to set, and replace "YourPassword" with the password you want to set. Once completed, you will see "Successfully changed the status of the hosted network." Step 3: Start the hosted network In the command prompt window, enter the following command to start the hosted network: netsh wlan start hostednetwork
Make sure your computer has a wireless network card to create and use WiFi hotspots. Creating a WiFi hotspot may consume computer power, so it is recommended to use it while charging. Do not share untrusted network connections to keep your network safe.
Through the above steps, you can easily set up a WiFi hotspot on your Win7 computer to realize the convenience of sharing the network. I hope this article is helpful to you and I wish you a happy use!
2. How to set up the IP address gateway of the mobile phone as a WiFi hotspot on the computer?1) First, obtain your IP address, subnet mask, default gateway, and DNS server.
Use on the computer: WIN key + R to open Run (or directly select "Run" in the "Start" menu), enter: CMD to enter the DOS command line, enter: ipconfig/all to run to view the IP address and other related information. 2) Set the mobile phone IP address. Click "Settings" to enter WLAN and select the "WIFI" hotspot you want to connect to. Select "Static" in the IP setting bar to enter, and then set it according to the IP address obtained in the first step. Note: The last three digits of the IP address can be set according to personal needs, but they cannot be the same as the addresses set by other devices. (The setting range is: 1-255) and must not exceed 255. 3) How to set the network parameters of the mobile phone: Menu - Tools - Settings - Connection Settings - Access Point - Options - New Access Point - Use default settings. Connection name: cmwap (can be chosen casually), Data Bearing Mode: Packet Data, Access Point Name: cmwap, User Name: None, Prompt for password: No, Password: None, Authentication: Security, Home page: http://wa p.monternet.com, then press Options and select Advanced settings, Network type: IPv4, Mobile phone IP address: Automatic, domain name server: automatic, proxy server address: 10.0.0.172, proxy port number: 80. 3. How to make the computer act as a WIFI hotspot when the network cable is connected to the laptop? 1. You need to purchase a USB wireless network card, then plug the USB network card into the computer and install the USB wireless network card driver. 🎜🎜2. Then plug in the network cable and connect to the Internet. 🎜🎜3. Download XX free WIFI tool, click to open, share the wireless network card as WIFI, and share the wired network to WIFI. 🎜4. コンピューター A が WiFi ホットスポットとして使用され、デバイス B が WiFi に接続されている場合、A と B はどのようにして同じ LAN 上にあるのでしょうか?
A がホットスポット サービスを開き、B デバイスが接続します。この場合、通信相手自体は追加の機器なしで同じ LAN 上にあります。 A がインターネット接続サービスを利用していなくても、AB 間の相互通信には影響しません。
そのため、追加の機器は必要ありません。
5. Android スマートフォンが WiFi ホットスポットとして USB を使用してコンピューターに接続されている場合、他のデバイスがインターネットに接続されている場合、携帯電話のデータまたはコンピューター独自のネットワークを使用する必要がありますか?
1. インターネットにアクセスするために携帯電話によって設定されたホットスポットに接続されているデバイスは、携帯電話のデータを使用します。
2. コンピュータを使用してブロードバンドに接続し、コンピュータにホットスポットを設定する場合、コンピュータに設定されたホットスポットに接続されているデバイスは携帯電話のトラフィックを使用しません。6. コンピューターはどのように WiFi ネットワークを共有しますか?コンピューターを WiFi ホットスポットとして使用するにはどうすればよいですか?
コンピューターはどのように WiFi ネットワークを共有しますか?
現代社会では、ワイヤレスネットワークは人々の生活に不可欠な部分となっています。私たちは、インターネットサーフィン、ビデオの視聴、友人との連絡などを目的として、携帯電話、タブレット、スマート TV、その他のデバイスを WiFi ネットワークに接続することがよくあります。
ただし、場合によっては、携帯電話の信号が不安定だったり、他のデバイスを使用して WiFi に接続したいのに、周囲に利用できるルーターがない場合があります。このとき、コンピューターを介して WiFi ネットワークを共有できるかどうか考えたことがありますか?答えは「はい」です。
強力なツールとして、コンピューターは WiFi ネットワークに接続できるだけでなく、構成によってはコンピューター自体を WiFi ホットスポットに変え、他のデバイスが接続できるようにすることもできます。このようにして、追加のルーターを購入することなく、他のデバイスとネットワークを簡単に共有できます。
具体的には、次の手順で WiFi ネットワークをコンピューターと共有できます:
まず、コンピューターが利用可能な WiFi ネットワークに接続されていることを確認します。 コンピューターのネットワーク共有設定を開きます。 Windows では、この設定はコントロール パネルのネットワークと共有センターにあります。 共有設定で、「アダプター オプションの変更」または同様のオプションを見つけます。このインターフェイスでは、コンピュータのネットワーク アダプタのリストが表示されます。 現在接続しているネットワークアダプターを選択し、右クリックして「プロパティ」を選択します。 [プロパティ]ダイアログ ボックスで、[共有]タブをクリックします。 [共有] タブで、[他のネットワーク ユーザーがこのコンピュータのインターネット接続を介して接続できるようにする] にチェックを入れます。 他のデバイスに接続するときにパスワードを要求したい場合は、「他のネットワーク ユーザーがこのコンピュータのインターネット接続を介して接続することを許可する」にチェックを入れてパスワードを設定します。 「OK」ボタンをクリックして変更を保存します。上記の手順を完了すると、コンピューター自体が WiFi ホットスポットになり、他のデバイスにネットワーク接続が提供されます。このようにして、コンピュータが接続されているネットワークを使用して、他のデバイスをインターネットに接続できます。
コンピューターを WiFi ホットスポットとして使用するにはどうすればよいですか?
コンピューターを WiFi ホットスポットとして使用する利点は明らかです。まず、旅行中や WiFi ネットワークがない場所でインターネットにアクセスする必要がある場合、コンピューターのネットワーク接続を使用して他のデバイスにネットワーク サービスを提供できます。次に、自宅やオフィスでコンピュータが高速ネットワークに接続されている場合、そのコンピュータをホットスポットとして使用して、他のデバイスの接続を容易にし、共有ネットワークを実現できます。
コンピューターを WiFi ホットスポットにすると、一定量のコンピューター リソースが占有されるため、コンピューターが熱くなり、バッテリーの消費量が増加する可能性があることに注意してください。さらに、コンピューターの WiFi ホットスポットに接続されているデバイスが多すぎると、ネットワークの速度と安定性に影響を与える可能性があります。
コンピューターを WiFi ホットスポットとしてより適切に使用したい場合は、これらのソフトウェアは通常、接続されているデバイスの数の制限、ネットワーク名とパスワードの設定など、より多くの機能と設定オプションを提供します。 、など。
概要
コンピューターは WiFi 信号を発信し、他のデバイスが接続するための WiFi ホットスポットとして機能するため、利便性と柔軟性が得られます。簡単な設定で、追加のルーターや WiFi デバイスを購入することなく、コンピューターのネットワーク接続を他のデバイスと共有できます。
もちろん、コンピューターを WiFi ホットスポットとして使用する場合には、いくつかの制限と注意事項があります。コンピュータに過度の負担をかけたり、ネットワークの品質に影響を与えたりしないように、合理的に使用する必要があります。
この記事をお読みいただき、ありがとうございます。この記事が、コンピューターと WiFi ネットワークを共有する方法、およびコンピューターを WiFi ホットスポットとして使用する方法を理解するのに役立つことを願っています。さらにご質問がある場合、またはさらにサポートが必要な場合は、お気軽にお問い合わせください。
7. コンピューターを Wi-Fi ホットスポットとして設定する方法
コンピューターを Wi-Fi ホットスポットとして設定する方法
どこでもスマート デバイスが普及している時代では、多くの場合、インターネットに接続するために複数のデバイスを使用する必要があります。コンピューターを Wi-Fi ホットスポットとして設定することは、複数のデバイスを接続する必要があるが、ワイヤレス ルーターがない場合に非常に便利な解決策です。しかし、多くの人は、コンピューターを Wi-Fi ホットスポットとして設定する方法についてまだ混乱しています。この記事では、Windows および Mac プラットフォームでコンピューターを Wi-Fi ホットスポットとして設定する方法を紹介し、関連する注意事項をいくつか共有します。
Windows プラットフォームでコンピューターを Wi-Fi ホットスポットとして設定します
Windows オペレーティング システムにはワイヤレス ホットスポットを作成する機能があり、コンピューターに接続されているネットワークを他のデバイスと共有できます。具体的な手順は次のとおりです:
「設定」を開きます 「ネットワークとインターネット」をクリックします 「モバイルホットスポット」を選択します ポップアップウィンドウで、「モバイルホットスポット」スイッチをオンにします ホットスポット名とパスワードを設定します 他のデバイスをコンピュータのホットスポットに接続します上記の手順により、Windows コンピューターを Wi-Fi ホットスポットとして設定でき、他のデバイスもホットスポットに接続してネットワーク接続を楽しむことができます。
Mac プラットフォームでコンピューターを Wi-Fi ホットスポットとして設定します
Windows と比較して、Mac プラットフォームでコンピューターを Wi-Fi ホットスポットとして設定する手順は若干異なります:
「システム環境設定」を開き、「共有」をクリックします。 「インターネット共有」オプション 共有する必要がある接続を選択します。 「接続の共有」オプションで「WiFi」を選択し、ホットスポット名とパスワードを設定します。上記の手順により、Mac コンピュータを Wi-Fi ホットスポットとして接続し、ネットワーク接続を他のデバイスと簡単に共有できます。
注意事項
コンピューターを Wi-Fi ホットスポットとして設定する場合は、次の点に留意してください:
コンピューターがインターネットに接続されていることを確認してください 他人による不正使用を避けるために、ホットスポットのパスワードのセキュリティに注意してください接続の安定性を確保するために、ホットスポットの距離と信号強度に注意してください セキュリティリスクを回避するために、不要な共有サービスをオフにしてください上記の手順と注意事項により、コンピューターを簡単に Wi-Fi ホットスポットとして設定でき、他のデバイスが接続しやすくなりますネットワーク接続をお楽しみください。
この記事をお読みいただきありがとうございます。この内容が、コンピューターを Wi-Fi ホットスポットとして正常に設定し、デバイスの接続エクスペリエンスを向上させるのに役立つことを願っています。
8. コンピューターに Wi-Fi ホットスポットを設定するにはどうすればよいですか?
コンピューターを Wi-Fi ホットスポットとして設定する方法:
1. コンピューターの電源を入れ、タスクバーのネットワーク接続アイコンをクリックし、ネットワークと共有センターを開き、メニューを選択します。新しい接続とネットワークをセットアップします」、設定ネットワーク接続インターフェースを開きます;
3. 「ワイヤレス一時コンピューターをコンピューターネットワークに設定する」オプションを選択します;
4. 一時ネットワークインターフェースをセットアップし、名前を入力しますWi-Fi ホットスポットと暗号化パスワードを入力して確認します。
9. コンピューターをホットスポット WiFi に接続するにはどうすればよいですか?
1. [設定] を開き、[モバイル ネットワーク]、[パーソナル ホットスポット] の順にクリックし、[パーソナル ホットスポット] をオンにして、[パスワード] をクリックし、ホットスポットのパスワードを設定して、[OK] をクリックします。
2. 次に、コンピューター上で、右下隅にあるネットワーク信号アイコンをクリックして、WLAN をオンにします。
3. 上記で接続する必要があるホットスポット名を見つけ、クリックして接続を選択します。
4. パスワードを入力し、「次へ」をクリックして「はい」を選択し、接続が完了するまで待ちます。
10. コンピューターの WIFI ホットスポットを共有するには?
1. システムを起動します。開始位置を右クリックしてオプションを選択します
2. 右側のオプションをクリックして、モバイル ホットスポット機能をオンにします
4. 共有するネットワーク接続を選択した後、クリックしてください。共有したいネットワーク名/パスワード/バンドを変更します
5. 共有するネットワーク名/パスワード/バンドを編集します。このモバイル ホットスポット機器に接続していることが機能ページで確認できます。
The above is the detailed content of Use win7 computer as wifi hotspot. For more information, please follow other related articles on the PHP Chinese website!

 Understanding Data Loss Risks of SSD Drives & How to PreventMay 15, 2025 pm 08:06 PM
Despite their impressive speed and reliability, SSDs are not immune to failures. This article from MiniTool delves into the most common data loss risks associated with SSD drives and provides effective strategies to minimize the risk of file loss.Qui
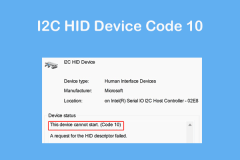 I2C HID Device Code 10 Happens on Win11/10? 8 Proven TipsMay 15, 2025 pm 08:05 PM
Have you encountered problems with I2C HID device code 10 on your Windows 11/10 computer? Learn how to fix code 10 errors with some proven solutions. Here, MiniTool will provide you with detailed guidance to help you solve your problem. Quick navigation: - I2C HID device cannot start code 10 - Fix 1: Disable and enable I2C HID devices - Fix 2: Change the power management settings - Fix 3: Uninstalling I2C HID device drivers - Fix 4: Uninstall and reinstall HID-compliant mouse driver - Fix 5: Update I2C HID device driver - Fix 6: Change BIOS settings - Fixed
 Laptop Shuts Down Without Low Battery Notification? Fix ItMay 15, 2025 pm 08:04 PM
If your laptop shuts down directly without warning when it is low, this may affect your work. To solve this problem, you can refer to the guide provided by MiniTool. Quick navigation: - No low battery notifications in Windows 11/10 - Method 1. Turn on Windows Notifications - Method 2. Run the power supply troubleshooting tool - Method 3. Change the battery power saving settings - Method 4. Check the power option settings - Method 5. Restore the default power plan - at last There is no low battery notification in Windows 11/10 When the battery is low, the desktop displays a warning message so that you can save your current work or plug in the charger. Usually, when the battery is low,
 A Complete Guide to Fix TeamViewer Protocol Negotiation FailedMay 15, 2025 pm 08:03 PM
TeamViewer enables users to remotely control another computer, share files, and engage in real-time communication. However, issues like "TeamViewer protocol negotiation failed" can arise, disrupting the connection. This article from MiniToo
 Windows 11 KB5058411 Not Installing? Try These MethodsMay 15, 2025 pm 08:02 PM
Microsoft has rolled out the KB5058411 update for Windows 11 version 24H2 users. If you're curious about the new features, how to download and install it, or what to do if KB5058411 fails to install, this MiniTool article has you covered.Quick Naviga
 How to fix Microsoft Office error code 0-2048 in Windows?May 15, 2025 pm 08:00 PM
Microsoft Office is a cornerstone Windows productivity software that enables applications like Word, Excel, and Outlook to execute document creation all the way
 Revenge of the Savage Planet Crashing/Not Launching: FixedMay 15, 2025 pm 06:01 PM
Nothing is more satisfying than having a problem with Survival: Revenge crashing or failing to start on PC. Don't worry, here are several fixes provided by MiniTool to solve these annoying problems. Quick navigation: - Fix 1. Run the game as administrator - Fix 2. Disable overlay - Fix 3. Update GPU drivers - Fix 4. Verify the integrity of the game file - in conclusion Survival of the Wild: Revenge is an exciting new adventure game where players travel between different planets, collecting resources and finding ways to return to Earth. Although the game isn't hardware-required, if you have problems with your download or your PC isn't fully updated, you may encounter Survival of the Wild: Revenge
 Top 5 Proven Fixes for VPN Not Working on ChromeMay 14, 2025 pm 08:02 PM
Are you experiencing issues with websites not loading on Google Chrome while using a VPN, yet other browsers function normally? This guide from MiniTool will help you understand the causes and provide solutions to fix VPN issues on Chrome.Quick Navig


Hot AI Tools

Undresser.AI Undress
AI-powered app for creating realistic nude photos

AI Clothes Remover
Online AI tool for removing clothes from photos.

Undress AI Tool
Undress images for free

Clothoff.io
AI clothes remover

Video Face Swap
Swap faces in any video effortlessly with our completely free AI face swap tool!

Hot Article
Hot Tools

Safe Exam Browser
Safe Exam Browser is a secure browser environment for taking online exams securely. This software turns any computer into a secure workstation. It controls access to any utility and prevents students from using unauthorized resources.

WebStorm Mac version
Useful JavaScript development tools

Dreamweaver CS6
Visual web development tools

Notepad++7.3.1
Easy-to-use and free code editor

MantisBT
Mantis is an easy-to-deploy web-based defect tracking tool designed to aid in product defect tracking. It requires PHP, MySQL and a web server. Check out our demo and hosting services.

