


If you have a shared or public computer that several people use, you may be worried about your important data being viewed, tampered with, or deleted. To dispel such concern, it's a good idea to prevent access to certain drives from This PC.
To prevent users from accessing the drive from This PC, one possible method is to use BitLocker to encrypt the drive. However, BitLocker encryption is a time-consuming task. You may not want to do that, and in fact you don't have to. Now, on this page, we will show you two simple and fast ways to prevent access to drives from My Computer in Windows 10.
Way 1: Prevent access to drives in This PC using Group Policy
Step 1: Open the Run dialog box using Win + R, type gpedit.msc, and then click OK. This will open Local Group Policy Editor.

Step 2: Once the Local Group Policy Editor opens, navigate to User Configuration > Administrative Templates > Windows Components > File Explorer. Select the File Explorer folder on the left pane, and then double click the setting titled "Prevent access to drives from My Computer" on the right pane.

Step 3: Select the Enabled radio button, select the drive or drive combinations you want to prevent access to, and then click Apply.

Changes will take effect immediately without restarting Windows 10. Then if the user tries to access the drive from This PC, he will be blocked and get an error message as shown in the figure below.

If you want to allow access to the drive, just open that policy setting and set it to Not Configured or Disabled.
Way 2: Prevent access to drives from This PC using Registry Editor
Step 1: Open the Run dialog box, type regedit, and then click OK. This will open Registry Editor.

Step 2: Once the Registry Editor opens, navigate to the key ComputerHKEY_CURRENT_USERSOFTWAREMicrosoftWindowsCurrentVersionPoliciesExplorer on the left pane.
Tips: If the Explorer key does not exist, you can right-click on Policies and select New > Key to create a new key. Then name this new key Explorer.
Step 3: Right-click the Explorer key on the left pane, and select New > DWORD (32-bit) Value. Then name the new value NoViewOnDrive.

Step 4: Double-click the NoViewOnDrive value, set its value data to 4 (to prevent access to C drive), or 8 (to prevent access to D drive), or 67108863 (to prevent access to all drives), and then click OK to save the changes.
Tips: If you want to prevent access to C drive and D drive, set the value data to 12 (4 + 8).

Step 5: Close the Registry Editor and restart Windows 10 for the changes to take effect.
The above is the detailed content of How to Prevent Access to Drives in This PC on Windows 10. For more information, please follow other related articles on the PHP Chinese website!

 Logitech G515 Keyboard Hits All Time Low at $109May 14, 2025 am 02:32 AM
Logitech G515 Lightspeed TKL Gaming Keyboard
 I Miss the Times Computers Were Plug and PlayMay 13, 2025 am 06:03 AM
Building a new PC was once a moment of triumph. Now, it’s just the beginning, as you have to install apps, download large games, and tweak dozens of settings before it's fully set up. Let's take a look at how we got here and how things used to be.
 Why Is This Logitech Mouse on Every Tech Person's Desk?May 13, 2025 am 06:02 AM
Logitech's MX Master series of mice has become a common sight in YouTube videos or photographs of tech-savvy people's desk setups, but what makes this now-iconic mouse so special? I'm on my third MX Master mouse at this point, and, honestly, I can
 I Refuse to Buy a Keyboard Without a ScreenMay 13, 2025 am 03:05 AM
Mechanical keyboards offer a plethora of features, from switch type and keycap material to sound dampening. But one often overlooked, yet invaluable feature, is the built-in screen. Why Integrate Screens into Keyboards? The QWERTY keyboard, a staple
 The Galaxy S25 Gets Edgy, and RIP Skype: Weekly RoundupMay 13, 2025 am 03:04 AM
Tech News Roundup: Major Updates and New Releases Across the Tech Landscape This week brings a flurry of exciting tech news, from AI advancements to new gaming peripherals and significant software updates. Let's dive into the highlights: AI and Secu
 How to Rollback Windows 11 UpdateMay 12, 2025 pm 08:01 PM
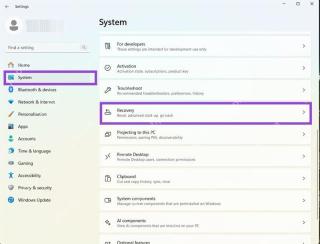
Is Windows 11 update causing system problems? Don’t panic! This article provides three methods of rollback updates to help you restore system stability. Method 1: Rollback updates through Windows settings This method is suitable for users whose update time is less than 10 days. Step 1: Click the "Start" menu to enter "Settings". You can also press the Windows key I on the keyboard. Step 2: In Settings, select System, and then click Recover. Step 3: Under Recovery Options, find "Previous Windows Versions". If the Back button is clickable, the system can be rolled back to the previous version. Step 4: The system will ask you why the rollback is
 13 Windows Keyboard Shortcuts I Couldn't Live WithoutMay 12, 2025 am 03:02 AM
Mastering Windows keyboard shortcuts isn't just about efficiency; it streamlines your entire computing experience. Windows' interface can be less than intuitive, hiding crucial settings within layers of menus. Fortunately, countless shortcuts exist
 How to Speed Up Your PC (Windows 11)May 11, 2025 pm 06:01 PM
Is your Windows 11 PC running slower than usual? Opening apps and loading websites taking an eternity? You're not alone! This guide offers three simple, no-download solutions to boost your computer's performance without complex settings adjustments


Hot AI Tools

Undresser.AI Undress
AI-powered app for creating realistic nude photos

AI Clothes Remover
Online AI tool for removing clothes from photos.

Undress AI Tool
Undress images for free

Clothoff.io
AI clothes remover

Video Face Swap
Swap faces in any video effortlessly with our completely free AI face swap tool!

Hot Article
Hot Tools

mPDF
mPDF is a PHP library that can generate PDF files from UTF-8 encoded HTML. The original author, Ian Back, wrote mPDF to output PDF files "on the fly" from his website and handle different languages. It is slower than original scripts like HTML2FPDF and produces larger files when using Unicode fonts, but supports CSS styles etc. and has a lot of enhancements. Supports almost all languages, including RTL (Arabic and Hebrew) and CJK (Chinese, Japanese and Korean). Supports nested block-level elements (such as P, DIV),

SublimeText3 Chinese version
Chinese version, very easy to use

WebStorm Mac version
Useful JavaScript development tools

Zend Studio 13.0.1
Powerful PHP integrated development environment

Dreamweaver Mac version
Visual web development tools

