
 Software TutorialOffice SoftwareTwo strategies for protecting Excel workbooks: preventing worksheets from being added, deleted or moved
Protect Excel workbooks from unauthorized editing When using Excel, you often need to protect the data and structure in the workbook to prevent others from making unauthorized changes. You can easily set different protection levels in Excel to meet your specific needs. This article will detail two simple methods for you to effectively protect your Excel workbook and ensure its security and integrity. Don’t miss the following content compiled by PHP editor Baicao to learn how to protect Excel workbooks to avoid accidental or malicious editing.
Method 1: Set a restricted password
Lock the Excel workbook with a password, so that only the worksheet can be added, deleted, moved or hidden by knowing the password.
Setting method
First, open the Excel workbook that needs to be protected and click "Protect Workbook" in the "Review" tab list.
In the pop-up dialog box, select the "Structure" checkbox to ensure that only the workbook structure is protected.
Then enter the password you want to set in the password field, click "Confirm" and re-enter it to set it.

After setting up, you can see that operations such as adding, deleting or moving worksheets are prohibited, which means that the workbook structure has been protected.

Cancellation method
If you need to cancel the protection of the workbook structure, follow the steps below:
In the "Review" tab, click "Unprotect Workbook". After the dialog box pops up, enter the password and click "OK", and the workbook structure protection will be cancelled.

It should be noted that after setting the password, remember to remember it or save it, because it is impossible to cancel the structure protection in Excel without a password.
If you really forget it accidentally, you need to use other tools to solve the problem. For example, PepsiNiu Excel Password Recovery Tool can directly remove the "restriction password" of the Excel workbook without a password and cancel the structure protection.
You only need to click the [Unrestriction] module in the tool, and then import the protected Excel into the tool, and you can unblock it with one click.

Method 2: Use VBA macro to protect the workbook structure
If you don’t want to set a password, you can also use VBA macro code to protect the workbook.
Setting method
1. After opening Excel, press "Alt + F11" to open the VBA editor. In the VBA editor, click the "Insert" menu and select "Module".

2. After creating a new module, enter the following code:
Sub ProtectWorkbookStructure() Dim wb As Workbook Set wb = ThisWorkbook wb.Protect Password:=”yourpassword”, Structure:=True, Windows:=FalseEnd Sub

3. Close the VBA editor, return to Excel, press "Alt + F8" to open the macro dialog box, select "ProtectWorkbookStructure", and then click "Run", the Excel workbook structure will be locked, and Begin to be protected.

Cancellation method
If you need to cancel the protection set through VBA macro, follow the steps below:
1. Call up the VBA editor according to the setting method. After creating a new module, enter the following code:
Sub UnprotectWorkbookStructure() Dim wb As Workbook Set wb = ThisWorkbook wb.Unprotect Password:=”yourpassword”End Sub

2. Close the VBA editor, return to Excel, press "Alt + F8" to open the macro dialog box, select "UnprotectWorkbookStructure", and then click "Run".
The structure protection of the Excel workbook is cancelled.

The above is the detailed content of Two strategies for protecting Excel workbooks: preventing worksheets from being added, deleted or moved. For more information, please follow other related articles on the PHP Chinese website!

 IF function in Excel: formula examples for text, numbers, dates, blanksMay 13, 2025 am 10:50 AM
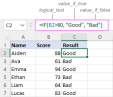
In this article, you will learn how to build an Excel IF statement for different types of values as well as how to create multiple IF statements. IF is one of the most popular and useful functions in Excel. Generally, you use an IF statem
 How to sum a column in Excel - 5 easy waysMay 13, 2025 am 09:53 AM
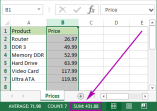
This tutorial shows how to sum a column in Excel 2010 - 2016. Try out 5 different ways to total columns: find the sum of the selected cells on the Status bar, use AutoSum in Excel to sum all or only filtered cells, employ the SUM function
 How to make and use Pivot Table in ExcelMay 13, 2025 am 09:36 AM
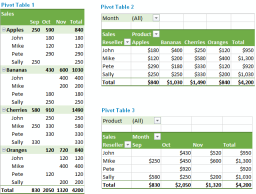
In this tutorial you will learn what a PivotTable is, find a number of examples showing how to create and use Pivot Tables in all version of Excel 365 through Excel 2007. If you are working with large data sets in Excel, Pivot Table comes
 Excel SUMIFS and SUMIF with multiple criteria – formula examplesMay 13, 2025 am 09:05 AM
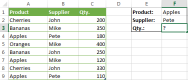
This tutorial explains the difference between the SUMIF and SUMIFS functions in terms of their syntax and usage, and provides a number of formula examples to sum values with multiple AND / OR criteria in Excel 365, 2021, 2019, 2016, 2013,
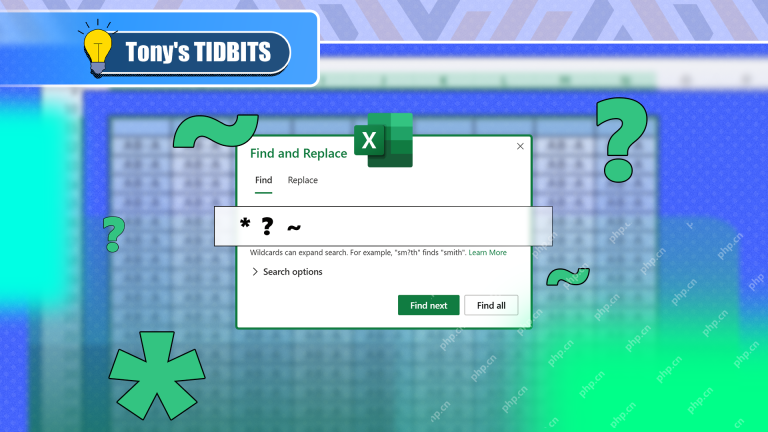 How You Can Use Wildcards in Microsoft Excel to Refine Your SearchMay 13, 2025 am 01:59 AM
Excel wildcards: a powerful tool for efficient search and filtering This article will dive into the power of wildcards in Microsoft Excel, including their application in search, formulas, and filters, and some details to note. Wildcards allow you to perform fuzzy matching, making it more flexible to find and process data. *Wildcards: asterisks () and question marks (?)** Excel mainly uses two wildcards: asterisk (*) and question mark (?). *Asterisk (): Any number of characters** The asterisk represents any number of characters, including zero characters. For example: *OK* Match the cell containing "OK", "OK&q
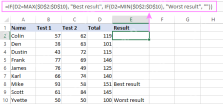 Excel IF function with multiple conditionsMay 12, 2025 am 11:02 AM
The tutorial shows how to create multiple IF statements in Excel with AND as well as OR logic. Also, you will learn how to use IF together with other Excel functions. In the first part of our Excel IF tutorial, we looked at how to constru
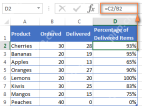 How to calculate percentage in Excel - formula examplesMay 12, 2025 am 10:28 AM
In this tutorial, you will lean a quick way to calculate percentages in Excel, find the basic percentage formula and a few more formulas for calculating percentage increase, percent of total and more. Calculating percentage is useful in m
 Logical operators in Excel: equal to, not equal to, greater than, less thanMay 12, 2025 am 09:41 AM
Logical operators in Excel: The key to efficient data analysis In Excel, many tasks involve comparing data in different cells. To this end, Microsoft Excel provides six logical operators, also known as comparison operators. This tutorial is designed to help you understand the connotation of Excel logical operators and write the most efficient formulas for data analysis. Excel logical operators equal Not equal to Greater than/less than/greater than/six equal to/less than equal to Common uses of logical operators in Excel Overview of Excel Logical Operators Logical operators in Excel are used to compare two values. Logical operators are sometimes called boolean operators because in any given case, the result of comparison


Hot AI Tools

Undresser.AI Undress
AI-powered app for creating realistic nude photos

AI Clothes Remover
Online AI tool for removing clothes from photos.

Undress AI Tool
Undress images for free

Clothoff.io
AI clothes remover

Video Face Swap
Swap faces in any video effortlessly with our completely free AI face swap tool!

Hot Article
Hot Tools

SublimeText3 Chinese version
Chinese version, very easy to use

MinGW - Minimalist GNU for Windows
This project is in the process of being migrated to osdn.net/projects/mingw, you can continue to follow us there. MinGW: A native Windows port of the GNU Compiler Collection (GCC), freely distributable import libraries and header files for building native Windows applications; includes extensions to the MSVC runtime to support C99 functionality. All MinGW software can run on 64-bit Windows platforms.

SublimeText3 Mac version
God-level code editing software (SublimeText3)

Dreamweaver CS6
Visual web development tools

Atom editor mac version download
The most popular open source editor

