


When working with Excel sheets containing sensitive information, it is crucial to ensure the security of your data. Improper data processing can lead to information leakage, with serious consequences for individuals or organizations. This article will delve into best practices for securely handling sensitive information in Excel, including data encryption, access control, audit trails, and more. We'll also provide some practical tips and tools to help you protect your data. PHP editor Xinyi recommends that you read the following content carefully to understand how to safely handle sensitive information in Excel and protect your data from unauthorized access and the risk of data leakage.
In order to ensure the security of this data, we can protect the data by hiding cells, rows and columns, and setting passwords to protect the worksheet. Let’s take a look below!
1. Hidden data:
If you want sensitive data not to be seen, you can use the following two hiding methods.
1. Hide cells
First, select the cells you want to hide, as shown in the picture, then right-click the mouse and select "Format Cells" in the list ";

After the dialog box pops up, in the "Number" tab, select "Custom", then in the "Type" box, enter three semicolons ";;;", and finally click "OK" to complete the setting. .

You can see that the originally selected cell becomes a blank cell and the data inside is hidden.

Cancel method:
If you no longer need to hide the data, you only need to follow the setting process to bring up the "Format Cells" dialog box, then delete the three semicolons ";;;" originally added, and then click "OK" , you can unhide it.

2. Hide rows and columns
Select the row or column that needs to be hidden, such as column C as shown in the picture, then right-click the mouse and select "Hide" in the list "That's it;

You can see that the originally selected column C has been hidden.
It should be noted that the method of hiding cells is to hide the data, and the cells are still there, but they become blank cells; the method of hiding columns or rows is to hide both the data and the cells.

Cancel method:
If you no longer need to hide it, you only need to select one of the columns or rows, then right-click the mouse and select "Unhide" in the list.

2. Protect sensitive data through passwords
Sensitive data can be protected by hiding the data, but as long as you unhide it, you can see the data. If you want to get more efficient Protection method, we can set password protection after hiding the data, so that only the password can be used to unhide the settings.
Setting method:
After setting the hidden data in Excel, click "Protect Worksheet" in the "Review" list of the menu tab;

After opening the "Protect Worksheet" dialog box, check "Protect worksheet and locked cell contents", then enter the password you want to set in the password field, and then click "OK" to set it.

After the setting is completed, you can see that the relevant options for unhiding data have turned gray and cannot be clicked, which means that they cannot be unhidden.

Cancellation method:
If you want to cancel the restriction protection later, you need to pass a password to do so.
First, click "Unprotect Worksheet" in the "Review" list of the menu tab. After the dialog box pops up, enter the originally set password in the password field, and click "OK" to remove the restriction.

It should be noted that after setting the "restriction password" in Excel, you must remember or protect it well, because without the password, you cannot lift the restrictions in Excel.
In this case, we need the help of other tools.
For examplePepsi Niu Excel Password Recovery Tool can directly remove Excel’s “restricted password” without a password.
Just click on the [Unrestriction] module in the tool, and then import the Excel table into the tool to lift it with one click.

That’s it for today’s sharing, I hope it will be helpful to everyone!
The above is the detailed content of How to hide and protect sensitive data in Excel sheets?. For more information, please follow other related articles on the PHP Chinese website!

 Excel SUM formula to total a column, rows or only visible cellsApr 22, 2025 am 09:17 AM
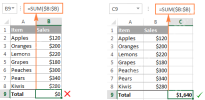
This tutorial demonstrates how to calculate sums in Excel using the AutoSum feature and custom SUM formulas for columns, rows, and selected ranges. It also covers summing only visible cells, calculating running totals, summing across multiple sheets
 How to AutoSum in ExcelApr 22, 2025 am 09:05 AM
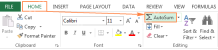
This concise guide explains Excel's AutoSum feature and its efficient uses. Learn to quickly sum columns, rows, or visible cells, and troubleshoot common AutoSum issues. Excel's SUM function is incredibly popular, prompting Microsoft to include a ded
 Excel Switch function – the compact form of nested IF statementApr 22, 2025 am 09:04 AM
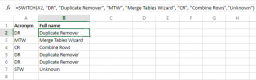
This article introduces the Excel SWITCH function, explaining its syntax and demonstrating its use in simplifying complex nested IF statements. If you've struggled with lengthy nested IF formulas, the SWITCH function offers a significant time-saving
 How to do a running total in Excel (Cumulative Sum formula)Apr 21, 2025 am 11:16 AM
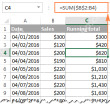
This concise guide demonstrates how to efficiently calculate running totals (cumulative sums) in Excel using a SUM formula with strategically placed absolute and relative cell references. A running total displays the accumulated sum of a dataset as
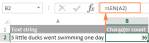 Excel LEN function: count characters in cellApr 21, 2025 am 10:10 AM
Are you looking for an Excel formula to count characters in a cell? If so, then you have certainly landed up on the right page. This short tutorial will teach you how you can use the LEN function to count characters in Excel, with or with
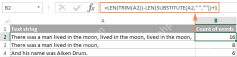 How to count words in Excel - formula examplesApr 21, 2025 am 09:59 AM
This tutorial demonstrates how to count words in Excel using a combination of the LEN, SUBSTITUTE, and TRIM functions. It offers both case-sensitive and case-insensitive formulas for counting total words or specific words/text within a cell or range
 Excel: Split string by delimiter or pattern, separate text and numbersApr 21, 2025 am 09:19 AM
This tutorial demonstrates how to efficiently split cells in Excel using both formulas and the advanced "Split Text" feature. Learn to separate text using commas, spaces, or any delimiter, and to split alphanumeric strings into their text
 Excel Solver tutorial with step-by-step examplesApr 21, 2025 am 09:15 AM
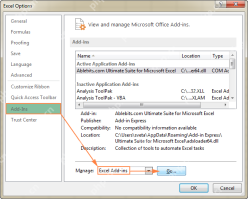
This tutorial explains how to locate and utilize the Solver add-in within various Excel versions, ranging from 2003 to 365. Step-by-step instructions and practical examples demonstrate Solver's application in optimizing solutions for linear programm


Hot AI Tools

Undresser.AI Undress
AI-powered app for creating realistic nude photos

AI Clothes Remover
Online AI tool for removing clothes from photos.

Undress AI Tool
Undress images for free

Clothoff.io
AI clothes remover

Video Face Swap
Swap faces in any video effortlessly with our completely free AI face swap tool!

Hot Article
Hot Tools

MantisBT
Mantis is an easy-to-deploy web-based defect tracking tool designed to aid in product defect tracking. It requires PHP, MySQL and a web server. Check out our demo and hosting services.

Dreamweaver Mac version
Visual web development tools

SublimeText3 Mac version
God-level code editing software (SublimeText3)

PhpStorm Mac version
The latest (2018.2.1) professional PHP integrated development tool

WebStorm Mac version
Useful JavaScript development tools

