


Unlike external drives, you cannot just connect a new internal SSD and start using it right away on Windows. You'll need to go through an initial setup process using a utility called Disk Management. Whatever you need this tool for, we'll teach you how to open it.
What Is Windows Disk Management?
Disk Management is a built-in system utility that lets you perform advanced storage-related tasks like creating or formatting a hard disk partition, resizing a partition by extending or shrinking the volume, and initializing the volume.
When you physically connect a new internal drive to your PC, Windows sees it as a blank disk with no allocated space. Therefore, it doesn't show up in the File Explorer. You can use Disk Management to create a partition and thus make your new drive usable in the operating system.

1. Search for Disk Management in Windows
The search feature in Windows 10 and 11 lets you open any app on your computer, no matter where it's stored. You can use it to launch a built-in utility like Disk Management too. However, the search results may confuse you since Disk Management doesn't directly show up here. Let's clarify this:
- When you type Disk Management in the Start menu search bar, you get an indirect result. But this is indeed the correct result; all you need to do is click Create and format hard disk partitions to launch the Disk Management tool.
- Alternatively, you can type in diskmgmt.msc in the Start menu search bar for a more direct result. Clicking on the best match will take you to Disk Management.
Both search keywords do the same thing. Although you don't see "Disk Management" as a result, the best match will still launch the program you need to initialize or manage your storage drives.
2. Launch Disk Management From the Quick Access Menu
While the search method may be popular, launching Disk Management from the Quick Access menu is the easiest way to open the Disk Management utility in Windows. The best part? You don't even need to use your keyboard, which is unlike any other method on this list.
All you have to do is right-click the Windows logo in the taskbar (or hit Win + X if you prefer) and choose Disk Management from the context menu.

When the program opens, you'll be able to see your connected drives and start managing their partitions.
3. Use the Run Dialog to Open Disk Management
As the name suggests, the Run dialog lets you run or open any program on your Windows PC, provided you know the full file path. You can also run any executable stored in the C:\Windows directory by typing the file name. It can be a great productivity tool if you know exactly which Windows Run commands to use.
Here, we'll focus on the command you need to enter to open the Disk Management utility. To open the Run command window, press Windows + R. Now, type diskmgmt.msc, and hit the Enter key to launch Disk Management.

This way to open Disk Management is preferable if you're busy on the keyboard and don't want to reach for your mouse.
4. Open Disk Management From the Control Panel
If you've been a Windows user for a while, you're probably already familiar with the Control Panel. If not, this is a destination on your Windows PC where important system utilities are located—even some that don't have a modern equivalent in the Settings app.
The Control Panel is primarily used to change system settings, configure your network, manage your devices and user accounts, and more. To access Disk Management from the Control Panel, follow these instructions:
- Type Control Panel in the Start menu search bar and select the best match.
- In the top-right, change to Category if this isn't already selected.
- Select System and Security and scroll to the bottom.
- Under Windows Tools (or Administrative Tools on Windows 10), you'll see multiple options for disk drives. Click Create and format hard disk partitions to open Disk Management.
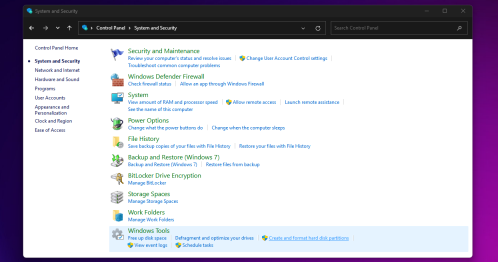
Don't make the mistake of clicking Administrative/Windows Tools; that will open File Explorer instead.
While we listed only four methods here, Windows offers more options to open Disk Management. For instance, you can type diskmgmt and hit Enter in Command Prompt or Windows PowerShell to launch Disk Management. You can also find Disk Management in the Computer Management app on Windows.
Although you only need to learn one of these methods to open the Disk Management utility on your Windows computer, it's always good to know about an alternate option that may be better in certain scenarios. Don't want to take your hands off the keyboard? Use the Run command. Too lazy to lift your hand off the mouse? Use the Quick Access menu.
Try these methods yourself and find out what works best for you. Whether you want to set up a new SSD or partition an existing drive in Windows, Disk Management is what you'll need to rely on.
The above is the detailed content of 4 Ways to Open Disk Management in Windows 10 and 11. For more information, please follow other related articles on the PHP Chinese website!

 Windows 10 Won't Lose Microsoft 365 Apps in 2025May 14, 2025 am 06:01 AM
Related When Will Microsoft Stop Supporting Windows 10? According to Microsoft's lifecycle
 Kingston Launches the Ultra-Fast FURY Renegade G5 SSDMay 14, 2025 am 04:58 AM
Related Samsung 9100 PRO NVMe SSD Review: Blazing a New Speed Trail So much speed, but I ha
 Cooler Master's Hyper 612 Apex Might Be Perfect for Your Next PCMay 14, 2025 am 04:52 AM
Some people don't like liquid cooling on their PCs. It's hard to install, and in a lot of cases, it can be tricky to fit one inside of your PC. Cooler Master makes some great air coolers, and this new one looks pretty good. Cooler Master has just
 Logitech G515 Keyboard Hits All Time Low at $109May 14, 2025 am 02:32 AM
Logitech G515 Lightspeed TKL Gaming Keyboard
 I Miss the Times Computers Were Plug and PlayMay 13, 2025 am 06:03 AM
Building a new PC was once a moment of triumph. Now, it’s just the beginning, as you have to install apps, download large games, and tweak dozens of settings before it's fully set up. Let's take a look at how we got here and how things used to be.
 Why Is This Logitech Mouse on Every Tech Person's Desk?May 13, 2025 am 06:02 AM
Logitech's MX Master series of mice has become a common sight in YouTube videos or photographs of tech-savvy people's desk setups, but what makes this now-iconic mouse so special? I'm on my third MX Master mouse at this point, and, honestly, I can
 I Refuse to Buy a Keyboard Without a ScreenMay 13, 2025 am 03:05 AM
Mechanical keyboards offer a plethora of features, from switch type and keycap material to sound dampening. But one often overlooked, yet invaluable feature, is the built-in screen. Why Integrate Screens into Keyboards? The QWERTY keyboard, a staple
 The Galaxy S25 Gets Edgy, and RIP Skype: Weekly RoundupMay 13, 2025 am 03:04 AM
Tech News Roundup: Major Updates and New Releases Across the Tech Landscape This week brings a flurry of exciting tech news, from AI advancements to new gaming peripherals and significant software updates. Let's dive into the highlights: AI and Secu


Hot AI Tools

Undresser.AI Undress
AI-powered app for creating realistic nude photos

AI Clothes Remover
Online AI tool for removing clothes from photos.

Undress AI Tool
Undress images for free

Clothoff.io
AI clothes remover

Video Face Swap
Swap faces in any video effortlessly with our completely free AI face swap tool!

Hot Article
Hot Tools

Notepad++7.3.1
Easy-to-use and free code editor

SecLists
SecLists is the ultimate security tester's companion. It is a collection of various types of lists that are frequently used during security assessments, all in one place. SecLists helps make security testing more efficient and productive by conveniently providing all the lists a security tester might need. List types include usernames, passwords, URLs, fuzzing payloads, sensitive data patterns, web shells, and more. The tester can simply pull this repository onto a new test machine and he will have access to every type of list he needs.

MantisBT
Mantis is an easy-to-deploy web-based defect tracking tool designed to aid in product defect tracking. It requires PHP, MySQL and a web server. Check out our demo and hosting services.

ZendStudio 13.5.1 Mac
Powerful PHP integrated development environment

SublimeText3 Chinese version
Chinese version, very easy to use

