


Are you worried about HTC Vive VR installation? PHP editor Yuzai will help you solve your doubts easily! This article will guide you step-by-step through the installation process, from setting up the VR headset to connecting the controller and base station, ensuring your VR experience is smooth and worry-free.

First step
The first is the space problem. Players need to prepare an activity space of at least 2m×1.5m. This area can only It meets the most basic standing games. If possible, it is recommended that you arrange a larger space to better experience HTC Vive.
Step Two
After preparing the game space, we can start installing accessories. Players disassemble the equipment and sort out all the equipment that needs to be installed. First, let’s understand the entire HTC Vive What equipment and accessories are included in the box.
A is the base station Long)
C is the base station power adapter x2 (any electronic equipment requires energy support)
D is the installation tool kit (this is more considerate)
E is the connector ( It is used to connect the headset to the computer)
F is a special patch for the connector (you can stick the connector on the main chassis or the like to fix it)
G is the connector Power adapter (same as C)
H is HDMI cable (connector to computer 1)
I is USB cable (connector to computer 2)
J is Headphones (it is said that the effect is not bad)
K is a cotton pad (it is already on the headset, you don’t need to install it yourself, this is a spare)
L is a wiping cloth
M It’s the manual
N is the head display
O is the controller x 2
P is the Micro USB charger x 2 (used to charge the controller) The most important one The components are A base station, N head display, and O controller.
Through the above introduction, I believe everyone has an understanding of the accessories. Next, we need to install and connect the locator, streaming box and helmet.
Step Three
First install the locator, which we usually call a base station. The base station has a 120° visual range, so players need to set up the two base stations at high altitudes on both sides of the diagonal. The location is such that the base station can scan the game space without blocking each other.
The interfaces at the back end of the base station only need to be connected to the power supply when in use, and the remaining interfaces are only used for connection processing when they need to be updated or when synchronization problems occur.
After the installation is complete, connect the power supply. If you see the green light on the indicator light, it means that the base station is working normally. If the indicator light flashes, it means that there is displacement and the base station position needs to be readjusted.
Step 4
The next step is to connect the streaming box. This step is actually very simple. You only need to plug the included USB data cable, HDMI cable and power cable into the corresponding interfaces on the streaming box, and connect the other end to the corresponding interface on the computer host.
Finally, there are three orange interfaces on the other end of the streaming box, which are used to connect the three-in-one data cable on the helmet. Similarly, connect the cable ends to the corresponding interfaces and the computer will automatically start to install the driver.
Step 5
HTC’s controller is configured wirelessly, so after installing the system, press the button at the bottom of the controller. After you hear a beep and feel a vibration, you can successfully turn on the controller. , the upper indicator light is always on, indicating that the handle is running.
At this point, the entire installation is over. Compared to the complicated instructions, this tutorial is simpler and easier to understand. We have also prepared a video of the installation tutorial for your reference.
After everything is installed, we will proceed to the next step of software installation and settings on the computer.
First we need to go to the HTC official website to download a Vive program installation, which includes the Vive Port app store PC client, Vive virtual reality homepage and SteamVR.
After downloading and installing, let’s first introduce the Viveport registration process.
The first time you open Vive, the login page will pop up. We choose registration below. Of course, players can also choose QQ or Weibo to log in.
The second step is to fill in the relevant information such as email, password and other information, and finally click "Create Account"
The third step is to create an account and the email verification interface will pop up. At this time we need to register Verify the information in your email.
The fourth step is to open the received email in the registered mailbox and click "Verify my email"
Finally, when the successfully created page appears, it means that the account registration is completed, return to the software login You can purchase the game.
Step 5: After successfully logging in, we will enter the VIVE homepage. We need to select the location, which is the country. Just select OK here.
The sixth step is to enter the VIVE game interface, which contains a variety of paid and free games for players to experience.
Step 7 Select a game and click to enter
Step 8 Select the green logo with the amount written in the upper right corner
Jump out of the purchase interface and click to continue
After selecting the payment method and entering the account password, you can purchase the game. After the purchase is successful, you can proceed to download. After completion, players can start to experience it.
This is the registration and purchase guide for HTC’s own store. In addition, it also supports steam game content. Next, we will introduce the steam VR setup guide.
The first step is to open the installed steam VR. After running, the setting screen will appear, confirm the size of the space you are in.
The second step is to place the controller and helmet in a position visible to the locator for identification.
The third step is to stand in the middle of the space, point the controller at the computer monitor and hold down the trigger to check the equipment.
The fourth step is to place the two controllers on the floor in the space, make sure they are within the visible range of the locator, and then perform ground calibration.
The fifth step is to use the handle to draw the scope of the space in the game space you planned, ensuring that there are no obstructions above and below the drawn area.
After the settings are completed, click "Next" to enter steam VR and start the experience.
SteamVR games need to be purchased in the store, so you also need to register a steam account. We can register in the software or go to the official website. Let’s briefly talk about the official website registration method.
Enter the official website and click Login in the upper right corner
After jumping out of the login page, select "Join Steam" in the middle
Then fill in the relevant information in the account creation, and finally verify it in the email The operation is completed, and then players can enter the steam store to select and purchase the game.
Regarding the settings of Steam VR, we have also prepared a video tutorial to allow everyone to understand the setting process more intuitively and quickly.
Finally, after all preparations are completed, players can enter the steam store to purchase and download the games they want to play, and enjoy the magical and exciting VR journey in HTC Vive. I wish you all a happy game.
The above is the detailed content of How to install htc vive vr?. For more information, please follow other related articles on the PHP Chinese website!

 Where Is The Last of Us Part II Remastered Save File LocationApr 10, 2025 pm 12:31 PM
This guide explains how to locate and recover save files for The Last of Us Part II Remastered. We'll cover save file locations and recovery methods, ensuring your progress isn't lost. Save File Locations for The Last of Us Part II Remastered Save g
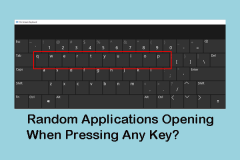 Random Applications Opening When Pressing Any Key: Fix GuideApr 10, 2025 pm 12:29 PM
Keyboard failure causes the program to open randomly? This article will provide some practical ways to solve this problem and get your computer back to normal working state. How to prevent the keyboard from automatically opening the program? The keyboard is a key tool for computers to enter commands, but sometimes the keyboard fails, such as pressing any key will open the application randomly. To solve this problem, you can try the following: Step 1: Use the on-screen keyboard to check for stuck keys First, check if there are keys stuck on the keyboard. Since it is difficult to directly identify stuck keys, you can turn on the on-screen keyboard to check. Step 1: Enter "Screen Keyboard" in the search box and select the correct option to launch it. Step 2: If any key press (such as Windows key, Ctrl key or
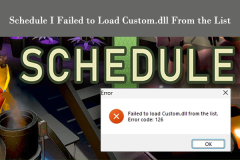 Fix Schedule I Failed to Load Custom.dll From the List Error 126Apr 10, 2025 pm 12:26 PM
Troubleshooting "Schedule I Failed to Load custom.dll" Error (Code 126) The error "Schedule I failed to load custom.dll from the list" (error code 126) prevents players from launching the Schedule I video game. This often stems fr
 The Last of Us Part 2 Remastered Audio Not Working, Top 5 WaysApr 10, 2025 pm 12:25 PM
Troubleshooting Audio Issues in The Last of Us Part 2 Remastered on PC Many players are experiencing audio problems with The Last of Us Part 2 Remastered on their PCs. This guide offers several solutions to fix this frustrating issue, ranging from s
 Easily Fixed - Error 1628 Failed to Complete InstallationApr 10, 2025 pm 12:19 PM
Troubleshooting Error 1628: Failed to Complete Installation Encountering installation, repair, or update errors is common. This guide addresses error 1628 ("failed to complete installation," "failed to complete script based install,&q
 Guide to Fix Last of Us Part II Remastered Autosave Not WorkingApr 10, 2025 pm 12:15 PM
The Last of Us Part II Remastered, released on PS5 in 2024 and subsequently on PC, has unfortunately presented some players with a frustrating autosave malfunction. This guide offers several solutions to resolve the "Last of Us Part II Remaster
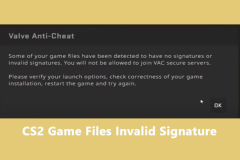 Top 5 Simple Fixes for CS2 Game Files Invalid SignatureApr 10, 2025 pm 12:11 PM
Counter-Strike 2 (CS2) "Invalid Signature" Error: Troubleshooting Guide The dreaded "CS2 game files invalid signature" error can prevent you from accessing VAC-secured servers. This guide offers several solutions to resolve this
 Wanderstop Lagging/Stuttering/Low FPS, Easily FixedApr 10, 2025 pm 12:05 PM
Wanderstop: A Guide to Fixing Lag, Stuttering, and Low FPS Wanderstop's charming world can be marred by performance issues. This guide provides solutions to common lag, stuttering, and low FPS problems. Troubleshooting Wanderstop Performance Issues


Hot AI Tools

Undresser.AI Undress
AI-powered app for creating realistic nude photos

AI Clothes Remover
Online AI tool for removing clothes from photos.

Undress AI Tool
Undress images for free

Clothoff.io
AI clothes remover

AI Hentai Generator
Generate AI Hentai for free.

Hot Article
Hot Tools

mPDF
mPDF is a PHP library that can generate PDF files from UTF-8 encoded HTML. The original author, Ian Back, wrote mPDF to output PDF files "on the fly" from his website and handle different languages. It is slower than original scripts like HTML2FPDF and produces larger files when using Unicode fonts, but supports CSS styles etc. and has a lot of enhancements. Supports almost all languages, including RTL (Arabic and Hebrew) and CJK (Chinese, Japanese and Korean). Supports nested block-level elements (such as P, DIV),

SublimeText3 Linux new version
SublimeText3 Linux latest version

MantisBT
Mantis is an easy-to-deploy web-based defect tracking tool designed to aid in product defect tracking. It requires PHP, MySQL and a web server. Check out our demo and hosting services.

SublimeText3 Chinese version
Chinese version, very easy to use

Safe Exam Browser
Safe Exam Browser is a secure browser environment for taking online exams securely. This software turns any computer into a secure workstation. It controls access to any utility and prevents students from using unauthorized resources.

