Home >Software Tutorial >Computer Software >How to draw PLC self-locking using Mitsubishi PLC programming software. How to draw PLC self-locking using Mitsubishi PLC programming software.
How to draw PLC self-locking using Mitsubishi PLC programming software. How to draw PLC self-locking using Mitsubishi PLC programming software.
- WBOYWBOYWBOYWBOYWBOYWBOYWBOYWBOYWBOYWBOYWBOYWBOYWBOriginal
- 2024-06-02 17:28:221395browse
How to draw PLC self-locking program? Mitsubishi PLC programming software provides easy tools for building such programs. If you are looking for a clear guide to drawing a PLC self-locking program, this article will show you the complete method step by step using Mitsubishi PLC programming software. This article covers the basic principles of creating a self-locking program and provides detailed steps to get you started.
Step one: Double-click to open Mitsubishi PLC programming software, and click Create New Project in the menu bar.

Step 2: Select our plc series and type. For the fx2n series selected here, select ladder diagram.

Step 3: First understand the function of the coil. If you choose a normally closed coil, it will automatically disconnect after being powered on. We draw it based on the principle.

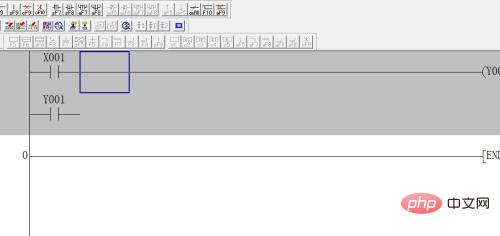
Step 4: Click the normally open contact as the input point of the start button. coil as output.

Step 5: If we press x1 now, y1 will get power. But when x1 is released, y1 will be powered off. We can choose to connect a normally open contact of y1 in parallel.

Step 6: Click on the vertical line and connect a y1 in parallel. At this time, press x1, y1 is energized, the parallel y1 is energized, automatically closed, and y1 will continue to be energized.
The above is the detailed content of How to draw PLC self-locking using Mitsubishi PLC programming software. How to draw PLC self-locking using Mitsubishi PLC programming software.. For more information, please follow other related articles on the PHP Chinese website!

