


After buying a Lenovo computer, many people don’t know how to assemble it by themselves. In fact, the assembly steps of United Computer are not complicated. Today, PHP editor Youzi will bring you the detailed steps of Lenovo computer assembly, from unboxing to installation completion. We will guide you step by step to easily assemble your Lenovo computer. Continue reading now to put your Lenovo computer into use quickly!

Detailed steps for Lenovo computer installation?
Lenovo computer reinstallation system steps:
1. Make a U disk boot disk, and then copy the downloaded Lenovo win7 system iso file directly to the GHO directory of the U disk:
2. Insert the U disk into the Lenovo computer. After restarting, keep pressing the F12 or Fn+F12 shortcut keys to open the boot menu. Select the U disk item and press Enter:
3. Boot from the U disk and enter In this main menu, press the number 2 or press the up and down arrow keys to select Enter to start the pe system:
4. For users who do not need to partition, go directly to step 6. If you want to completely repartition, you need to back up all files. Then double-click to open it in the PE desktop, right-click the hard disk, and select:
5. Set the number and size of partitions. The primary partition is 35G or more, and it is recommended to be 50G or more. If it is a solid-state drive, check "Align Partitions" It is 4k alignment, click OK to perform the hard disk partition process:
6. After partitioning, open and select the Lenovo win7 system iso image. At this time, the gho file will be extracted. Click the drop-down box and select the gho file:
7. Then click "Restore Partition", select the location of the system disk, usually the C drive, or select according to the "volume label" and disk size, click OK:
8. A prompt box will pop up, check the box "Restart after completion" and "Boot Repair", click Yes to start the process of reinstalling the system:
9. Go to this interface, perform the operation of reinstalling the Lenovo win7 system to the C drive, and wait patiently for the progress bar. Execution completed:
10. After the operation is completed, the Lenovo computer will automatically restart. At this time, pull out the U disk and boot into this interface to reinstall the win7 system and system configuration process:
11 , finally boot into Lenovo's new win7 system desktop, and the Lenovo computer win7 system will be reinstalled.
Lenovo pxe detailed steps to start the computer?
Method 1: Press the Del key or Delete key on the keyboard repeatedly during the boot process, enter the BIOS settings of the motherboard, find and click to enter "Advanced Mode (Advanced Mode)", or press and use the F7 key directly Enter advanced mode, in the "Advanced" option, set "intel pxe option rom" to ON in "Intel Network Controller", press the F10 key, confirm to save and exit.
Method 2: Press the DEL key repeatedly during the boot process to enter the BIOS setup interface, English--Simplified Chinese-Advanced Mode-Advanced-Built-in Devices-Realtek pxe OPROM select to open, press the F10 key, confirm to save and quit.
Method 3: Press the DEL key repeatedly during the boot process to enter the BIOS setup interface, select the Advanced option - select the Onboard Devices Configuration option - Enter - select the OnBoard LAN Boot ROM option Enter - select Enabled, and press F10 key to save and exit.
Detailed steps to assemble the rice cooker?
The steps for assembling the rice cooker include:
1. Place the inner pot into the main body of the rice cooker, making sure that the inner pot is completely attached to the bottom of the main body.
2. Place the steamer tray on the inner pot to steam food.
3. Make sure the sealing ring is installed at the bottom of the inner tank to ensure sealing performance.
4. Place the lid of the rice cooker on the main unit and lock it, making sure that the lid and the main unit fit completely.
5. Insert the power plug into the power socket and connect the power source.
6. Add appropriate amount of rice and water into the inner pot according to the recipe, and operate the rice cooker according to the instruction manual.
7. Turn on the power switch and start the rice cooker. After completing the above steps, the rice cooker can be used normally.
Detailed steps to reinstall Lenovo computer system?
Method
1. First install the one-click system reinstallation tool of Kaka Installer on an available computer and open it. Insert a blank U disk of more than 8g and select U disk reinstallation. Install system mode and click to start production.
2. Select the computer operating system that needs to be installed and click to start production.
3. After waiting for the software to successfully create a USB boot disk, you can first preview the startup hotkey of the Lenovo computer motherboard that needs to be installed (usually f12), and then remove the USB disk to exit.
4. Insert the startup disk into the Lenovo computer, press the startup hotkey continuously to enter the startup interface, select the U disk startup item and press Enter to confirm to enter the pe selection interface, select the first item pe system and press Enter to enter.
5. Open the Kaka installation tool on the pe system desktop, then select the system that needs to be installed and click Install.
6. Install the system to the system disk c drive and click to start the installation.
7. After the installation is completed, choose to restart the computer immediately.
8. Wait until you enter the system desktop, which means the installation is successful.
Summarize
The above is the detailed content of Detailed steps for Lenovo computer installation?. For more information, please follow other related articles on the PHP Chinese website!

 What if KB5055683 Fails to Install? Here Are Some FixesApr 21, 2025 pm 08:03 PM
The KB5055683 cumulative update is designed to improve the quality and reliability of .NET Framework 3.5, 4.8 and 4.8.1 in Windows 10 systems. If you encounter the failure of KB5055683 installation, how to solve it? This article will provide effective solutions. Windows 10 KB5055683 Update KB5055683 is a cumulative update for .NET Framework 3.5, 4.8 and 4.8.1 for Windows 10 22H2 versions, released on April 8, 2025. This update contains all security improvements from previous versions, but no new security improvements were added. It is recommended that you download and install KB50 as soon as possible
 Fresh Guide! Fix REMATCH A D3D12-compatible GPU ErrorApr 21, 2025 pm 08:01 PM
Encountering the REMATCH D3D12-compatible GPU error on Windows? This guide provides solutions to get you back in the game. REMATCH, a multiplayer online football game, requires a graphics card supporting DirectX 12 (Feature Level 12.0, Shader Model
 Clone a Hard Drive Without OS, Watch Pro Guide with Easy StepsApr 21, 2025 am 10:24 AM
This guide shows you how to clone a hard drive even if your Windows system won't boot. MiniTool ShadowMaker simplifies this process. Windows boot failures are common, caused by issues like corrupted system files or MBR errors. Cloning your hard dri
 League of Legends Play Button Not Working on PC: ResolvedApr 21, 2025 am 10:09 AM
The League of Legends game buttons do not work properly, resulting in the inability to enter the game? don’t worry! This guide will guide you to solve this problem quickly and effectively, allowing you to easily resume the game. Just follow the steps below to quickly resolve the game button issue! Quick navigation: League of Legends game buttons don't work How to fix League of Legends game buttons not working on PC Summarize League of Legends game buttons don't work As a MOBA game, League of Legends continues to attract global players and has a huge and stable player group. To enhance the gaming experience, Riot Games regularly releases updates to introduce new content, but this doesn't always go smoothly. Sometimes, some accidental technical failures may occur after a new update, such as League of Legends games
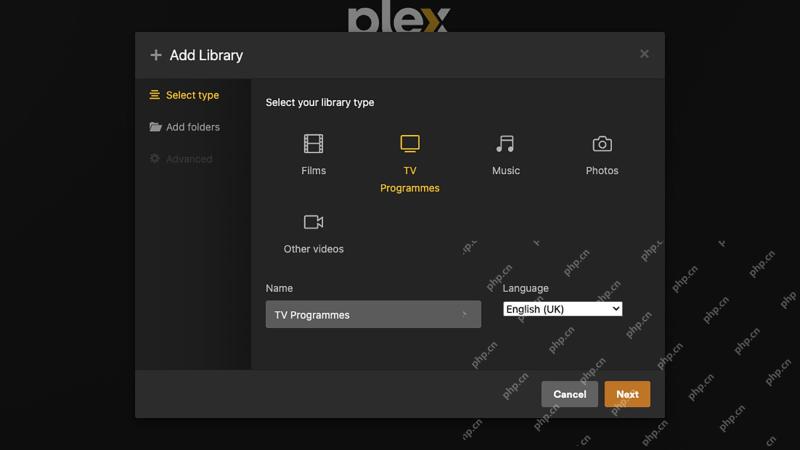 How to use Plex to create your own private Netflix or SpotifyApr 20, 2025 am 10:13 AM
Build Your Own Streaming Service with Plex: A Step-by-Step Guide We're accustomed to on-demand content at our fingertips, thanks to services like Netflix and Spotify. However, building a personal media library offers unique advantages: ownership and
 Spotlight on How to Fix Taskbar Search Bar Blank Box on WindowsApr 19, 2025 pm 08:06 PM
Troubleshooting a Blank Windows 11/10 Taskbar Search Box A blank search bar in Windows 10 or 11 severely impacts usability. This guide offers solutions to resolve this common issue, preventing you from easily searching for apps and files. The Proble
 How to Fix Forever Skies Crashing? Try the 6 Effortless WaysApr 19, 2025 pm 08:01 PM
Encountering crashes in Forever Skies? This guide offers solutions to get your game running smoothly. We'll cover troubleshooting steps for crashes on startup and provide fixes for common causes. Forever Skies Crashes at Startup: Common Causes Fore
 Device Manager Is Blank or Not Showing Anything? Fix It NowApr 19, 2025 pm 06:02 PM
Troubleshooting a Blank Device Manager in Windows Device Manager, a crucial Windows utility for managing hardware, can sometimes fail to display any content. This issue, often caused by disabled services or registry permission problems, can lead to v


Hot AI Tools

Undresser.AI Undress
AI-powered app for creating realistic nude photos

AI Clothes Remover
Online AI tool for removing clothes from photos.

Undress AI Tool
Undress images for free

Clothoff.io
AI clothes remover

Video Face Swap
Swap faces in any video effortlessly with our completely free AI face swap tool!

Hot Article
Hot Tools

SublimeText3 English version
Recommended: Win version, supports code prompts!

mPDF
mPDF is a PHP library that can generate PDF files from UTF-8 encoded HTML. The original author, Ian Back, wrote mPDF to output PDF files "on the fly" from his website and handle different languages. It is slower than original scripts like HTML2FPDF and produces larger files when using Unicode fonts, but supports CSS styles etc. and has a lot of enhancements. Supports almost all languages, including RTL (Arabic and Hebrew) and CJK (Chinese, Japanese and Korean). Supports nested block-level elements (such as P, DIV),

SublimeText3 Mac version
God-level code editing software (SublimeText3)

MinGW - Minimalist GNU for Windows
This project is in the process of being migrated to osdn.net/projects/mingw, you can continue to follow us there. MinGW: A native Windows port of the GNU Compiler Collection (GCC), freely distributable import libraries and header files for building native Windows applications; includes extensions to the MSVC runtime to support C99 functionality. All MinGW software can run on 64-bit Windows platforms.

Atom editor mac version download
The most popular open source editor

