Home >Software Tutorial >Computer Software >How to use onenote Onenote usage tutorial
How to use onenote Onenote usage tutorial
- WBOYWBOYWBOYWBOYWBOYWBOYWBOYWBOYWBOYWBOYWBOYWBOYWBOriginal
- 2024-05-30 10:19:21934browse
1. After installing the software, open the software. The software's management of materials is mainly divided into four levels: notebook, partition, page, and subpage. Each notebook is equivalent to a folder, and a partition is equivalent to files, pages and subpages stored in the folder being stored in partition files (as shown in the figure).

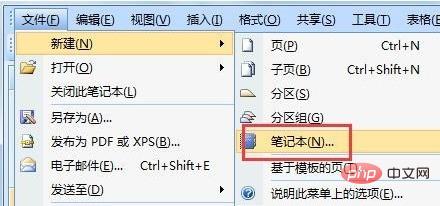
2. Then create a notebook, create a notebook through File>New>Notebook, and set the notebook name and location in the pop-up dialog box (as shown in the figure).

3. Then create a partition. Use File>New>Partition to create a new partition and rename the new partition (as shown in the figure).

4. Then select the partition creation page, first click "New Partition", right-click the mouse at the location shown, and select [New Page] to create a new page (as shown in the figure) Show).

5. Then you can create subpages under the page. The subpages belong to the lower-level directory of the page and will be indented relative to the page (as shown in the figure).

6. In the main interface of the software, you can edit materials and insert collected pictures, text, etc. (as shown in the picture).

7. Save the notebook and the file will be stored in the folder corresponding to the previously selected path. An independent file will be created for each partition (as shown in the figure).

The above is the detailed content of How to use onenote Onenote usage tutorial. For more information, please follow other related articles on the PHP Chinese website!

