Home >Web Front-end >JS Tutorial >How to use jQuery Draggable and Droppable to implement drag and drop function_jquery
How to use jQuery Draggable and Droppable to implement drag and drop function_jquery
- WBOYWBOYWBOYWBOYWBOYWBOYWBOYWBOYWBOYWBOYWBOYWBOYWBOriginal
- 2016-05-16 17:29:531774browse
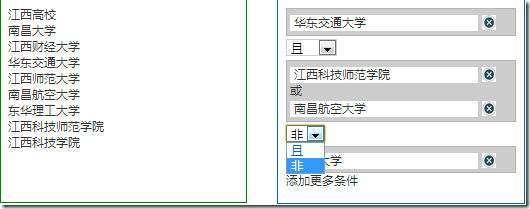
In previous articles, I have introduced the basic drag-and-drop principles in web development, and now I will give you the functions that need to be completed. The final running effect is as shown below:

Main functional requirements description:
1. The element structure on the left will finally pass the Ajax call It is generated from server data and can support multi-level elements. Parent nodes can be collapsed
2. Users can drag elements from the left to the right through drag and drop operations. If the parent node element is dragged, then the elements of its child nodes need to be dragged to the right together
3. Place the element on the right side. There are two possibilities for the area on the right side that can accept elements. One is to create a new area, similar to that shown in "East China Jiaotong University". Another way is to drag and drop it into an area where there are already elements. The relationship between the two is "or". Single element areas have "not" and "and" relationships. Click the delete button on the right to delete the node element.
Step 1: The left element can be dragged
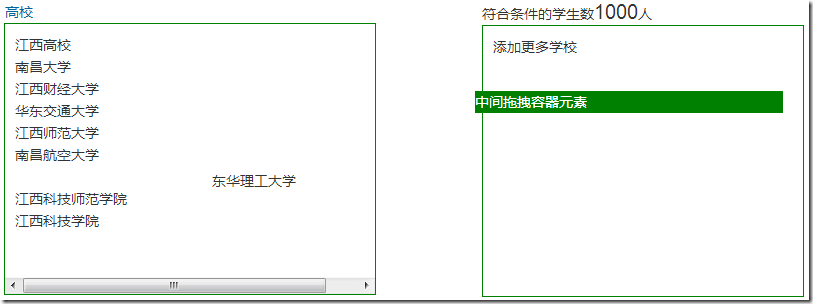
The official example is to add class="ui-widget-content" directly to the element to be dragged. Initially I added the "ui-widget-content" category to all elements I wanted to drag. But when I tested the dragging results, I found that the element can only be dragged inside the container it is in. If you drag it to the right, a horizontal or vertical scroll bar will appear on the div. I don't know if I have set the parameters wrong. The container has overflow:auto set.
The effect is as shown below:
Because the final left element node is accessed through Ajax to return json data in the background, and then dynamically through Javascript To generate this structure, the drag event cannot be bound to the dynamically generated element, and the draggable method cannot be called, so I used a so-called "middle draggable element", which keeps this div on the page. It just doesn't appear by default, and it appears as soon as the user starts dragging the element on the left. Of course, you need to add a lot of code manually here.
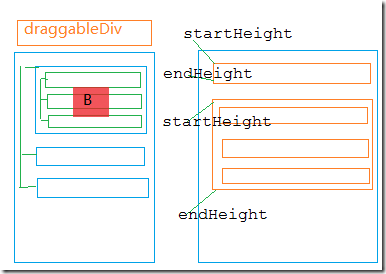
ステップ 2: ドラッグする要素のコンテンツを draggableDiv にコピーします。親ノードをドラッグするときは、その下の子ノード要素も右側にドラッグ アンド ドロップする必要があります。ドラッグされた子ノード要素の場合は、その子ノード要素がすぐ右側に表示されます。左側のツリー構造内のノードは無限になる可能性があるため、親ノードと子ノードは相対的です。そのため、要素は子ノード要素と親ノード要素の両方になる可能性があります。マウスダウン イベントとマウスアップ イベントをリッスンすることで、ユーザーが要素をドラッグしていることを判断できます。このステップの原理を次の図に示します。

ユーザーが B ノードをドラッグすると、まずコンテンツを B ノードにコピーします。 B要素をdraggableDiv要素にドラッグすると、ユーザーがB要素をドラッグすると、実際にはdraggableDiv要素がドラッグされます。そのため、クリックした B 要素の位置を計算し、ドラッグするときに draggableDiv に正しい位置が表示されるようにする必要があります。その場合、ドラッグされるのは draggableDiv 要素であり、ユーザーはドラッグされた B ノード要素のように見えます。
var clickElement = null; threepanels .ptreelist ").bind("mousedown",function (event) {
//現在のマウスダウン要素のコンテンツを取得します
var itemContent = $(this).html(); varraggableDiv = $( "#draggableDiv") ;
$(draggableDiv).css({ "display": "block", "height": 0 });
//クリックされた要素の内容をコピーします
clickElement = $(this).clone ();
var currentdiv = $(this).offset(); $(draggableDiv).css({ "top": currentdiv.top, "left": currentdiv.left }); raggableDiv.trigger(event) ;
//デフォルトの動作をキャンセルします return false });
$("#draggableDiv").mouseup(function (event) { $(this).css({ "height ": "0" }) ; });
//要素をドラッグするときのマウスの位置
varragDivLeft = 0;
varragDivTop = 0;
$("#draggableDiv" ).draggable({ containment: "parent ", ドラッグ: function (event, ui) { $("#draggableDiv").css({ "width": "260px", "height": "22px" });
$("#draggableDiv") .append(clickElement);
var closeTop = $(".closeBar").offset().top;
ragDivLeft =event.target.offsetLeft; =event.target.offsetTop; },
stop: function () {
//ドラッグ完了後にドラッグコンテナの中身を空にする
$("#draggableDiv").html("") ;
$("#draggableDiv" ).css({"height":"0"}) }
});
ステップ 3: 上の要素右側は指定した位置に配置できます
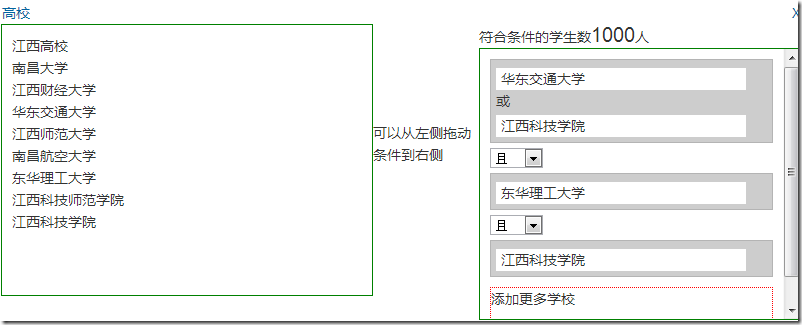
要素を指定した領域にドラッグしてから操作を放す必要があります。 「put」操作を完了します。上の図からわかるように、要素の左上端と左下端を配列に格納します。そして、「ドラッグ」プロセス中に、ドラッグの左側が常に記録され、右側に配置された場合、現在の要素がどこに配置されるかを判断できます。コードをダウンロードして詳細を表示できます。 コードの完成後の
レンダリングは次のとおりです:
 コードのダウンロード:
 Related articles
See more- An in-depth analysis of the Bootstrap list group component
- Detailed explanation of JavaScript function currying
- Complete example of JS password generation and strength detection (with demo source code download)
- Angularjs integrates WeChat UI (weui)
- How to quickly switch between Traditional Chinese and Simplified Chinese with JavaScript and the trick for websites to support switching between Simplified and Traditional Chinese_javascript skills

