1,安装vim,你可以使用ubuntu 自带的apt-get 工具安装。
apt-get install vim-gnome
2,安装成功后,进行配置
1>首先进行自动提示补全的配置(pydiction)
从官方上下载http://www.vim.org/scripts/script.php?script_id=850最新的即可,解压缩后,进入解压缩后的目录,执行如下命令
# cp python_pydiction.vim /usr/share/vim/vim74/ftplugin
# mkdir /usr/share/vim/vim74/pydiction
# cp complete-dict pydiction.py /usr/share/vim/vim74/pydiction/
# vi ~/.vimrc
讲解:
第一行 就是复制下载的文件 到/usr/share/vim/vim74/ftplugin
第二行 就是在/usr/share/vim/vim74/目录下创建文件夹pydiction
第三行 复制 complete-dict pydiction.py 这两个文件到
第四行 打开 .vimc配置文件
然后把下面的三行代码复制到里面然后保存,应该都会吧。
单击Esc后,执行:wq,保存
let g:pydiction_location = '/usr/share/vim/vim74/pydiction/complete-dict'
let g:pydiction_menu_height = 20
autocmd FileType python set omnifunc=pythoncomplete#Complete
2>安装python_fold自动折叠插件从官方下载http://www.vim.org/scripts/script.php?script_id=515最新的插件,解压缩后,进入解压缩后的目录,执行如下命令
# cp python_fold.vim /usr/share/vim/vim74/plugin/
# vi ~/.vimrc
讲解:
第一行 就是复制下载的文件 到/usr/share/vim/vim74/plugin
第二行 打开 .vimc配置文件
然后把下面的一行代码复制到里面
set foldmethod=indent
3> 安装自动高亮插件从官方上下载:http://www.vim.org/scripts/script.php?script_id=790,下载最新的插件,解压缩后,进入解压缩后的目录,执行如下命令
mv /usr/share/vim/vim74/syntax/python.vim /usr/share/vim/vim74/syntax/python.vim_backup cp python.vim /usr/share/vim/vim74/syntax
讲解:
第一行 就是将python.vim 备份
第二行 复制python.vim 到/usr/share/vim/vim74/syntax 目录下
4> 生成 ctag 序列
进入到 python 程序脚本(项目)所在的目录,在该目录下执行:
ctags -R *
如果提示没有安装ctags,执行apt-get install ctags即可。
生成一个 ctags 文件,该文件记录了程序/项目的函数、类等的分析序列记录。有关 ctag 的详细用法请阅读 ctag 的 manpage。
5>安装taglist 插件
从官方上下载插件:http://www.vim.org/scripts/script.php?script_id=273 ,用最新的即可,解压缩后,进入解压缩后的目录,执行如下命令。
# cp plugin/taglist.vim /usr/share/vim/vim74/plugin/
# cp doc/taglist.txt /usr/share/vim/vim74/doc/
# vi
执行下面的命令
:helptags /usr/share/vim/vim74/doc
:help taglist.txt 第一行 生成 taglist 帮助文件列表 第二行 查看 taglist 帮助信息配置 vimrc, vi ~/.vimrc,在后面添加如下代码
let Tlist_Show_One_File = 1
let Tlist_Exit_OnlyWindow = 1
let Tlist_Use_Right_Window = 1
let Tlist_Auto_Open=1
let Tlist_File_Fold_Auto_Close=1
讲解:
第一行 不同时显示多个文件的tag,只显示当前文件的。
第二行 如果 taglist 窗口是最后一个窗口,则退出 vim。
第三行 在右侧窗口中显示 taglist 窗口。
第四行 在启动 vim 后,自动打开 taglist 窗口。
第五行 只显示当前文件 tag,其它文件的tag折叠。
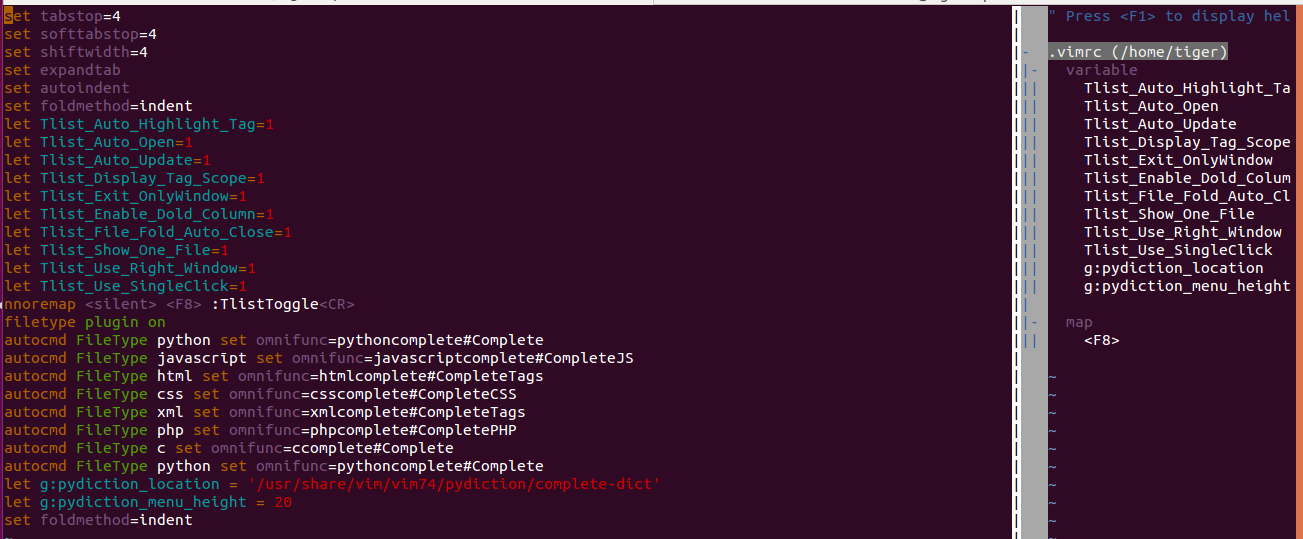
最后的配置结果截图如下:

配置文件内容如下:需要的可复制。
set tabstop=4
set softtabstop=4
set shiftwidth=4
set expandtab
set autoindent
set foldmethod=indent
let Tlist_Auto_Highlight_Tag=1
let Tlist_Auto_Open=1
let Tlist_Auto_Update=1
let Tlist_Display_Tag_Scope=1
let Tlist_Exit_OnlyWindow=1
let Tlist_Enable_Dold_Column=1
let Tlist_File_Fold_Auto_Close=1
let Tlist_Show_One_File=1
let Tlist_Use_Right_Window=1
let Tlist_Use_SingleClick=1
nnoremap <silent> <F8> :TlistToggle<CR>
filetype plugin on
autocmd FileType python set omnifunc=pythoncomplete#Complete
autocmd FileType javascrīpt set omnifunc=javascriptcomplete#CompleteJS
autocmd FileType html set omnifunc=htmlcomplete#CompleteTags
autocmd FileType css set omnifunc=csscomplete#CompleteCSS
autocmd FileType xml set omnifunc=xmlcomplete#CompleteTags
autocmd FileType php set omnifunc=phpcomplete#CompletePHP
autocmd FileType c set omnifunc=ccomplete#Complete
autocmd FileType python set omnifunc=pythoncomplete#Complete
let g:pydiction_location = '/usr/share/vim/vim74/pydiction/complete-dict'
let g:pydiction_menu_height = 20
set foldmethod=indent
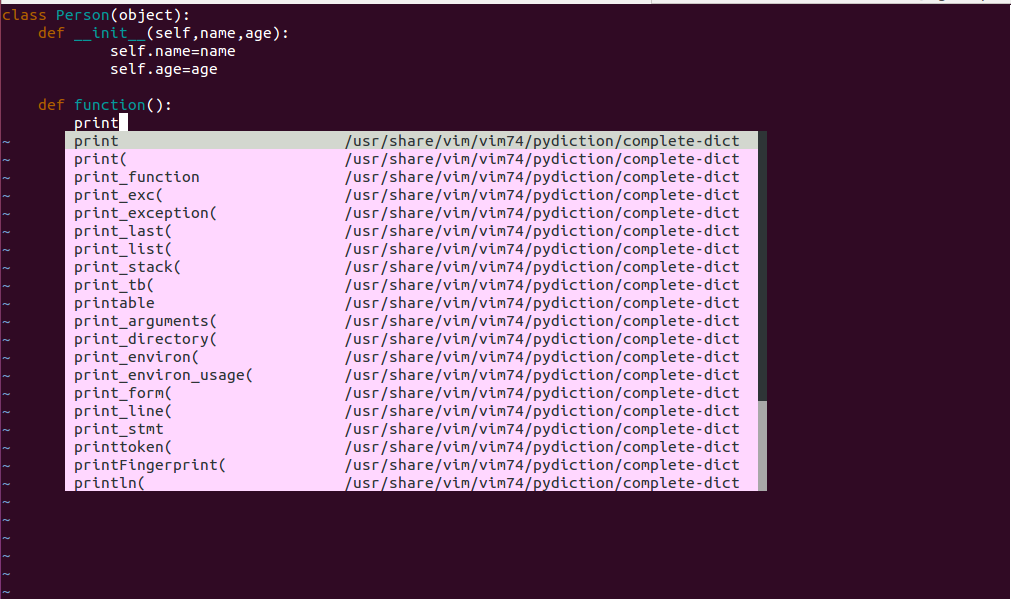
配置后,文件编辑结果如下:

 Python vs. C : Understanding the Key DifferencesApr 21, 2025 am 12:18 AM
Python and C each have their own advantages, and the choice should be based on project requirements. 1) Python is suitable for rapid development and data processing due to its concise syntax and dynamic typing. 2)C is suitable for high performance and system programming due to its static typing and manual memory management.
 Python vs. C : Which Language to Choose for Your Project?Apr 21, 2025 am 12:17 AM
Choosing Python or C depends on project requirements: 1) If you need rapid development, data processing and prototype design, choose Python; 2) If you need high performance, low latency and close hardware control, choose C.
 Reaching Your Python Goals: The Power of 2 Hours DailyApr 20, 2025 am 12:21 AM
By investing 2 hours of Python learning every day, you can effectively improve your programming skills. 1. Learn new knowledge: read documents or watch tutorials. 2. Practice: Write code and complete exercises. 3. Review: Consolidate the content you have learned. 4. Project practice: Apply what you have learned in actual projects. Such a structured learning plan can help you systematically master Python and achieve career goals.
 Maximizing 2 Hours: Effective Python Learning StrategiesApr 20, 2025 am 12:20 AM
Methods to learn Python efficiently within two hours include: 1. Review the basic knowledge and ensure that you are familiar with Python installation and basic syntax; 2. Understand the core concepts of Python, such as variables, lists, functions, etc.; 3. Master basic and advanced usage by using examples; 4. Learn common errors and debugging techniques; 5. Apply performance optimization and best practices, such as using list comprehensions and following the PEP8 style guide.
 Choosing Between Python and C : The Right Language for YouApr 20, 2025 am 12:20 AM
Python is suitable for beginners and data science, and C is suitable for system programming and game development. 1. Python is simple and easy to use, suitable for data science and web development. 2.C provides high performance and control, suitable for game development and system programming. The choice should be based on project needs and personal interests.
 Python vs. C : A Comparative Analysis of Programming LanguagesApr 20, 2025 am 12:14 AM
Python is more suitable for data science and rapid development, while C is more suitable for high performance and system programming. 1. Python syntax is concise and easy to learn, suitable for data processing and scientific computing. 2.C has complex syntax but excellent performance and is often used in game development and system programming.
 2 Hours a Day: The Potential of Python LearningApr 20, 2025 am 12:14 AM
It is feasible to invest two hours a day to learn Python. 1. Learn new knowledge: Learn new concepts in one hour, such as lists and dictionaries. 2. Practice and exercises: Use one hour to perform programming exercises, such as writing small programs. Through reasonable planning and perseverance, you can master the core concepts of Python in a short time.
 Python vs. C : Learning Curves and Ease of UseApr 19, 2025 am 12:20 AM
Python is easier to learn and use, while C is more powerful but complex. 1. Python syntax is concise and suitable for beginners. Dynamic typing and automatic memory management make it easy to use, but may cause runtime errors. 2.C provides low-level control and advanced features, suitable for high-performance applications, but has a high learning threshold and requires manual memory and type safety management.


Hot AI Tools

Undresser.AI Undress
AI-powered app for creating realistic nude photos

AI Clothes Remover
Online AI tool for removing clothes from photos.

Undress AI Tool
Undress images for free

Clothoff.io
AI clothes remover

Video Face Swap
Swap faces in any video effortlessly with our completely free AI face swap tool!

Hot Article

Hot Tools

MantisBT
Mantis is an easy-to-deploy web-based defect tracking tool designed to aid in product defect tracking. It requires PHP, MySQL and a web server. Check out our demo and hosting services.

Dreamweaver Mac version
Visual web development tools

SublimeText3 Mac version
God-level code editing software (SublimeText3)

PhpStorm Mac version
The latest (2018.2.1) professional PHP integrated development tool

WebStorm Mac version
Useful JavaScript development tools


