Home >Web Front-end >JS Tutorial >How to use jQuery jcrop plugin to take screenshot_jquery
How to use jQuery jcrop plugin to take screenshot_jquery
- WBOYWBOYWBOYWBOYWBOYWBOYWBOYWBOYWBOYWBOYWBOYWBOYWBOriginal
- 2016-05-16 17:13:382184browse
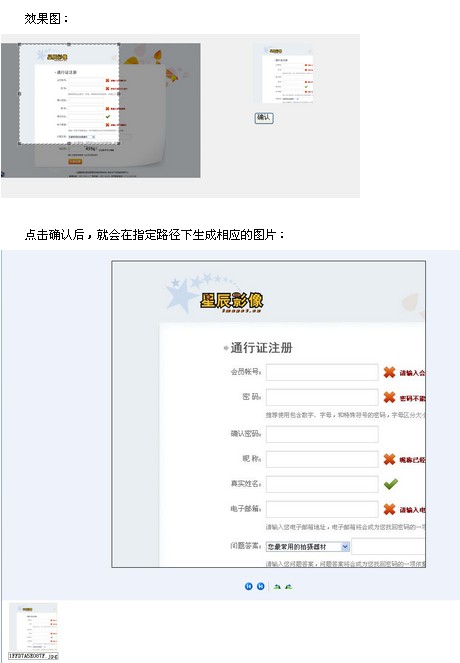
Cut images in the background.
The principle of avatar interception: Use jcrop in the front desk to obtain the x-axis coordinate, y-axis coordinate, height of the slice, and width of the slice, and then pass these four values to the backend
. Amplification processing is required in the background: magnify the section N times, N=original image/avatar displayed at the front desk. That is, X = high.
Example:
JSP:
Then use jcrop. Before using jcrop, we need to download jcrop: http://deepliquid.com/content/Jcrop.html.
After decompressing the downloaded compressed package, you can see three folders and an index.html file. Jcorp’s style files are placed under /css, and several simple examples (index.html) are placed under /demo. The link cited in is placed in this folder), and the most important script file in Jcorp is placed under /js. We only need to use three files: jquery.Jcrop.css, jquery.Jcrop.js, JQuery.js
Usage:
function cutImage(){
$("#srcImg").Jcrop( {
aspectRatio : 1,
onChange : showCoords,
onSelect : showCoords,
minSize :[200,200]
});
//Simple event handler, respond to onChange, onSelect events, call
function showCoords(obj) {
$("#x").val(obj.x); $("#y").val(obj.y);
$("#w").val(obj.w);
$("#h").val(obj. h);
if (parseInt(obj.w) > 0) {
//Calculate the zoom ratio of the preview area image by calculating the width (and height) of the display area and the width (and height) of the clipping The ratio is
var rx = $("#preview_box").width() / obj.w;
var ry = $("#preview_box").height() / obj.h;
//Control the style and display of the image through the proportion value
$("#previewImg").css( {
/ ", //The width of the preview image is the product of the calculated ratio value and the width of the original image
height : Math.round(rx * $("#srcImg").height()) "px", //The height of the preview image is Calculate the product of the proportion value and the height of the original image
marginLeft: "-" Math.round(rx * obj.x) "px",
marginTop: "-" Math.round(ry * obj.y) " px"
});
}
}
}
onSelect: showPreview,
aspectRatio: 1
});
この方法は、Jcrop で生成されたオブジェクトをグローバル変数に代入することで、操作をより便利にします。
上記jsにより、背景にX軸座標、Y軸座標、高さH、幅Wの4つの値が渡され、これらを元に背景を拡大してカットするだけです。 4つの価値観
以上です。
アクション
/**
* 作物のアバター
*/
public String CutImage(){
/*
* パラメータを取得
* x,y,w,h,bigImage
*/
HttpServletRequest request = (HttpServletRequest) ActionContext.getContext ().get(ServletActionContext.HTTP_REQUEST);
int x = Integer.valueOf(request.getParameter("x"));
int y = Integer.valueOf(request.getParameter("y") ));
int w = Integer.valueOf(request.getParameter("w"));
int h = Integer.valueOf(request.getParameter("h"));
String bigImage = request .getParameter( "bigImage");
//ファイルの実際のパスを取得します
//ファイル名を取得します
String[] imageNameS = bigImage.split("/");
String imageName = imageNameS[imageNameS.length-1];
//ファイルの正式なパス
String imagePath = getSavePath() "\" imageName;
//画像を切り取る
ImageCut imageCut = new ImageCut();
imageCut.cutImage(imagePath, x, y, w, h);
//アバターが切り取られた後、画像パスをユーザーに保存します
UserBean userBean = (UserBean) request.getSession( ).getAttribute("userBean");
userBean.setUserPhoto(bigImage);
//アバターを保存
UserCenterService centerService = new UserCenterService();
centerService.updatePhoto(userBean);
//変更したユーザーをセッションに保存します
request.getSession().setAttribute("userBean", userBean);
return "updatePhoto";
}
}
画像トリミングツールクラス: ImageCut.java
public class ImageCut {
/* *
* 画像切り出し
* @param imagePath 元画像アドレス
* @param x 対象スライス座標 X 軸開始点
* @param y 対象スライス座標 Y 軸開始点
* @param w ターゲットスライス幅
* @param h ターゲットスライス高さ
*/
public void CutImage(String imagePath, int x,int y,int w,int h){
try {
Image img;
ImageFilter CropFilter;
// ソース画像を読み取ります
BufferedImage bi = ImageIO.read(new File(imagePath));
int srcWidth = bi.getWidth() // ソース画像の幅
int srcHeight = bi.getHeight; () ; // ソース画像の高さ
// 元の画像のサイズがスライス サイズより大きい場合は、切り取ります
if (srcWidth >= w && srcHeight >= h) {
画像 image = bi.getScaledInstance(srcWidth, srcHeight,Image.SCALE_DEFAULT);
int x1 = x*srcWidth/400;
int y1 = y*srcHeight/270;
int w1 = w*srcWidth/400;
int h1 = h*srcHeight/270;
CropFilter = new CropImageFilter(x1, y1, w1, h1);
img = Toolkit.getDefaultToolkit().createImage (new FilteredImageSource(image.getSource(), CropFilter));
BufferedImage タグ = new BufferedImage(w1, h1,BufferedImage.TYPE_INT_RGB);
グラフィック g = tag.getGraphics();
g.drawImage (img, 0, 0 , null); // 縮小画像を描画
g.dispose();
// ファイルとして出力
ImageIO.write(tag, "JPEG", new File( imagePath));
}
} catch (IOException e) {
e.printStackTrace();
}
}
}

Related articles
See more- An in-depth analysis of the Bootstrap list group component
- Detailed explanation of JavaScript function currying
- Complete example of JS password generation and strength detection (with demo source code download)
- Angularjs integrates WeChat UI (weui)
- How to quickly switch between Traditional Chinese and Simplified Chinese with JavaScript and the trick for websites to support switching between Simplified and Traditional Chinese_javascript skills

