
 Web Front-endJS TutorialCreating a full record of tank battles with javascript (1)_javascript skills
Creating a full record of tank battles with javascript (1)_javascript skills

PS: This tank battle was rewritten by myself after downloading a piece of source code online. There is nothing too difficult in itself. This case uses js object-oriented better and can be used as an introductory tutorial for js object-oriented.
1. Create basic objects to realize simple movement of tanks
1.1 How to draw canvas in the map?
Taking into account the issue of browser compatibility, we use the method of operating dom to realize the drawing and refreshing of game objects. How do we store our map? We should save the map in a two-dimensional array. There is no two-dimensional array in js, but it can be achieved by storing the array in a one-dimensional array.
1.2 Code Implementation
We design the canvas as a two-dimensional array of 13 * 13. The corresponding length and width of each element in the map are both 40px. The entire map can be regarded as a cell composed of 40px*40p x size. table, then the size of our entire canvas is 520px * 520px;
Before loading the code, let me give you an object relationship diagram:
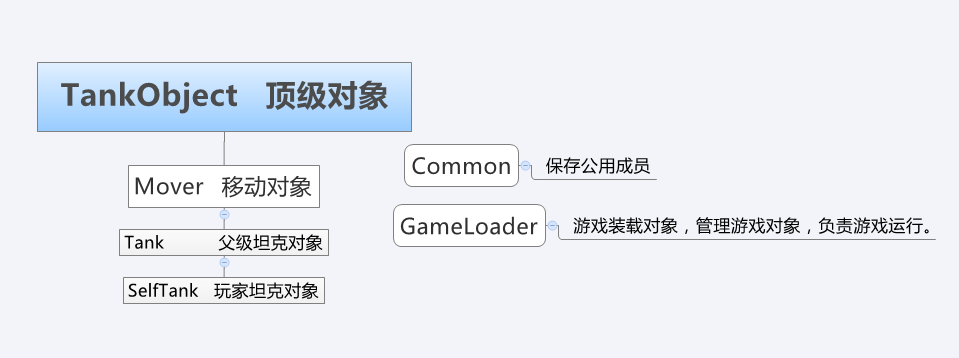
1.2.1 Create top-level objects
html code:
<script><br /> window.onload = function () {<br /> // Call the game loading object <br /> var loader = new GameLoader();<br /> Loader.Begin();<br /> }<br /> </script>
TankObject.js file:
// Top-level object
TankObject = function () {
This.XPosition = 0; // The X position of the object in the map (13*13)
This.YPosition = 0;
This.UI = null; // dom element
}
//Change UI static method
TankObject.prototype.UpdateUI = function (battlFiled) { }
//Set the position, the parameters are as follows: 1*40,6*40
TankObject.prototype.SetPosition = function (leftPosition, topPosition) {
// Math.round at the map location
This.XPosition = Math.round(leftPosition / 40);
This.YPosition = Math.round(topPosition / 40);
//Set the position on the form
If (this.UI != null && this.UI.style != null) {
This.UI.style.left = leftPosition "px";
This.UI.style.top = topPosition "px";
}
}
Here we use X, Y coordinates to represent the location of the object on the map. Later we will put each object in the map into a two-dimensional array. At this time, we can obtain the corresponding object through the X and Y coordinates.
Then use left and top in css to control the position of our object in the form. (movable objects: tanks, bullets)
1.2.2 Create public objects
We also need to create a public object to write some of our commonly used methods.
Common.js:
//Four directions of tank movement
var EnumDirection = {
Up: "0",
Right: "1",
Down: "2",
Left: "3"
};
//General method object
var UtilityClass = {
//Create dom element into parentNode, you can specify id, className
CreateE: function (type, id, className, parentNode) {
var J = document.createElement(type);
If (id) { J.id = id };
If (className) { J.className = className };
return parentNode.appendChild(J);
}, // Remove element
RemoveE: function (obj, parentNode) {
parentNode.removeChild(obj);
},
GetFunctionName: function (context, argumentCallee) {
for (var i in context) {
If (context[i] == argumentCallee) { return i };
}
return "";
}, // Bind the event and return the func method, this is the incoming obj
BindFunction: function (obj,func) {
return function () {
func.apply(obj, arguments);
};
}
};
1.2.3 Creating moving objects
Mover.js
//Move object, inherited from top-level object
Mover = function () {
This.Direction = EnumDirection.Up;
This.Speed = 1;
}
Mover.prototype = new TankObject();
Mover.prototype.Move = function () {
If (this.lock) {
return;/* Deactivated or still in progress, the operation is invalid */
}
//Set the background image of the tank according to the direction
This.UI.style.backgroundPosition = "0 -" this.Direction * 40 "px";
// If the direction is up and down, vp is top; if the direction is up and left, val is -1
var vp = ["top", "left"][((this.Direction == EnumDirection.Up) || (this.Direction == EnumDirection.Down)) ? 0 : 1];
var val = ((this.Direction == EnumDirection.Up) || (this.Direction == EnumDirection.Left)) ? -1 : 1;
This.lock = true;/* Lock */
//Save the current object to This
var This = this;
//Record the starting position of object movement
var startmoveP = parseInt(This.UI.style[vp]);
var xp = This.XPosition, yp = This.YPosition;
var subMove = setInterval(function () {
// Start moving, 5px each time
This.UI.style[vp] = parseInt(This.UI.style[vp]) 5 * val "px";
// Move one cell at a time 40px
If (Math.abs((parseInt(This.UI.style[vp]) - startmoveP)) >= 40) {
clearInterval(subMove);
This.lock = false;/* Unlock, allow stepping again */
// Record the position of the object in the table after moving
This.XPosition = Math.round(This.UI.offsetLeft / 40);
This.YPosition = Math.round(This.UI.offsetTop / 40);
}
}, 80 - this.Speed * 10);
}
The move object here inherits from our top-level object, and this here represents the object that calls the Move method.
The function of Move object moves according to the direction and speed of the object. Each time it moves 5px, it moves a total of 40px one cell. This object will be expanded later, and functions such as collision detection will be added.
1.2.4 Create tank object
Tank.js file:
//tank object inherited from Mover
Tank=function(){}
Tank.prototype = new Mover();
//Create a player tank, inherited from the tank object
SelfTank = function () {
This.UI = UtilityClass.CreateE("div", "", "itank", document.getElementById("divMap"));
This.MovingState = false;
This.Speed = 4;
}
SelfTank.prototype = new Tank();
//Set the tank's position
SelfTank.prototype.UpdateUI = function () {
This.UI.className = "itank";
// Top-level object method, set the position of the tank
This.SetPosition(this.XPosition * 40, this.YPosition * 40);
}
Now only player tanks have been created, and we will add enemy tanks to them later.
1.2.5 Create game loading object (core)
// Game loading object The core object of the entire game
GameLoader = function () {
This.mapContainer = document.getElementById("divMap"); // The div
that stores the game map This._selfTank = null; // Player tank
This._gameListener = null; // Game main loop timer id
}
GameLoader.prototype = {
Begin: function () {
// Initialize player tank
var selfT = new SelfTank();
selfT.XPosition = 4;
selfT.YPosition = 12;
selfT.UpdateUI();
This._selfTank = selfT;
// Add key event
var wrapper = UtilityClass.BindFunction(this, this.OnKeyDown);
window.onkeydown = document.body.onkeydown = warpper;
warpper = UtilityClass.BindFunction(this, this.OnKeyUp);
window.onkeyup = document.body.onkeyup = warpper;
// Game main loop
warpper = UtilityClass.BindFunction(this, this.Run);
/*Long timer monitoring control key*/
This._gameListener = setInterval(warpper, 20);
}
// Press the keyboard and the player tank starts moving
, OnKeyDown: function (e) {
switch ((window.event || e).keyCode) {
case 37:
This._selfTank.Direction = EnumDirection.Left;
This._selfTank.MovingState = true;
break; case 38:
This._selfTank.Direction = EnumDirection.Up;
This._selfTank.MovingState = true;
break; case 39:
This._selfTank.Direction = EnumDirection.Right;
This._selfTank.MovingState = true;
break; case 40:
This._selfTank.Direction = EnumDirection.Down;
This._selfTank.MovingState = true;
break; }
}
// The button pops up to stop moving
, OnKeyUp: function (e) {
switch ((window.event || e).keyCode) {
case 37:
case 38:
case 39:
case 40:
This._selfTank.MovingState = false;
break;
}
}
/*Game main loop running function, the heart and hub of the game*/
, Run: function () {
If (this._selfTank.MovingState) {
This._selfTank.Move();
}
}
};
The game loading object code seems to be a lot, but it actually does two things:
1. Create a player tank object.
2. Add a key listening event. When the player presses the movement key, the tank Move method is called to move the tank.
Summary: At this point our tank can move freely by pressing buttons. Next we need to improve the map and collision detection.

 Javascript Data Types : Is there any difference between Browser and NodeJs?May 14, 2025 am 12:15 AM
JavaScript core data types are consistent in browsers and Node.js, but are handled differently from the extra types. 1) The global object is window in the browser and global in Node.js. 2) Node.js' unique Buffer object, used to process binary data. 3) There are also differences in performance and time processing, and the code needs to be adjusted according to the environment.
 JavaScript Comments: A Guide to Using // and /* */May 13, 2025 pm 03:49 PM
JavaScriptusestwotypesofcomments:single-line(//)andmulti-line(//).1)Use//forquicknotesorsingle-lineexplanations.2)Use//forlongerexplanationsorcommentingoutblocksofcode.Commentsshouldexplainthe'why',notthe'what',andbeplacedabovetherelevantcodeforclari
 Python vs. JavaScript: A Comparative Analysis for DevelopersMay 09, 2025 am 12:22 AM
The main difference between Python and JavaScript is the type system and application scenarios. 1. Python uses dynamic types, suitable for scientific computing and data analysis. 2. JavaScript adopts weak types and is widely used in front-end and full-stack development. The two have their own advantages in asynchronous programming and performance optimization, and should be decided according to project requirements when choosing.
 Python vs. JavaScript: Choosing the Right Tool for the JobMay 08, 2025 am 12:10 AM
Whether to choose Python or JavaScript depends on the project type: 1) Choose Python for data science and automation tasks; 2) Choose JavaScript for front-end and full-stack development. Python is favored for its powerful library in data processing and automation, while JavaScript is indispensable for its advantages in web interaction and full-stack development.
 Python and JavaScript: Understanding the Strengths of EachMay 06, 2025 am 12:15 AM
Python and JavaScript each have their own advantages, and the choice depends on project needs and personal preferences. 1. Python is easy to learn, with concise syntax, suitable for data science and back-end development, but has a slow execution speed. 2. JavaScript is everywhere in front-end development and has strong asynchronous programming capabilities. Node.js makes it suitable for full-stack development, but the syntax may be complex and error-prone.
 JavaScript's Core: Is It Built on C or C ?May 05, 2025 am 12:07 AM
JavaScriptisnotbuiltonCorC ;it'saninterpretedlanguagethatrunsonenginesoftenwritteninC .1)JavaScriptwasdesignedasalightweight,interpretedlanguageforwebbrowsers.2)EnginesevolvedfromsimpleinterpreterstoJITcompilers,typicallyinC ,improvingperformance.
 JavaScript Applications: From Front-End to Back-EndMay 04, 2025 am 12:12 AM
JavaScript can be used for front-end and back-end development. The front-end enhances the user experience through DOM operations, and the back-end handles server tasks through Node.js. 1. Front-end example: Change the content of the web page text. 2. Backend example: Create a Node.js server.
 Python vs. JavaScript: Which Language Should You Learn?May 03, 2025 am 12:10 AM
Choosing Python or JavaScript should be based on career development, learning curve and ecosystem: 1) Career development: Python is suitable for data science and back-end development, while JavaScript is suitable for front-end and full-stack development. 2) Learning curve: Python syntax is concise and suitable for beginners; JavaScript syntax is flexible. 3) Ecosystem: Python has rich scientific computing libraries, and JavaScript has a powerful front-end framework.


Hot AI Tools

Undresser.AI Undress
AI-powered app for creating realistic nude photos

AI Clothes Remover
Online AI tool for removing clothes from photos.

Undress AI Tool
Undress images for free

Clothoff.io
AI clothes remover

Video Face Swap
Swap faces in any video effortlessly with our completely free AI face swap tool!

Hot Article
Hot Tools

SublimeText3 Chinese version
Chinese version, very easy to use

VSCode Windows 64-bit Download
A free and powerful IDE editor launched by Microsoft

SecLists
SecLists is the ultimate security tester's companion. It is a collection of various types of lists that are frequently used during security assessments, all in one place. SecLists helps make security testing more efficient and productive by conveniently providing all the lists a security tester might need. List types include usernames, passwords, URLs, fuzzing payloads, sensitive data patterns, web shells, and more. The tester can simply pull this repository onto a new test machine and he will have access to every type of list he needs.

Notepad++7.3.1
Easy-to-use and free code editor

SAP NetWeaver Server Adapter for Eclipse
Integrate Eclipse with SAP NetWeaver application server.

