Heim >Web-Frontend >PS-Tutorial >Photoshop打造超酷的火焰花纹
Photoshop打造超酷的火焰花纹
- PHP中文网Original
- 2016-06-01 14:34:541339Durchsuche
本教程介绍火焰花纹的制作方法。制作之前需要准备一些花纹及火焰素材。制作的时候先把花纹素材调成火焰色,并加上一些发光的图层样式。然后把火焰素材叠加到花纹上,用涂抹工具涂出火焰的形状即可。
最终效果

1、创建文件,大小为600 × 450,然后在添加一个渐变,如下:
2、我们打开下图所示的素材,并拖到画布里面,然后命名为“花”。

3、适用混合样式>颜色叠加,就会是下面的效果:
4、添加外发光和内发光,参数及效果如下图。


5、把“花”图层复制,然后选择滤镜>模糊>高斯模糊,设置如下:然后把原来的“花”图层设置透明度为:50%。
6、下面我们就用涂抹工具,在花的涂出火焰效果来,有点难度,但是很好玩。
7、现在我们加强火焰效果。打开下图所示的火焰素材,用魔术棒去掉背景后拖进来,命名为“火焰”,然后用涂抹工具涂抹他的边缘,方法和效果如下:


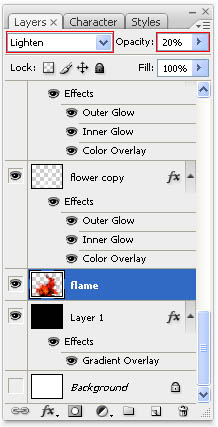
8、现在我们把“图层”放到花的下面,然后设置混合模式为颜色减淡。不透明为:20%。

9、现在我们加强火焰,在画布上加入小火焰,放在花图层的下面,然后在适用涂抹工具,涂抹出它燃烧的效果,过程如下图。


最终效果:
Stellungnahme:
Der Inhalt dieses Artikels wird freiwillig von Internetnutzern beigesteuert und das Urheberrecht liegt beim ursprünglichen Autor. Diese Website übernimmt keine entsprechende rechtliche Verantwortung. Wenn Sie Inhalte finden, bei denen der Verdacht eines Plagiats oder einer Rechtsverletzung besteht, wenden Sie sich bitte an admin@php.cn
Vorheriger Artikel:Photoshop打造唯美的抽象光带Nächster Artikel:Photoshop制作漂亮的金色立体花纹

