Heim >Technologie-Peripheriegeräte >KI >Maschinelles Lernen |. PyTorch Kurzanleitung Teil 2
Maschinelles Lernen |. PyTorch Kurzanleitung Teil 2
- WBOYWBOYWBOYWBOYWBOYWBOYWBOYWBOYWBOYWBOYWBOYWBOYWBnach vorne
- 2023-11-02 17:29:15907Durchsuche
Nach dem vorherigen Artikel „PyTorch Concise Tutorial Teil 1“ lernen Sie weiterhin mehrschichtiges Perzeptron, Faltungs-Neuronales Netzwerk und LSTMNet.
1. Mehrschichtiges Perzeptron
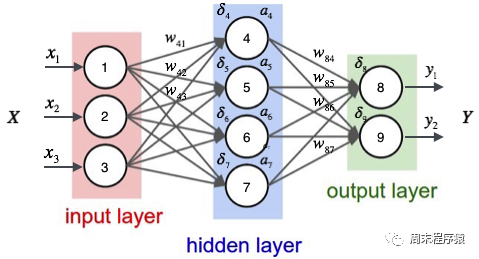
Mehrschichtiges Perzeptron ist ein einfaches neuronales Netzwerk und eine wichtige Grundlage für tiefes Lernen. Es überwindet die Einschränkungen linearer Modelle, indem es dem Netzwerk eine oder mehrere verborgene Schichten hinzufügt. Das spezifische Diagramm lautet wie folgt:

import numpy as npimport torchfrom torch.autograd import Variablefrom torch import optimfrom data_util import load_mnistdef build_model(input_dim, output_dim):return torch.nn.Sequential(torch.nn.Linear(input_dim, 512, bias=False),torch.nn.ReLU(),torch.nn.Dropout(0.2),torch.nn.Linear(512, 512, bias=False),torch.nn.ReLU(),torch.nn.Dropout(0.2),torch.nn.Linear(512, output_dim, bias=False),)def train(model, loss, optimizer, x_val, y_val):model.train()optimizer.zero_grad()fx = model.forward(x_val)output = loss.forward(fx, y_val)output.backward()optimizer.step()return output.item()def predict(model, x_val):model.eval()output = model.forward(x_val)return output.data.numpy().argmax(axis=1)def main():torch.manual_seed(42)trX, teX, trY, teY = load_mnist(notallow=False)trX = torch.from_numpy(trX).float()teX = torch.from_numpy(teX).float()trY = torch.tensor(trY)n_examples, n_features = trX.size()n_classes = 10model = build_model(n_features, n_classes)loss = torch.nn.CrossEntropyLoss(reductinotallow='mean')optimizer = optim.Adam(model.parameters())batch_size = 100for i in range(100):cost = 0.num_batches = n_examples // batch_sizefor k in range(num_batches):start, end = k * batch_size, (k + 1) * batch_sizecost += train(model, loss, optimizer,trX[start:end], trY[start:end])predY = predict(model, teX)print("Epoch %d, cost = %f, acc = %.2f%%"% (i + 1, cost / num_batches, 100. * np.mean(predY == teY)))if __name__ == "__main__":main()
(1) Der obige Code ähnelt dem Code eines einschichtigen neuronalen Netzwerks. Der Unterschied besteht darin, dass build_model ein neuronales Netzwerkmodell erstellt, das drei lineare Schichten und zwei ReLU-Aktivierungen enthält Funktionen:
- Fügen Sie dem Modell die erste lineare Ebene hinzu. Die Anzahl der Eingabefunktionen dieser Ebene beträgt 512.
- Fügen Sie dann eine ReLU-Aktivierungsfunktion und eine Dropout-Ebene hinzu, um die nichtlinearen Funktionen zu verbessern des Modells und verhindern Sie eine Überanpassung.
- Fügen Sie dem Modell eine zweite lineare Ebene hinzu. Die Anzahl der Eingabemerkmale dieser Ebene beträgt 512.
- Fügen Sie dann eine ReLU-Aktivierungsfunktion hinzu Dropout-Ebene;
- Fügen Sie dem Modell eine dritte lineare Ebene hinzu. Die Anzahl der Eingabemerkmale dieser Ebene beträgt 512 und die Anzahl der Ausgabemerkmale beträgt ausgabe_dim, was der Anzahl der Ausgabekategorien des Modells entspricht (2) Was ist die ReLU-Aktivierungsfunktion? Die ReLU-Aktivierungsfunktion (Rectified Linear Unit) ist eine häufig verwendete Aktivierungsfunktion in Deep Learning und neuronalen Netzen. Der mathematische Ausdruck der ReLU-Funktion lautet: f(x) = max(0, x), wobei x der Eingabewert ist. Das Merkmal der ReLU-Funktion besteht darin, dass die Ausgabe 0 ist, wenn der Eingabewert kleiner oder gleich 0 ist. Wenn der Eingabewert größer als 0 ist, ist die Ausgabe gleich dem Eingabewert. Einfach ausgedrückt unterdrückt die ReLU-Funktion den negativen Teil auf 0 und lässt den positiven Teil unverändert. Die Rolle der ReLU-Aktivierungsfunktion im neuronalen Netzwerk besteht darin, nichtlineare Faktoren einzuführen, damit das neuronale Netzwerk komplexe nichtlineare Beziehungen anpassen kann. Gleichzeitig weist die ReLU-Funktion im Vergleich zu anderen Aktivierungsfunktionen (z. B wie Sigmoid oder Tanh) und andere Vorteile
(3) Was ist die Dropout-Schicht? Die Dropout-Schicht ist eine Technik, die in neuronalen Netzen verwendet wird, um eine Überanpassung zu verhindern. Während des Trainingsprozesses setzt die Dropout-Schicht die Ausgabe einiger Neuronen zufällig auf 0, dh sie „verwirft“. Der Zweck besteht darin, die gegenseitige Abhängigkeit zwischen Neuronen zu verringern und dadurch die Generalisierungsfähigkeit zu verbessern.
(4)print("Epoch %d, cost = %f, acc = %.2f%%" % (i + 1, cost / num_batches, 100. * np.mean(predY == teY))) Endlich , die aktuelle Trainingsrunde, der Verlustwert und der Acc werden wie folgt ausgegeben:
...Epoch 91, cost = 0.011129, acc = 98.45%Epoch 92, cost = 0.007644, acc = 98.58%Epoch 93, cost = 0.011872, acc = 98.61%Epoch 94, cost = 0.010658, acc = 98.58%Epoch 95, cost = 0.007274, acc = 98.54%Epoch 96, cost = 0.008183, acc = 98.43%Epoch 97, cost = 0.009999, acc = 98.33%Epoch 98, cost = 0.011613, acc = 98.36%Epoch 99, cost = 0.007391, acc = 98.51%Epoch 100, cost = 0.011122, acc = 98.59%
Es ist ersichtlich, dass die endgültige Datenklassifizierung eine höhere Genauigkeit aufweist als das einschichtige neuronale Netzwerk (98,59 % > 97,68). %).
2. Convolutional Neural Network
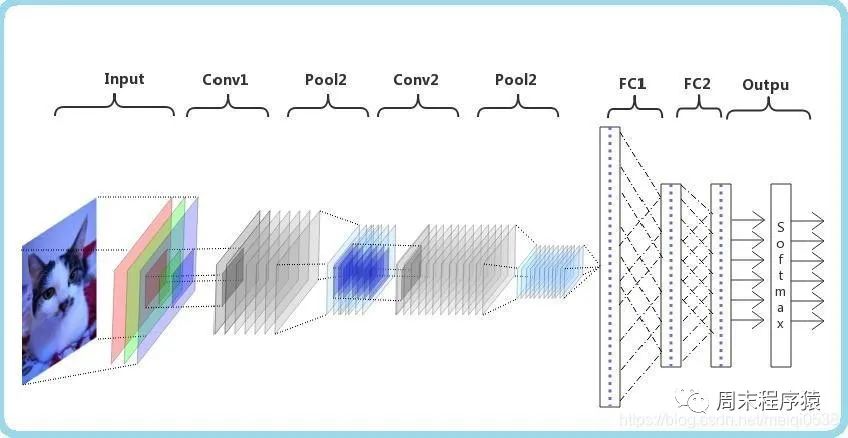
Convolutional Neural Network (CNN) ist ein Deep-Learning-Algorithmus. Bei der Eingabe einer Matrix kann CNN zwischen wichtigen und unwichtigen Teilen unterscheiden (Gewichte zuweisen). Im Vergleich zu anderen Klassifizierungsaufgaben erfordert CNN keine hohe Datenvorverarbeitung. Solange es vollständig trainiert ist, kann es die Eigenschaften der Matrix lernen. Die folgende Abbildung zeigt den Prozess:
import numpy as npimport torchfrom torch.autograd import Variablefrom torch import optimfrom data_util import load_mnistclass ConvNet(torch.nn.Module):def __init__(self, output_dim):super(ConvNet, self).__init__()self.conv = torch.nn.Sequential()self.conv.add_module("conv_1", torch.nn.Conv2d(1, 10, kernel_size=5))self.conv.add_module("maxpool_1", torch.nn.MaxPool2d(kernel_size=2))self.conv.add_module("relu_1", torch.nn.ReLU())self.conv.add_module("conv_2", torch.nn.Conv2d(10, 20, kernel_size=5))self.conv.add_module("dropout_2", torch.nn.Dropout())self.conv.add_module("maxpool_2", torch.nn.MaxPool2d(kernel_size=2))self.conv.add_module("relu_2", torch.nn.ReLU())self.fc = torch.nn.Sequential()self.fc.add_module("fc1", torch.nn.Linear(320, 50))self.fc.add_module("relu_3", torch.nn.ReLU())self.fc.add_module("dropout_3", torch.nn.Dropout())self.fc.add_module("fc2", torch.nn.Linear(50, output_dim))def forward(self, x):x = self.conv.forward(x)x = x.view(-1, 320)return self.fc.forward(x)def train(model, loss, optimizer, x_val, y_val):model.train()optimizer.zero_grad()fx = model.forward(x_val)output = loss.forward(fx, y_val)output.backward()optimizer.step()return output.item()def predict(model, x_val):model.eval()output = model.forward(x_val)return output.data.numpy().argmax(axis=1)def main():torch.manual_seed(42)trX, teX, trY, teY = load_mnist(notallow=False)trX = trX.reshape(-1, 1, 28, 28)teX = teX.reshape(-1, 1, 28, 28)trX = torch.from_numpy(trX).float()teX = torch.from_numpy(teX).float()trY = torch.tensor(trY)n_examples = len(trX)n_classes = 10model = ConvNet(output_dim=n_classes)loss = torch.nn.CrossEntropyLoss(reductinotallow='mean')optimizer = optim.SGD(model.parameters(), lr=0.01, momentum=0.9)batch_size = 100for i in range(100):cost = 0.num_batches = n_examples // batch_sizefor k in range(num_batches):start, end = k * batch_size, (k + 1) * batch_sizecost += train(model, loss, optimizer,trX[start:end], trY[start:end])predY = predict(model, teX)print("Epoch %d, cost = %f, acc = %.2f%%"% (i + 1, cost / num_batches, 100. * np.mean(predY == teY)))if __name__ == "__main__":main()
 (1) Der obige Code definiert eine Klasse namens ConvNet, die von der Torch.nn.Module-Klasse erbt und ein Faltungs-Neuronales Netzwerk in der __init__-Methode darstellt. Zwei Untermodule conv und fc sind definiert und repräsentieren die Faltungsschicht bzw. die vollständig verbundene Schicht. Im Conv-Submodul definieren wir zwei Faltungsschichten (torch.nn.Conv2d), zwei maximale Pooling-Schichten (torch.nn.MaxPool2d), zwei ReLU-Aktivierungsfunktionen (torch.nn.ReLU) und eine Dropout-Schicht (torch.nn. Ausfallen). Im fc-Untermodul sind zwei lineare Schichten (torch.nn.Linear), eine ReLU-Aktivierungsfunktion und eine Dropout-Schicht definiert.
Die Pooling-Schicht spielt eine wichtige Rolle in CNN und hat folgende Hauptzwecke: Punkt :
- 降低维度:池化层通过对输入特征图(Feature maps)进行局部区域的下采样操作,降低了特征图的尺寸。这样可以减少后续层中的参数数量,降低计算复杂度,加速训练过程;
- 平移不变性:池化层可以提高网络对输入图像的平移不变性。当图像中的某个特征发生小幅度平移时,池化层的输出仍然具有相似的特征表示。这有助于提高模型的泛化能力,使其能够在不同位置和尺度下识别相同的特征;
- 防止过拟合:通过减少特征图的尺寸,池化层可以降低模型的参数数量,从而降低过拟合的风险;
- 增强特征表达:池化操作可以聚合局部区域内的特征,从而强化和突出更重要的特征信息。常见的池化操作有最大池化(Max Pooling)和平均池化(Average Pooling),分别表示在局部区域内取最大值或平均值作为输出;
(3)print("Epoch %d, cost = %f, acc = %.2f%%" % (i + 1, cost / num_batches, 100. * np.mean(predY == teY)))最后打印当前训练的轮次,损失值和acc,上述的代码输出如下:
...Epoch 91, cost = 0.047302, acc = 99.22%Epoch 92, cost = 0.049026, acc = 99.22%Epoch 93, cost = 0.048953, acc = 99.13%Epoch 94, cost = 0.045235, acc = 99.12%Epoch 95, cost = 0.045136, acc = 99.14%Epoch 96, cost = 0.048240, acc = 99.02%Epoch 97, cost = 0.049063, acc = 99.21%Epoch 98, cost = 0.045373, acc = 99.23%Epoch 99, cost = 0.046127, acc = 99.12%Epoch 100, cost = 0.046864, acc = 99.10%
可以看出最后相同的数据分类,准确率比多层感知机要高(99.10% > 98.59%)。
3、LSTMNet
LSTMNet是使用长短时记忆网络(Long Short-Term Memory, LSTM)构建的神经网络,核心思想是引入了一个名为"记忆单元"的结构,该结构可以在一定程度上保留长期依赖信息,LSTM中的每个单元包括一个输入门(input gate)、一个遗忘门(forget gate)和一个输出门(output gate),这些门的作用是控制信息在记忆单元中的流动,以便网络可以学习何时存储、更新或输出有用的信息。
import numpy as npimport torchfrom torch import optim, nnfrom data_util import load_mnistclass LSTMNet(torch.nn.Module):def __init__(self, input_dim, hidden_dim, output_dim):super(LSTMNet, self).__init__()self.hidden_dim = hidden_dimself.lstm = nn.LSTM(input_dim, hidden_dim)self.linear = nn.Linear(hidden_dim, output_dim, bias=False)def forward(self, x):batch_size = x.size()[1]h0 = torch.zeros([1, batch_size, self.hidden_dim])c0 = torch.zeros([1, batch_size, self.hidden_dim])fx, _ = self.lstm.forward(x, (h0, c0))return self.linear.forward(fx[-1])def train(model, loss, optimizer, x_val, y_val):model.train()optimizer.zero_grad()fx = model.forward(x_val)output = loss.forward(fx, y_val)output.backward()optimizer.step()return output.item()def predict(model, x_val):model.eval()output = model.forward(x_val)return output.data.numpy().argmax(axis=1)def main():torch.manual_seed(42)trX, teX, trY, teY = load_mnist(notallow=False)train_size = len(trY)n_classes = 10seq_length = 28input_dim = 28hidden_dim = 128batch_size = 100epochs = 100trX = trX.reshape(-1, seq_length, input_dim)teX = teX.reshape(-1, seq_length, input_dim)trX = np.swapaxes(trX, 0, 1)teX = np.swapaxes(teX, 0, 1)trX = torch.from_numpy(trX).float()teX = torch.from_numpy(teX).float()trY = torch.tensor(trY)model = LSTMNet(input_dim, hidden_dim, n_classes)loss = torch.nn.CrossEntropyLoss(reductinotallow='mean')optimizer = optim.SGD(model.parameters(), lr=0.01, momentum=0.9)for i in range(epochs):cost = 0.num_batches = train_size // batch_sizefor k in range(num_batches):start, end = k * batch_size, (k + 1) * batch_sizecost += train(model, loss, optimizer,trX[:, start:end, :], trY[start:end])predY = predict(model, teX)print("Epoch %d, cost = %f, acc = %.2f%%" %(i + 1, cost / num_batches, 100. * np.mean(predY == teY)))if __name__ == "__main__":main()
(1)以上这段代码通用的部分就不解释了,具体说LSTMNet类:
- self.lstm = nn.LSTM(input_dim, hidden_dim)创建一个LSTM层,输入维度为input_dim,隐藏层维度为hidden_dim;
- self.linear = nn.Linear(hidden_dim, output_dim, bias=False)创建一个线性层(全连接层),输入维度为hidden_dim,输出维度为output_dim,并设置不使用偏置项(bias);
- h0 = torch.zeros([1, batch_size, self.hidden_dim])初始化LSTM层的隐藏状态h0,全零张量,形状为[1, batch_size, hidden_dim];
- c0 = torch.zeros([1, batch_size, self.hidden_dim])初始化LSTM层的细胞状态c0,全零张量,形状为[1, batch_size, hidden_dim];
- fx, _ = self.lstm.forward(x, (h0, c0))将输入数据x以及初始隐藏状态h0和细胞状态c0传入LSTM层,得到LSTM层的输出fx;
- return self.linear.forward(fx[-1])将LSTM层的输出传入线性层进行计算,得到最终输出。这里fx[-1]表示取LSTM层输出的最后一个时间步的数据;
(2)print("第%d轮,损失值=%f,准确率=%.2f%%" % (i + 1, cost / num_batches, 100. * np.mean(predY == teY)))。打印出当前训练轮次的信息,其中包括损失值和准确率,以上代码的输出结果如下:
Epoch 91, cost = 0.000468, acc = 98.57%Epoch 92, cost = 0.000452, acc = 98.57%Epoch 93, cost = 0.000437, acc = 98.58%Epoch 94, cost = 0.000422, acc = 98.57%Epoch 95, cost = 0.000409, acc = 98.58%Epoch 96, cost = 0.000396, acc = 98.58%Epoch 97, cost = 0.000384, acc = 98.57%Epoch 98, cost = 0.000372, acc = 98.56%Epoch 99, cost = 0.000360, acc = 98.55%Epoch 100, cost = 0.000349, acc = 98.55%
4、辅助代码
两篇文章的from data_util import load_mnist的data_util.py代码如下:
import gzip
import os
import urllib.request as request
from os import path
import numpy as np

DATASET_DIR = 'datasets/'
MNIST_FILES = ["train-images-idx3-ubyte.gz", "train-labels-idx1-ubyte.gz", "t10k-images-idx3-ubyte.gz", "t10k-labels-idx1-ubyte.gz"]

def download_file(url, local_path):
    dir_path = path.dirname(local_path)
    if not path.exists(dir_path):
        print("创建目录'%s' ..." % dir_path)
        os.makedirs(dir_path)
    print("从'%s'下载中 ..." % url)
    request.urlretrieve(url, local_path)

def download_mnist(local_path):
    url_root = "http://yann.lecun.com/exdb/mnist/"
    for f_name in MNIST_FILES:
        f_path = os.path.join(local_path, f_name)
        if not path.exists(f_path):
            download_file(url_root + f_name, f_path)

def one_hot(x, n):
    if type(x) == list:
        x = np.array(x)
    x = x.flatten()
    o_h = np.zeros((len(x), n))
    o_h[np.arange(len(x)), x] = 1
    return o_h

def load_mnist(ntrain=60000, ntest=10000, notallow=True):
    data_dir = os.path.join(DATASET_DIR, 'mnist/')
    if not path.exists(data_dir):
        download_mnist(data_dir)
    else:
        # 检查所有文件
        checks = [path.exists(os.path.join(data_dir, f)) for f in MNIST_FILES]
        if not np.all(checks):
            download_mnist(data_dir)

    with gzip.open(os.path.join(data_dir, 'train-images-idx3-ubyte.gz')) as fd:
        buf = fd.read()
        loaded = np.frombuffer(buf, dtype=np.uint8)
        trX = loaded[16:].reshape((60000, 28 * 28)).astype(float)

    with gzip.open(os.path.join(data_dir, 'train-labels-idx1-ubyte.gz')) as fd:
        buf = fd.read()
        loaded = np.frombuffer(buf, dtype=np.uint8)
        trY = loaded[8:].reshape((60000))

    with gzip.open(os.path.join(data_dir, 't10k-images-idx3-ubyte.gz')) as fd:
        buf = fd.read()
        loaded = np.frombuffer(buf, dtype=np.uint8)
        teX = loaded[16:].reshape((10000, 28 * 28)).astype(float)

    with gzip.open(os.path.join(data_dir, 't10k-labels-idx1-ubyte.gz')) as fd:
        buf = fd.read()
        loaded = np.frombuffer(buf, dtype=np.uint8)
        teY = loaded[8:].reshape((10000))

    trX /= 255.
    teX /= 255.
    trX = trX[:ntrain]
    trY = trY[:ntrain]
    teX = teX[:ntest]
    teY = teY[:ntest]

    if onehot:
        trY = one_hot(trY, 10)
        teY = one_hot(teY, 10)
    else:
        trY = np.asarray(trY)
        teY = np.asarray(teY)

    return trX, teX, trY, teY
Das obige ist der detaillierte Inhalt vonMaschinelles Lernen |. PyTorch Kurzanleitung Teil 2. Für weitere Informationen folgen Sie bitte anderen verwandten Artikeln auf der PHP chinesischen Website!
In Verbindung stehende Artikel
Mehr sehen- Detaillierte Einführung in den Entscheidungsbaum für maschinelles Lernen in Python
- JavaScript-Maschinenlernen basierend auf TensorFlow.js
- Self-Service-Maschinelles Lernen basierend auf intelligenten Datenbanken
- Anwendungsfälle und Anwendungen für Datengitter in den Bereichen IoT, künstliche Intelligenz und maschinelles Lernen
- Wie man maschinelles Lernen und künstliche Intelligenz in der Cybersicherheit nutzt

