Heim >Datenbank >MySQL-Tutorial >So verwenden Sie Dockercompose, um ein Nginx+MySQL+Redis+Springboot-Projekt zu erstellen
So verwenden Sie Dockercompose, um ein Nginx+MySQL+Redis+Springboot-Projekt zu erstellen
- 王林nach vorne
- 2023-05-27 21:20:15966Durchsuche
Bitte installieren Sie Docker und Docker-Compose im Voraus und konfigurieren Sie die Bildbeschleunigung selbst.
A.docker-compose.yml-Datei
version: "3"
services:
  nginx: # 服务名称,用户自定义
    image: nginx:latest  # 镜像版本
    ports:
      - 80:80  # 暴露端口
    volumes: # 挂载
      - /root/nginx/html:/usr/share/nginx/html
      - /root/nginx/nginx.conf:/etc/nginx/nginx.conf
    privileged: true # 这个必须要,解决nginx的文件调用的权限问题
  mysql:
    image: mysql:5.7.27
    ports:
      - 3306:3306
    environment: # 指定用户root的密码
      - MYSQL_ROOT_PASSWORD=
  redis:
    ports:
      - 6379:6379
    image: redis:latest
  vueblog:
    image: vueblog:latest
    build: . # 表示以当前目录下的Dockerfile开始构建镜像
    ports:
      - 81:81
    depends_on: # 依赖与mysql、redis,其实可以不填,默认已经表示可以
      - mysql
      - redis


  nacos1:
    hostname: nacos1
    container_name: nacos1
    image: nacos/nacos-server:latest
    volumes:
      # 需要添加mysql8的插件
      #- ./nacos/plugins/mysql/:/home/nacos/plugins/mysql/
      # 把日志文件映射出来
      - /root/nacos1:/home/nacos/logs
      # 把配置文件映射出来
      - /root/nacos1/custom.properties:/home/nacos/init.d/custom.properties

    environment: # 设置环境变量,相当于docker run命令中的-e
      - JVM_XMS=512m
      - JVM_XMX=512m
      - JVM_XMN=128m
      #- MODE=standalone   #单机版
    ports:
      - "8848:8848"
    env_file:
      # 集群配置文件
      - /root/nacos1/nacos-hostname.env
    restart: always
    depends_on:
      - mysql
B.springboot-Konfiguration (eigenes Projekt)
Die MySQL- und Redis-Konfigurationen in der Konfiguration verwenden Dienstnamen anstelle von IP-Adressen
server:
  port: 81


spring:
  servlet:
    multipart:
      max-file-size: 10MB
      max-request-size: 10MB
  profiles:
    active: dev
  # mysql 配置
  datasource:
      url: jdbc:mysql://mysql:3306/blog4?serverTimezone=GMT%2B8&useUnicode=true&characterEncoding=UTF-8
      username:
      password:
#      schema: classpath:springbootsecurityauth.sql
      sql-script-encoding: utf-8
      initialization-mode: always
      driver-class-name: com.mysql.cj.jdbc.Driver
      type: com.alibaba.druid.pool.DruidDataSource
      # 初始化大小,最小,最大
      initialSize: 1
      minIdle: 3
      maxActive: 20
     # 配置获取连接等待超时的时间
      maxWait: 60000
      # 配置间隔多久才进行一次检测,检测需要关闭的空闲连接,单位是毫秒
      timeBetweenEvictionRunsMillis: 60000
      # 配置一个连接在池中最小生存的时间,单位是毫秒
      minEvictableIdleTimeMillis: 30000
      validationQuery: select 'x'
      testWhileIdle: true
      testOnBorrow: false
      testOnReturn: false
      # 打开PSCache,并且指定每个连接上PSCache的大小
      poolPreparedStatements: true
      maxPoolPreparedStatementPerConnectionSize: 20
      # 配置监控统计拦截的filters,去掉后监控界面sql无法统计,'wall'用于防火墙 ,slf4j
      filters: stat,wall,slf4j
      # 通过connectProperties属性来打开mergeSql功能;慢SQL记录
      connectionProperties: druid.stat.mergeSql=true;druid.stat.slowSqlMillis=5000

  redis:
    database: 6
    host: redis
    port: 6379
    timeout: 5000s  # 连接超时时长(毫秒)
    jedis:
      pool:
        max-active: 20 #连接池最大连接数(使用负值表示没有限制)
        max-idle: 8  #连接池中的最大空闲连接
        max-wait: -1s #连接池最大阻塞等待时间(使用负值表示没有限制)
        min-idle: 0  #连接池中的最小空闲连接
    password:  #rootroot
C.Dockerfile
FROM java:8
EXPOSE 81
ADD vueblog.jar app.jar
RUN bash -c 'touch /app.jar'
ENTRYPOINT ["java", "-jar", "/app.jar"]
D . Packen Sie das Springboot-Projekt und benennen Sie es in der Konfiguration mit dem Namen
E. Erstellen Sie einen Ordner oder eine Datei im entsprechenden Verzeichnis
- /root/nginx/html
- /root/nginx/nginx.conf
#user  root;
worker_processes  1;
events {
    worker_connections  1024;
}
http {
    include       mime.types;
    default_type  application/octet-stream;
    sendfile        on;
    keepalive_timeout  65;

   #这里配置nacos的ip:端口,因为nginx和nacos在同一个网络下,这里可以用服务名访问
   upstream nacos {
        server nacos1:8848 weight=1 max_fails=2 fail_timeout=10s;
        #server nacos2:8848 weight=1 max_fails=2 fail_timeout=10s;
        #server nacos3:8848 weight=1 max_fails=2 fail_timeout=10s;
    }

    server {
        listen       80;
        server_name  localhost;

        location / {
            root   /usr/share/nginx/html/front;
            try_files $uri $uri/ /index.html last; # 别忘了这个哈
            index  index.html index.htm;
        }

       location /admin {
	    alias /usr/share/nginx/html/admin;
	    expires  1d;
	    index index.html;
	    autoindex on;
        }

        location /nacos {
            proxy_pass   http://nacos;
            proxy_set_header Host $host;
            proxy_set_header X-Real-IP $remote_addr;
            proxy_set_header X-Forwarded-For $proxy_add_x_forwarded_for;
            proxy_set_header REMOTE-HOST $remote_addr;
            add_header X-Cache $upstream_cache_status;
            add_header Cache-Control no-cache;
        }

        error_page   500 502 503 504  /50x.html;
        location = /50x.html {
            root   html;
        }
    }
}
- /root/nacos1
# Ordnen Sie die Konfigurationsdatei zu
- /root/nacos1/custom.properties
#spring.security.enabled=false
#management.security=false
#security.basic.enabled=false
#nacos.security.ignore.urls=/**
#management.metrics.export.elastic.host=http://localhost:9200
# metrics for prometheus
management.endpoints.web.exposure.include=*

# metrics for elastic search
#management.metrics.export.elastic.enabled=false
#management.metrics.export.elastic.host=http://localhost:9200

# metrics for influx
#management.metrics.export.influx.enabled=false
#management.metrics.export.influx.db=springboot
#management.metrics.export.influx.uri=http://localhost:8086
#management.metrics.export.influx.auto-create-db=true
#management.metrics.export.influx.consistency=one
#management.metrics.export.influx.compressed=true
- /root/nacos1/nacos-hostname.env
Nacos-Datenbankinformationen konfigurieren
#nacos dev env
PREFER_HOST_MODE=hostname
NACOS_SERVERS=nacos1:8848
MYSQL_SERVICE_HOST=mysql
MYSQL_SERVICE_DB_NAME=nacos
MYSQL_SERVICE_PORT=3306
MYSQL_SERVICE_USER=
MYSQL_SERVICE_PASSWORD=
JVM_XMS=512m
JVM_XMX=512m
JVM_XMN=256m
JVM_MS=64m
JVM_MMS=128m
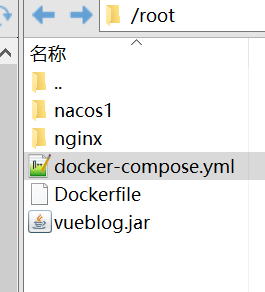
Die endgültige Verzeichnisstruktur

Führen Sie zuerst die MySQL-Instanz aus (niemals direkt docker-compose up -d, um alle Instanzen auszuführen)
docker-compose up -d mysql
F. Da mein Nacos später hinzugefügt wurde, kann ich es im Voraus zu MySQL hinzufügen. Fügen Sie die Nacos-Datenbank zum Container hinzu und starten Sie es (wenn Sie keine Datenbank haben, fügen Sie diese bitte im Voraus hinzu)
Start
docker-compose up
Stop
docker-compose down
Das obige ist der detaillierte Inhalt vonSo verwenden Sie Dockercompose, um ein Nginx+MySQL+Redis+Springboot-Projekt zu erstellen. Für weitere Informationen folgen Sie bitte anderen verwandten Artikeln auf der PHP chinesischen Website!

